I used the Lovely Day Kit (sold out) plus a sheet of Kraft cardstock and letter stickers from my stash to create this St. Paddy's Day page. I love the way the green and yellow play off each other against the neutrals!
A mixed title is a really fun way to use up those random letter stickers hanging around in your stash!
TFL!
Jana
Pages
▼
Thursday, April 30, 2009
Wednesday, April 29, 2009
Penny Arcade Kit
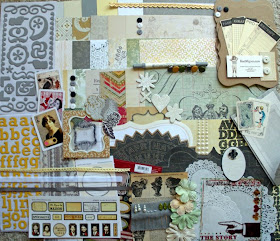
Penny Arcade includes the following:
Papers
Basic Grey "Porcelain"
-Doulton
-Arabella
-Chintz
-Empress Cream
SEI "Windsor" (Double Sided)
-Wickham
-Brighton
-Dover
Collage Press "Knave of Hearts" (Double Sided)
-Queen of Hearts
-Charming
-Knave of Hearts
-Dreamy (die cut)
-Vintage (die cut)
Melissa Frances
-Esther
-Clara
-Alma
Cosmo Cricket "Everafter" (Double Sided)
-Something Old
-Something New
-Something True
-Something Borrowed
Jenni Bowlin Designer papers
-Country Store
-Victorian Label (die cut)
5 matching AC Cardstock Sheets
-Butter
-Straw
-Ash
-White
-Smoke
Tim Holtz Grungeboard
-1 12x12 sheet
Embellishments
-1 sheet Collage Press Knave of Hearts Journaling Cards
-1 sheet Collage Press Knave of Hearts Alpha Stickers
-1 sheet BasicGrey Motifs Rub-Ons
-1 7 Gypsies Parenthesis 6x6 Chipboard book
-1 7 Gypsies 6x6 Gypsy Transparency
-1 sheet 7 Gypsies market Frames and Tags stickers
-1 pg from the reprint 1900 Sears Catalog
-1 gold ArtChix Gold Border
-1/3 page ArtChix Classy Black Labels
-3 Paper lace Doilies
-1 10" Tulle Circle
-1 Prima Vintage Label clear stamp
-2 Jenni Bowlin Self Adhesive Rhinestone Buttons
-2 Jenni Bowlin Vintage Label Strip Stickers
-4 Imaginisce Bling Blossoms
-1 American Crafts "Ash" Memory Marker
-4 SEI Windsor Die-Cut accents
-2 SEI Windsor Frames and Tags
-4 7 Gypsies Tags (Passport, Pro/Con, Graph, Receipt)
-1 mini vintage (1920's/30's) bird playing card
-1 Norman Rockwell "Spring" playing card
-3 ArtChix "Art Blast" playing cards
-4 Melissa Frances Glitter Shapes
-3 rows Melissa Frances self-adhesive pearls
-12 Maya Road buttons (Black, white, grey)
-9 Maya Road Stick Pins
-1 Melissa Frances Vintage Photo frame
-6 American Crafts Brads (Dandelion, Leaf, Pewter)
-1 package American Crafts Thickers (Typo Mustard)
-1 sheet American Crafts Thickers Accents (Text Ash)
-1 handmade Fleur de lis from Etsy of Michelle Lanning
-1 Yard Making Memories Yellow Crocheted Lace
-1 Yard American Crafts Shimmery Satin Silver Ribbon
-1/2 Yard American Crafts White velvet ribbon
$42.99 Click HERE to order!
Tuesday, April 28, 2009
Individuality Rocks!
My son is quite a character! I love that he is a leader, an individual who really walks his own path. He is perfectly ok with who he is......and I LOVE that about him. He got this quirky hat as a gift for Christmas.....and he wore it alllllll winter long! He didn't care that he looked like Paul Bunyan! LOL!
I used Noel's Lovely Day's kit for this LO. I added some red Thickers for the title, notebook paper, and some vintage book paper. The swirl was a Quickutz die cut.
Hope your Tuesday ROCKS! : )
I used Noel's Lovely Day's kit for this LO. I added some red Thickers for the title, notebook paper, and some vintage book paper. The swirl was a Quickutz die cut.
Hope your Tuesday ROCKS! : )
Monday, April 27, 2009
Flowers & Easter
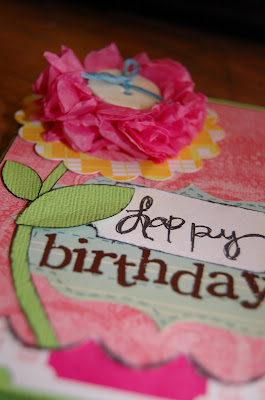
It is my week to show you guys a tip/technique, so if you hop over to the T&T blog, you can learn how I made this fluffy tissue paper flower for this card!
(I used the Lovely Day kit to make this, with the addition of some Jenni Bowlin rubons.)
Our current challenge is so dreamy... Michelle pointed us to some beautiful photos of this ethereal makeup for springtime, and we are using that as our inspiration this week! Come on over to the challenge blog to take part in it.
This layout is created using the Nightingale kit (plus a flower from the Lovely Day kit). I also used some patterned paper from Fancy Pants, tulle, Maya Road scalloped chipboard, buttons, Making Memories brads, a Hambly rubon, and American Crafts embossing powder out of my stash.
Sunday, April 26, 2009
How to Make a Tissue Paper Pom Pom Flower Accent
I definitely cannot claim the tissue paper pom pom idea as my own (I think perhaps that title maybe goes to Martha Stewart), BUT I haven't seen anyone customize one yet to make it as an embellishment.
I made some pom poms recently for a luncheon, and added them on my napkin rings. It got my wheels turning on how I could make them for my cards, altered items, and layouts.
Start by figuring out how big you want it to be. I wanted mine about 2 inches wide (or so), so I cut 6 pieces of tissue paper into 3" x 6" pom poms. (You need to make it a little bit more on the sides because you will trim it in a bit.)
Stack the pieces of tissue on top of each other.
Accordian fold them.
And squish the accordian folds down. I discovered that cutting two notches out of the center helps for the next step.
Wrap some skinny thread or ribbon around the middle (I used crochet thread). Tie it tightly and trim off the ends.
Trim the sides; I did large, rounded "petals;" you can also make them pointy or use decorative edged scissors. Experiment for different looks!
Gently pull apart the layers on each side of the flower and fluff them around until it's to your liking. I wanted to put something in the middle of my flower, so I squished it down...
Like so.
This makes such a pretty accent for a card! They are rather bumpy, as you can see, so you may need to "squish it" more if you want to put it in an album. I think these would be so pretty on something altered as well!
Try using different colors & patterns of tissue in the same flower, or white tissue and then spritzing the edges with Maya Mist. I love that they are such a fast & easy way to make a truly unique embellishment. There are definitely lots of possibilities with these- and you'll be seeing more of them on my projects for sure!
Lil' Helper
Friday, April 24, 2009
Being Popular
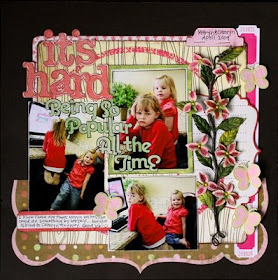
My daughters were playing together on the computer and even though they were getting along fine, Maryn looked less than thrilled to be so popular with her little sister. I'm sure there are times she'd rather play the computer by herself! LOL! And yet, there is Camryn grinning ear-to-ear that she gets to be big and play alongside her sister. It made me laugh and I had to snap a few shots to record such a common sibling feeling. Don't you remember feeling that way?! LOL! :)
I didn't want Maryn to appear grumpy so I "softened up" the situation in the photos with these gorgeous papers and flowers from the Lovely Day kit (one left!).
Thanks for stopping by! Have a great weekend!
Jana
I didn't want Maryn to appear grumpy so I "softened up" the situation in the photos with these gorgeous papers and flowers from the Lovely Day kit (one left!).
Thanks for stopping by! Have a great weekend!
Jana
Wednesday, April 22, 2009
Pre-K Friends
A little over a month ago I walked into Alyson's classroom and saw some super fun pictures of her and her girlfriends. I asked her teacher if she took them (because she often does) - but it turns out one of her little friends brought a camera and the girls took these fun pictures! I wrote a note to the child's mom and that evening I got the pictures! They are adorable - and even more so because it was just the girls being goffy with eachother. The quality was not that great so I turned them black and white - which I think helped a bit. But no matter - I think that they speak for themselves --- Girls having fun! And the yummy Cosmo Cricket paper was perfect for this!
Thanks for looking!
Michelle
For the love of food
Hello scrappers!! I hope you are having a fabulous week so far.
I created a new layout with the gorgeous Lovely Day kit today and today, I wanted to create something more linear and simple. This layout is inspired by one of my favourite scrappers, Christine Middlecamp.
The pictures are of food I had recently at Easter brunch at my aunt's. She really spares no effort in cooking up a storm! :)
Hope you enjoyed today's inspo.
Tuesday, April 21, 2009
1987.....
I am feeling a bit nostalgic today posting my homecoming picture from, yep you guessed it,1987. I was 16 in this picture with the guy who became my husband. We have changed a bit, bigger waist lines, wrinkles, kids, responsibilities...... and some areas of the body have redistributed a bit! LOL! I used Noel's Lovely Day's kit for this LO, with the exception of the Thickers (which are sold in her store) and a Tim Holtz mask I used for the background. Gotta love those masks to make a background pop! I used a brown suede spray paint. (And it actually looks like sueded IRL!)
Happy Tuesday!
Monday, April 20, 2009
Spring Surprises & Egg Hunt
At my church, we have secret sisters through out the year; we are supposed to drop them a little card in the mail or a little gift from time to time as a fun surprise!
This past weekend I made this card for my secret sis (from the Lovely Day kit):
And then used a cool template that I found here (there are 50 free templates here too!) to make a little bag to fill with chocolate.
It looked so cute in her bag of goodies! (It was a pampering set... who doesn't need chocolate?!)
I was able to print out all my Easter pics this week- it felt so good to go ahead and scrap our pictures from our Easter egg hunt!
I added some kraft cardstock and the Jenni Bowlin rubons that I love so much!
I loved how Ann Marie backed her die cut paper with cardstock, so I had to try it too. :)
Of course I made all of these projects with the beautiful, springy Lovely Day kit!
This past weekend I made this card for my secret sis (from the Lovely Day kit):
And then used a cool template that I found here (there are 50 free templates here too!) to make a little bag to fill with chocolate.
It looked so cute in her bag of goodies! (It was a pampering set... who doesn't need chocolate?!)
I was able to print out all my Easter pics this week- it felt so good to go ahead and scrap our pictures from our Easter egg hunt!
I added some kraft cardstock and the Jenni Bowlin rubons that I love so much!
I loved how Ann Marie backed her die cut paper with cardstock, so I had to try it too. :)
Of course I made all of these projects with the beautiful, springy Lovely Day kit!
Sunday, April 19, 2009
Dressed-Up Chipboard!
Hello! Here's a little something I did to dress up a chipboard piece for my altered recipe cards box.
I first cut out the chipboard shape with my Sizzix Big Shot, but you could use any other chipboard piece.
Trace and cut out a piece of patterned paper with the shape. Adhere the patterned paper to your chipboard shape.
Cover the surface of the chipboard shape now with a layer of Ranger Glossy Accent, and sprinkle some Pink Paislee glitter. Do this immediately after applying the glossy accent so that the glossy accent can act as a glue for the glitter to stick on.
And there you have a pretty, 'dressed-up' chipboard shape! :)
Friday, April 17, 2009
In celebration of Earth Day...
Every year on April 22, Earth Day is celebrated. The fight for a clean environment continues as we aim to build a clean, healthy, diverse world for generations to come.
In celebration of Earth Day, I decided to alter a box packaging that was used to contain chipboard that I bought.
A lot of raw materials is used up to make packaging for the products we buy. And instead of throwing these packages away, why not turn these packaging into useful things or works of art?
I needed a box to keep recipe cards I've been collecting from supermarkets so instead of buying a box, I decided to make one myself using the above box and bits and pieces of scrap patterned papers from the Lovely Day kit.
I hope you enjoyed the project I have to share. See you all again next week! :)
Make Your Own Patterned Paper!
This week I challenged myself to try a new technique, so I decided to pull out my paints and create my own patterned background paper for this layout. I used paint to draw a grid pattern on a 12 X 12 sheet of chipboard. Then I added dots of blue every so often. After the paint dried I outlined the pattern to give it a little more definition. Everything else is from the Lovely Day Kit (just 3 left!).
Have a great weekend!
Jana
Have a great weekend!
Jana
Wednesday, April 15, 2009
I am back!
Although you may not have caught that I have been missing - I have. I have been busy moving and adjusting to our new place whixh we LOVE and am finally getting things calmed down enough to scrap again. And of course I scrapped a page from Noel's Lovely Day kit for the current challenge that has you incorporating Spring into your layout - how perfect is that for right about now??
I JUST took this picture of my daughter and knew it was the perfect picture for these papers. I am LOVING the Hambly overlay that I simply put over pink cardstock and it looks like pattern paper right?
I hope you all create something Springy soon!
Michelle