Tuesday, December 22, 2015

A week documented with Mistletoe & Holly Daily Diary Kit

Hi Everyone! Lynn here with my latest pocket page using the oh so awesome Mistletoe & Holly Daily Diary Kit. I have created cards and a home décor project with this gorgeous holiday kit, and today I'm sharing a pocket page which shows how versatile these kits are. The color combos in the kit are so pretty and are very complimentary to your holiday photos. Here's my page ...
 
I love the kraft, white, green and blue colors together. Here's my title card. I layered some elements from the Daily Dairy kit to add some pizzazz to a piece of the red striped paper, which is from the Classic kit.
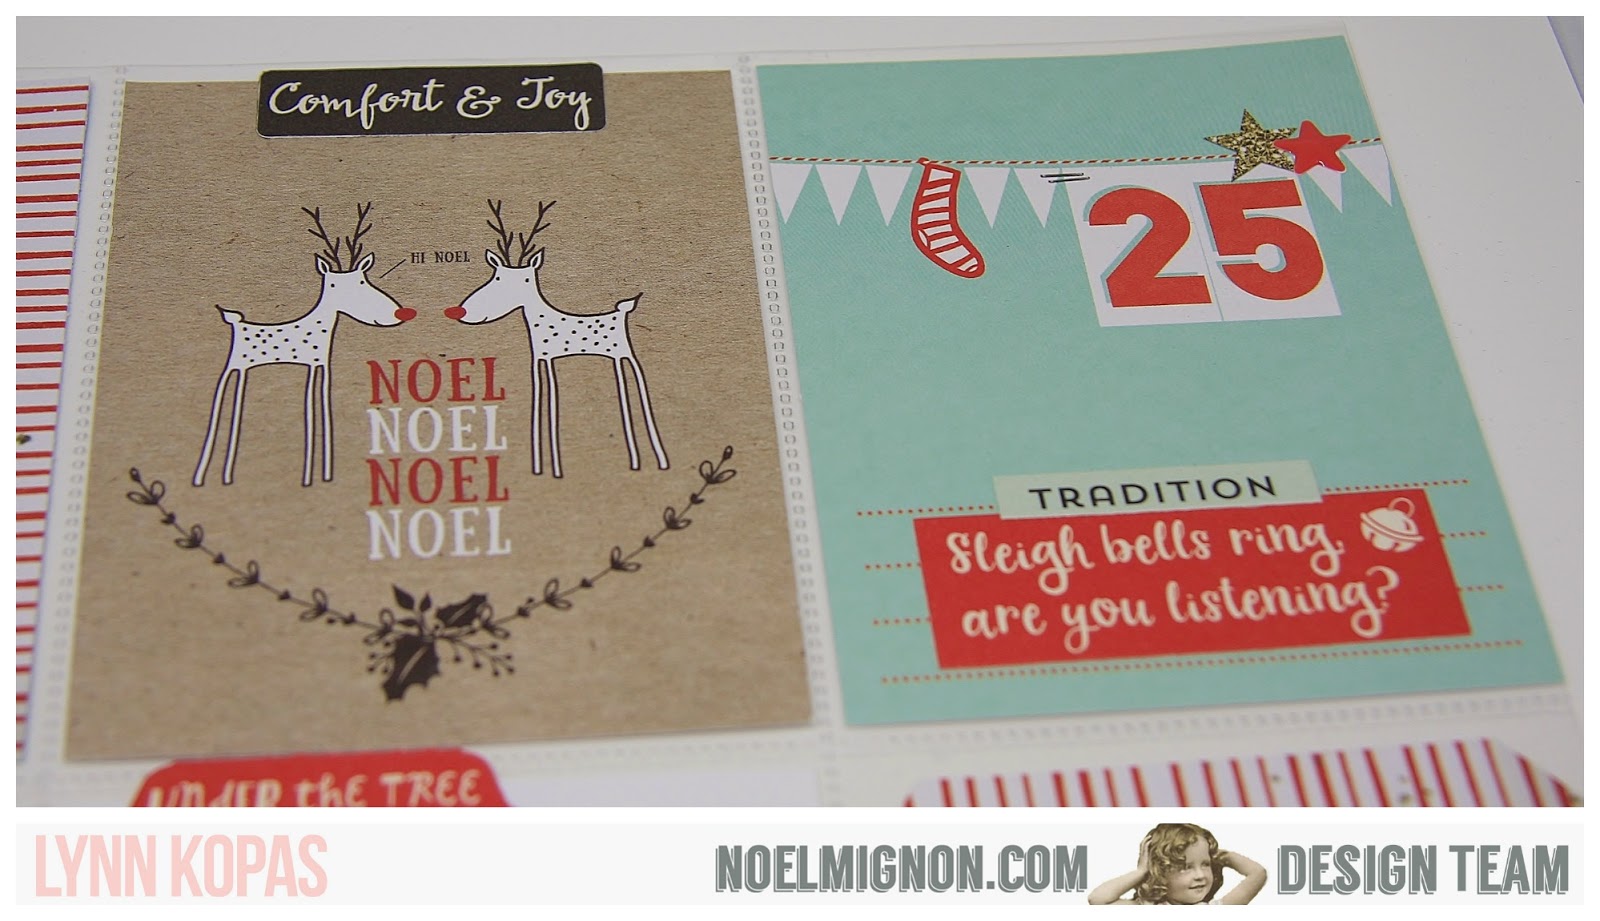
Here's some close-ups of the cards. I LOVE all the stickers in the kit and they are a quick and easy way to "dress up" your cards. Isn't the reindeer card so cute?!
 I also like adding puffy stickers for detail without a lot of bulk.
I cut a piece of kraft cardstock above, added cardstock and puffy stickers and made my own PL card. Here's the last few cards.
I had so much fun creating this page and it was easy with the lovely Mistletoe & Holly kit. Stay tuned for more inspiration from the DT and I'll see you next week with another pocket page! Have a great week and a wonderful Holiday Season!!
 

Monday, December 21, 2015

Documenting with Mistletoe & Holly ....

 HAPPY MONDAY! Danielle here today to share with you how I documented last week with the fabulous Mistletoe & Holly Daily Diary Kit!
Oh my goodness! Let me just say, there are so many awesome bits and pieces in this kit, that it makes it so easy to create each week!
Here, you can see the shaker pocket I created for last weeks spread. I love the element of "see through" pockets, and definitely will incorporate more of them in 2016!

Here on the right side of this weeks spread I did include some papers from my "Country Life" Classic Kit that I had left over (the white, pink & yellow 4x6 cards). I love the pop of colour they gave this week, AND I love that I used up part pieces of paper instead of wasting them!

The Tim Holtz Pine Twine stole my heart! At first I was a little worried that it would be bulky on my spread, but I was wrong. I used my Tiny Attacher to adhere it!

I added lots of Stickles in Star Dust to my cards this month! Stickles are a great way to add some texture and depth to you spread without adding bulk! 

Once again, this week I added lots of layers and stitching.

I am the sequin queen. I have millions I am sure. They are one of my favourite embellishments, and these sticky back sequins that were in the kit are definitely my new must have item!!

I hope I've inspired you to document your life this week, and if you like what I created here, Noel only has 4 kits left in stock, so grab one while you can!

I would also like to wish you a very
MERRY CHRISTMAS!


Friday, December 18, 2015

Joy

Hey guys, Michelle here! I've been printing out lots of photos that I want to use with the Mistletoe & Holly kit. I had planned on sharing a different layout today but then we had some family photos taken the other day and I had to play with those first!


I took some of my favorite photos from our family pics & cropped them to 3x4. Originally I was going to do a strip of photos straight across my page, most likely toward the bottom. But then I pulled out that great paper with "Joy" at the bottom and that woodgrain worked perfectly with my photos!

I've said it before that I love papers like this because it's almost like half the 'work' is done for you. Add some photos, some embellishments, and boom! Done!

I had to add the 'naughty' and 'nice' stickers...ya know, girls nice, boys naughty! haha And on pages like this I typically don't do an 'official' title since there's already the big word at the bottom. Sometimes I enhance it or add words but this time I left it as is.

I will be back after Christmas with the rest of my holiday pages. I hope everyone has a wonderful Christmas!!!
 

Thursday, December 17, 2015

Mistletoe & Holly: Having a "Krafty" Christmas!

Merry Christmas, Friends! Jana Eubank here. I LOVE the way the colors of the Dec. Mistletoe & Holly Kit coordinate with kraft cardstock, so today I thought I would share a couple of layouts using it as the base to my pages.

MAGICAL MOMENT

A couple of years ago my son was helping his grandparents deliver Christmas gifts to their neighbors. One of their neighbors sets out hay for the deer each year. They asked my son if he would like to help feed the deer ... they came and ate right out of his hand! He was delighted and mesmerized. It was definitely a magical moment for him that year!


I created a vertical line down my page to anchor my page design. This is a great solution when you are working with both horizontal and vertical photos. I layered a few strips of paper together for a little pattern play. I then created three shaker boxes from the square frames and sequins included with my kit. I layered these over the strips and photos.


In each corner I used metal dies to create the die cut snowflakes from white cardstock. I added the Shimelle wood buttons to the center of each one and then used the sparkles from the Shimelle rub ons to accent each group.


I placed the striped ribbon horizontally across the page to anchor the horizontal photo and also repeat the striped pattern of the top shaker box. I added one of the flair buttons to the knot in the ribbon.

I used the alphabets from the kit to create the title. I had a little space left at the bottom, so I used the Shimelle rub ons to fill that space in and make the design even with the bottom of the plaid paper strip.

............................................................

THIS IS WHAT CHRISTMAS IS ALL ABOUT

I love taking pictures of my kids all dressed up for church in front of the Christmas tree! It's just so festive! For this page, I again used a sheet of kraft cardstock to build my page on. I love how all of the other papers POP against it! 

I layered together several patterns and then added a bit of cream Hambly woodgrain transparency I had in my stash for additional interest. You could also use a woodgrain rub on or border stamp here for a similar look.

The two arrow paper clips help lead your eye across the page to the title and larger photos.


In the left corner, I had a little fun grouping together the star stickers from the Jillibean Soup sticker sheet and My Mind's Eye enamel shapes sheet. I accented the centers of the larger stars with the wood buttons from the kit.


I anchored my photos along the green cut apart border strip by Echo Park paper. I also let this serve as my title. I used the red pen from the kit to color in the word "Christmas" to help it stand out a bit. 


I accented the bottom right corner of the photos with a bird I cut from the October Afternoon paper and more star stickers and wood buttons.

............................................................

My next post for the NM Blog isn't until after Christmas, so I wanted to take a minute to wish you a very Merry Christmas!!! I hope you are making lots of fun memories with your family and friends this season! Stay warm and cozy out there!

Merry Christmas!
Jana


Wednesday, December 16, 2015

Christmas Morning 2014-"Mistletoe & Holly" Classic Kit

The Mistletoe & Holly Classic Kit  is to die for!  I looked forward to getting the December Noel Mignon kit so I could get some pictures from Christmases past scrapbooked.  For some reason, I have a hard time scrapbooking Christmas photos, probably because it is such a busy time of year--I just run out of time to scrapbook.  I take so many pictures in December and have a huge backlog of printed photos that need to be scrapped--and this month's kit is just what I need to get the job done!

For today's layout I took a cue from a layout I saw on Pinterest---sometimes I need to go there for inspiration and a starting point, it gets my creativity going.  I used a layout found on Little Scraps of Magic blog and loosely scraplifted it.  Here is the finished product...


I popped the die cut up off of the page using Pop Dots.  I really like adding a little dimension to some of the embellishments when I can.


The best part of making this layout was figuring out which embellishments I wanted to use from the kit and where I wanted to place them.  There are always so many great bits and pieces in the Noel Mignon kits---it makes it very easy to embellish my layouts. 


I had so many many photos of my son opening his Christmas gifts, so the second "half" of this layout is actually a 12x12 collage of photos from Christmas morning.


I liked the way this layout turned out so much, that I created an identical layout for the photos of my daughter opening her gifts! 


Thank you for checking out the blog today...I will see you next week!


Tuesday, December 15, 2015

Oh, Christmas Tree!

What do I remember from our trip to the Christmas Tree Lot this year? Not the adorable picture of Reed by the tree we chose. Nope. I remember him making the mad dash to the netting contraption, with the chainsaws next to it. Because that's my boy. Luckily, the worker guys were beyond sweet to him, and great sports for letting me snap some great pictures!

Kept it pretty simple for this one. And can I say? You can totally use a Daily Diary kit to scrapbook layouts with. This was such a nice little challenge for me - one I haven't done in a while.


 This is a true story, but also a pretty big departure for me - I have a hard time just sticking letter stickers to the page. Just feels wrong to me. But oddly, I love it this time! Those little puffy stickers from Evalicious are to die for amazing!


 And can I also just say, that "a good memory" sticker was supposed to be above the journaling on the page. But I dropped it. And it stuck. So there it stays. Forever. A love a happy accident!

I hope you are all enjoying your holiday season so far!

Monday, December 14, 2015

documenting my december


Ahhh....my most favourite time of the year!  
Hello to the month of December....AND a brand NEW monthly Noel Mignon kit.  It truly could not get any better than this!
There are SO many amazing elements to this months kit.  I cannot wait to share all of my projects with you all this month...so let's get started!
Of course, I am using this kit to continue on with my December album.  There are so many stories to tell this month, and this kit makes it incredibly easy to get my memories and photos documented and told!

When I saw the large October Afternoon "Under The Tree" sticker sheet I immediately fell in love with the large multi colored alphas.  They are SO fun.  So what I decided to create was a large title page.  I grabbed a piece of white card stock from my stash, and spelled out 'it's the most wonderful time of the year'.  I then added a piece of vellum (again from my stash) and laid it over top to "soften" the effect of the page.  I love the effect.


To secure the vellum to my white cardstock, I simply added some stickers along the bottom and ran some machine sewing stitching across. So simple, and I love it.

Such a fun page!


This kit comes with so many wonderful patterned papers and cards.  This is a great way to use punches that you may have in your stash!  I added in some photos into 2 of the pockets....then created some fun confetti embellishments  by simply using my star punch and a few of the patterned papers from the kit.

Such an easy way to create custom embellishments and really stretch the use of your kit...and use up scraps! 


I then added some typed journaling to one of the 3x4 cards.  Added the super cute tree paper clip, a punched star and an epoxy heart sticker.  Simple and cute!  Just the way I like it!


I hope you are having just as much fun playing with this stunning kit as I am.  Love December!