Showing posts with label Falloween Daily Diary Kit. Show all posts

Thursday, December 1, 2016

Documenting Wk 46 Recipe Challenge with a Video

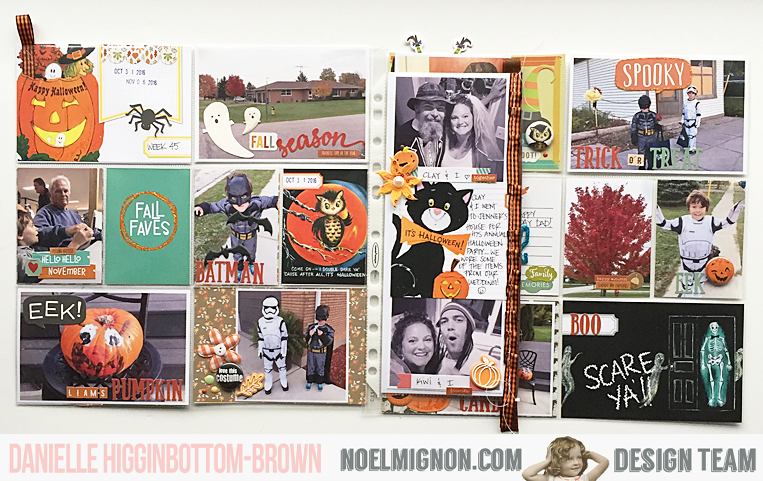
Happy Thursday! Danielle here! Today, I am up today with a Week 46 of my Project Life combining what is left of my Noel Mignon Falloween & All Fall Daily Diary Kits!!

here is the process video


This weeks Design Team Challenge was a "Recipe Challenge" - to use the following
* 1 sheet of Cardstock
* 2 Alphas
* 3 Photos
* 4 Pattern Papers
* 5 Embellishments


I loosely played with this challenge.. For the Cardstock & Pattern Papers, I just used my journal cards. For the Alphas, I used the Simple Stories alpha stickers, and I fussy cut out the word FALL from a Simple Stories card. For the 5 embellishments I used 1)stickers, 2)enamel dots, 3) flair, 4) bobby pin/clips, 5) buttons. There was no way I could only use 3 photos, so instead my take on it is 3 vintage family photos. 


Here are some close up photos


Thanks for stopping by!

Thursday, November 24, 2016

Documenting Week 45 with 2 Kits!

Happy Thursday! Danielle here today and I have Week 45 of my Project Life to share with you! I did something a little different this week. I mixed the ends of my Noel Mignon Falloween & All Fall Kit to create this spread. Look at how perfectly these 2 kits blended together!


I love to add inserts, so here are photos of the entire spread with it and without it.


On a few of my cards, I added some stickles from my stash in the colour "Orange Peel" to add a little bling to this week. I also stapled a piece of the orange & black gingham ribbon to my date card. I love little bits sticking out from my pages!


How cute are those witch legs? I added them behind my photo, so they too, could also stick out of the top of my page. I layered lots of die cuts and stickers on my photos this week.


Here is the insert I created this week. I used a piece of white cardstock and adhered my photos and journal cards, then trimmed it down. Next I put it in an 8.5 x 11 page protector. I used a binder clip on the bottom to hold it in place, then used my ATG gun to add adhesive along the edge and stuck my ribbon down (front & back). I used my sewing machine to stitch the ribbon down. Then I took my scissors and trimmed away the excess page protector!


I used my hot glue gun to adhere the fabric flowers and rubber charms to the outside of the page, for some added texture.


Here are some close ups


How are you making out on your Project Life 2016?

Friday, November 18, 2016

Autumn Family Fun

Hey guys, Michelle here! I have a traditional layout using the All Fall Classic Kit along with a pocket page using bits and pieces from the kit along with cards from the Falloween Daily Diary kit.
When I have a lot of photos I'll do one main page and then a supplemental pocket page. I may actually add another little pocket page in here because there's a couple more photos I wasn't able to fit in. But for now, this is good enough. "Good enough" is kind of my mantra when I just don't have the time to scrap every single photo. I do what I can and if I have time to go back and add to it someday I will. If not, it's okay! The story is recorded and that's the most important part!
The journaling card is from the Falloween Daily Diary kit, everything else is from the All Fall Classic Kit. There were tons of fall journaling cards in the Falloween kit so I used those in my pages.
For my pocket pages I again used the journaling cards from the Falloween Daily Dairy kit and supplemented with embellishments from the All Fall kit. 
And here's a look at how it comes together in my albums. I did the same thing with some Halloween photos - one traditional page along with a pocket page.
 So my pages from today are on the front side, then my Halloween pages when you turn the page. The pocket pages fit right in with my traditional pages!

Friday, November 4, 2016

Halloween 2016

Hi friends, Michelle here with just a couple more Halloween layouts to share. I was hoarding hanging onto those adorable cards from the Falloween Daily Diary kit and waiting til I had some Halloween pics so I could make some pages with them!
I absolutely love the vintage style cards that came with this kit and couldn't wait to use them!! You'll notice I added that cute little paperclip embellishment to my photo at the top. I didn't want to risk it falling out when the pages are turned so I used my tiny attacher to secure it in place.

Next I have my traditional layout from Halloween. On this page I did this week's 3-1 challenge. I used 3 strips of washi and 1 spiderweb doily.
I didn't like how the black glitter alphas were against my black spider web (they just didn't show up) so I grabbed those little green alphas from the All Fall classic kit.
And now Halloween is officially 'in the books'!! I have just a few papers left from the Falloween Classic Kit so I may try and squeeze out another layout or 2 before moving on the fabulous All Fall kit! I did a quick little video with the kit contents that you can check out here

ALSO - this is the last week to sign up for kit subscriptions for next Jan-June 2017. There are 3 options that you can check out here!

Wednesday, November 2, 2016

Falloween: Good Morning, Vietnam!

This week's challenge is a simple, but fun one! It's the "3-1" Challenge. The number 31 comes from the date of Halloween, of course, but we are using it in a different way this week ... use three of one thing and one of another on your project.

Here is what I came up with!

GOOD MORNING, VIETNAM!

My son loves anything to do with the army. He collects all kinds of army-issued supplies from second-hand stores ... so it was no surprise to me last year, when he put together his own costume for Halloween and dressed as the Robin Williams' character from the movie "Good Morning, Vietnam."


He wore the army shirt his grandpa gave to him and then put his headphones on. Quick and easy costume!


I could have ran with the army theme for this page, but I chose to focus on the Fall colors instead. I adore the Echo Park "Fall is In the Air" paper and chipboard pieces that were included in the Falloween kits this past month.


For my three of something and one of something, I used three of the felt flowers that came in the kit and one of the clips. As "extra credit" I also used three of the wood buttons from the Daily Diary kit.


I used the wood Thickers from the Classic Kit combined with green thickers I had in my stash. I love mixing fonts for my titles! It always turns out so cute!


I hope you have enjoyed seeing my "Falloween" pages this month on the blog. I created a few extras that I have been showcasing on my personal blog, and if you are interested, I would love it if you'd come by to check them out! (You can click through to my blog here.)

I'll be back next week with some new creations using the NEW "All Fall" kit. I can't wait! 

See you then!


Tuesday, November 1, 2016

Well, Hello November!

Hello and WOW, it's November 1st. Hard to believe. Lots going on this month ... Daylight Savings Time, Election Day, Veteran's Day and Thanksgiving. A busy month for sure. Lots to document and thanks to Noel's kits, it will be a breeze to create projects to honor all the events of November. However, since Halloween was yesterday I HAD to create one more pocket page with the "Falloween" Daily Diary Kit. I used a page design I don't usually gravitate towards but I like changing things up in my project life albums. This page is dedicated to Halloween and the pics I used are of the costumes worn by my Niece's daughter Tori. Our challenge this week is 3-1 ... use three of something and one of something! so fun, right!! Here's my page using photo pocket page design D.

I used Carta Bella's "Haunted" 4x6 journaling cards for this page and 4x6 photos. The three of something is the puffy stickers by Pebbles and the one of something is the strip of washi tape from Bella Blvd. Here's some close ups ... if you dare!

I love Tori's make up - she and her Mom go all out for Halloween - here she is a zombie hippie.
This makeup is amazing .. and a bit creepy!
I cut one of the 4x6 journaling cards into two to fill in middle pockets.
Here's the final card and photo.
Thanks for stopping by and I'll be back next week with a new pocket page using this month's BEAUTIFUL "All Fall" Daily Diary Kit. Have a great week and enjoy your Halloween candy!

Friday, October 28, 2016

#24

Hey guys, Michelle here! While I'm saving some of my Falloween Daily Diary kit for my Halloween pics next week (can you believe Halloween is just 3 days away??!!) I thought I'd use the classic kit to create a page all about football! This is my son's first season playing football (he's been playing baseball for the last 7yrs) and he's done really well. His team has had a rough season but they've improved so much from the start of the season. And they've kept a great attitude despite their losses.
I started pulling out some of the non-Halloween pages, mostly ones that didn't have too many designs on them. I love using fall colored papers for this page but I didn't want owls or leaves on it since that didn't really go with the theme of my page. 
I also added some of the journaling cards from the Daily Diary kit behind some of my photos to help lighten up the page a bit since the papers were a bit darker in color. Plus it helped my #24 show up better on my page.
I love how the colors in this kit helped give my page a fall feel without taking away the football theme!

Thursday, October 27, 2016

Documenting Week 41 with Falloween

Happy Thursday! Danielle here today, and I have my Project Life Week 41 to share with you using the Noel Mignon Falloween Daily Diary Kit!


This weeks design team challenge is "Enter if you Dare Challenge"-Create an interactive element on your project

I created a flip up 4x6 card. I have a super easy tutorial a little further down in the post.


There are so many fun elements in this kit. I used one of the Simple Stories 3x4 horizontal card with the hedgehog & butterfly, fussy cut them out, the glued them to a vertical 3x4 card.


I also fussy cut the cute fox & hello friend from one of the Simple Stories cards and used them like little embellishments on my 4x6 card/photo. 

Another thing I enjoy adding to my Project Life is a screen shot of a new recipe I tried!


and now for the Tutorial of my flip up card


I used washi tape to adhere the 2 4x6 cards together, leaving just a touch of space between the two. Next I added some machine stitching for some extra detail, and also because I wanted to make sure that with all the handling of this card over time, the washi tape didn't peel off.


Here are some close up photos


I just love that Bella Blvd Washi strip!!


I used a few more of the Bella Blvd washi strips on this journal card, then fussy cut and created the "Today Was..." banner. I ran out of "w" alphas, you I used 2 "v" alphas and stitched them down.


Thanks for stopping by!