Showing posts with label organization. Show all posts

Saturday, January 9, 2016

Superhero organization

Are you ready for some superhero organization?? Ok, not really. ha! But I do have a new layout and a couple organizing tips. But superhero organization sounded pretty good, no?? Let me tell ya, my scrap room could use it!

So I mentioned in my last post that I really don't do New Year's resolutions. But one of the things I would really like to conquer this year is some organization in my scrap room and to get some projects completed (you can check out my last post here). And one of those projects on my to do list is to finish up the layouts/albums from our past couple of Disney trips. Normally for a big trip I will do a separate album (either a 12x12 or smaller size, just depends) but then I will also create a few layouts for my kids' albums for something that pertains to one specific child.
On our trip to Disneyland last year we met Captain America who had THE sweetest conversation with my 4 yr old. I'm not sure what they talked about (I think he might have asked her about Elsa since she was on her shirt??) but you can tell from her huge grin that she loved it. Actually, Thor started in on a great story after seeing her shirt as well. Seriously, we joked that Addie was the superhero magnet ;)
As you may know, Captain America's colors are very bold. So I opted to mute the colors of my photo - not quite black and white but definitely more subtle so that it would match my papers. It just goes to show that you can take just about any of Noel's kits and have match them to your photos!
To add the typing on my paper, I did a rough layout of where I wanted things to go, then I very lightly marked in pencil where I wanted the journaling to go. Then I put the paper in my typewriter for my journaling! I also added some stitching and those teeny tiny little stars around my page....and those stamps. I mentioned before I love the stamp set that came with the Sweet Charlotte Classic Kit!
Now as far as organization, I have tried many different ways of storing my kits over the years to suit my needs. I've used trays, kept the kits in bags in a big basket, smaller containers, etc. Obviously, being on the design team I like to keep kit contents together for my projects. But I also like to do that because Noel has matched the kit contents so well that I can pull out a kit and create many projects with just the items in the kits, I don't have to search around in my stash for things to add to my pages. So it just makes sense to keep it all together.

Recently I have switched over to using these IRIS containers (found them on sale at Michaels recently). I use the large ones that are roughly 14x14 so they're big enough for those papers and embellishments/stickers that are longer than 12".
I also have the divided trays that go them which are perfect for all of the goodies that come in the kits. In the past I've used little containers/bowls/etc to hold this stuff but I have very limited table space. My scrap room right now is in my basement which is unfinished (i.e. no 'real' walls...so a lot of things that I would have on shelves are on my desk). So, I need to be able to put my kits away when I'm not using them. I only use these containers for the last couple of kits because once I've used up most of my kit I empty out what's left and put it in with the rest of my stash.
I hope this and all of the organization tips that have been shared this week have been helpful. Here's to an organized 2016!!!

Friday, January 8, 2016

Sweet Charlotte and a little peek into my space

Hello again!

I am so excited to be back on the Noel Mignon team!

I enjoyed my time here before and after taking some time off to devote more attention to family matters I decided I missed scrapping so much. I jumped at the chance to be back on the team here and am grateful to Noel for the opportunity.

Today I have a layout to share with you using the beautiful Sweet Charlotte Classic Kit:


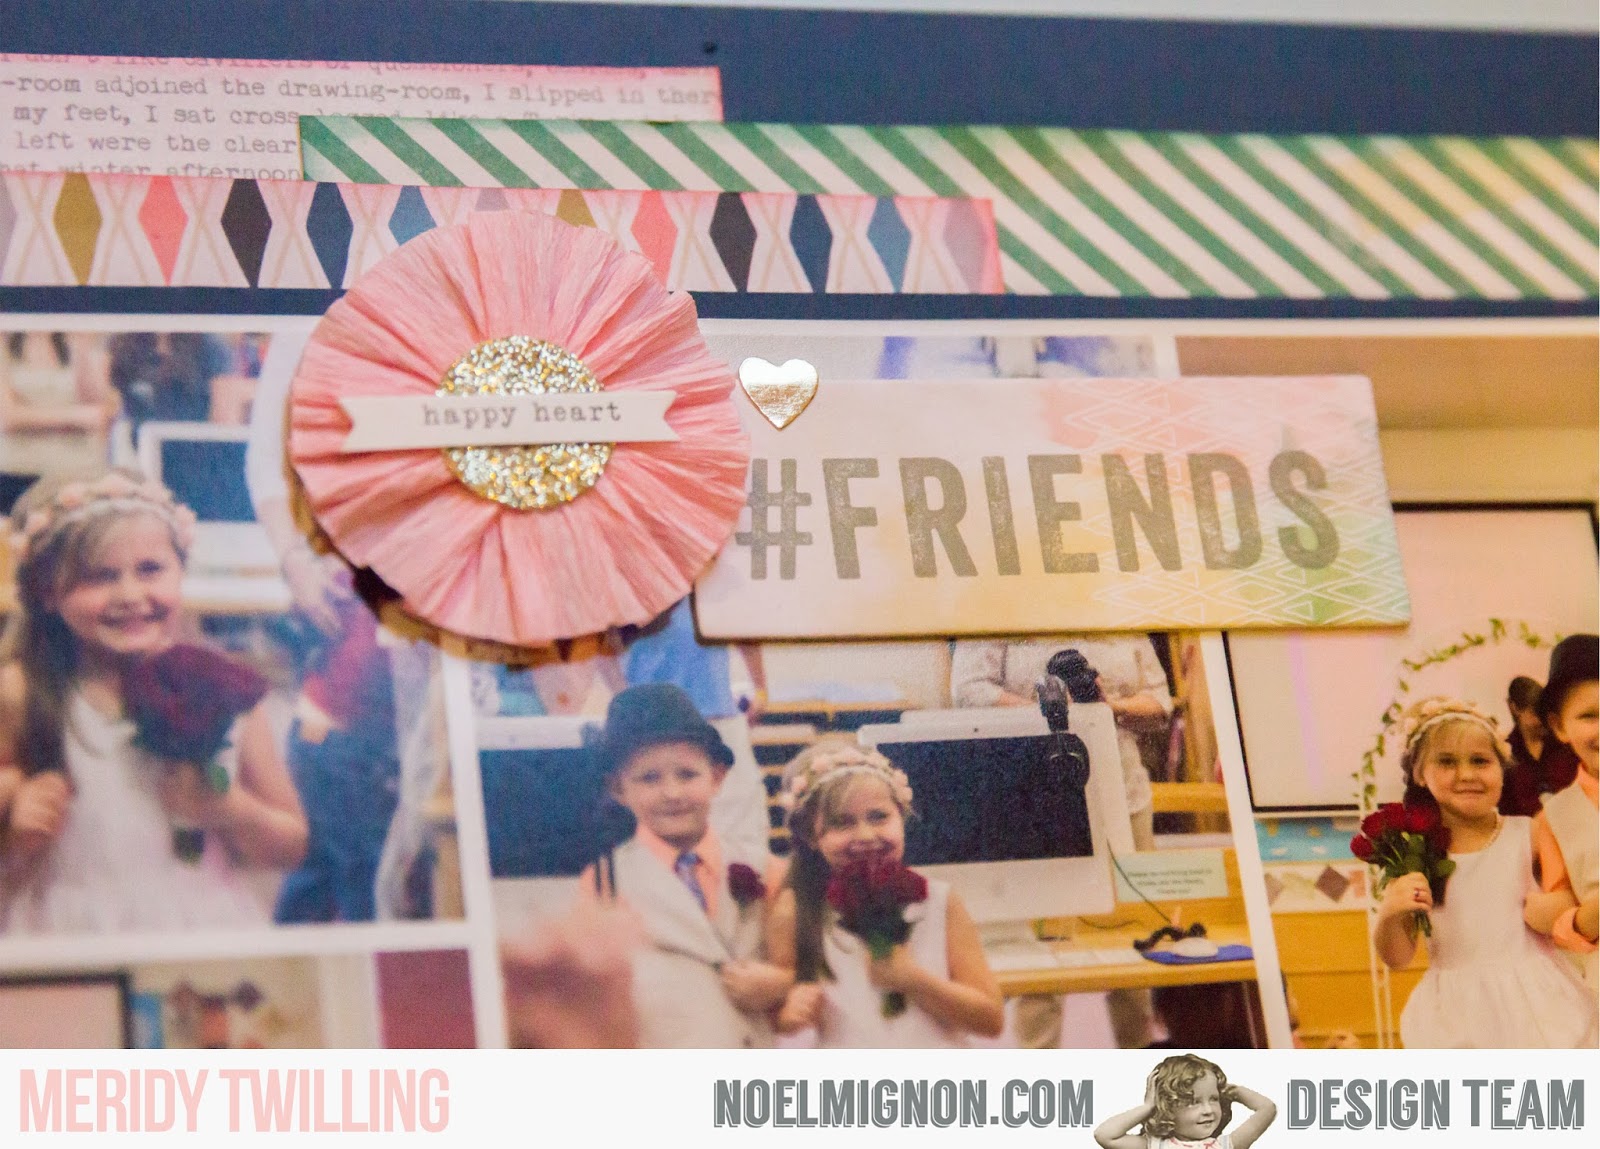
For this page I started out by mounting a piece of white cardstock to a piece of Sweet Charlotte kit patterned paper. I used spray mist on the background and then went to work on the grid on the right side of the page. This piece came with my daughter's Candy Land game that she got for Christmas. I saw it after she punched out the playing cards and knew I could put it to good use on a project. I just cut it down to use on this layout. I chose pieces of patterned paper and adhered them to the back of the grid piece. 


I used a piece of white washi tape at the top and bottom to anchor the piece and then added a few embellishments and stickers to finish it off. 


I like to incorporate a lot of layering on my projects and the stickers and tags were perfect for just that. I used the Patina spray mist to "paint" the edges of the tags with the spray nozzle before tucking them behind my picture and then added more stickers and my title.  I mixed some heart rub-ons and sequins to the spritzed background. 


Noel always has such a great variety of stickers and other embellishments in her kits. I love the mix of textures in Sweet Charlotte- the combination of cork, wood and the pretty florals is so fun. 

Our design team has shared some great tips here this week, some of which I really need to try and incorporate into my scrappy routine. I know I could get a lot more done if I were more organized. 

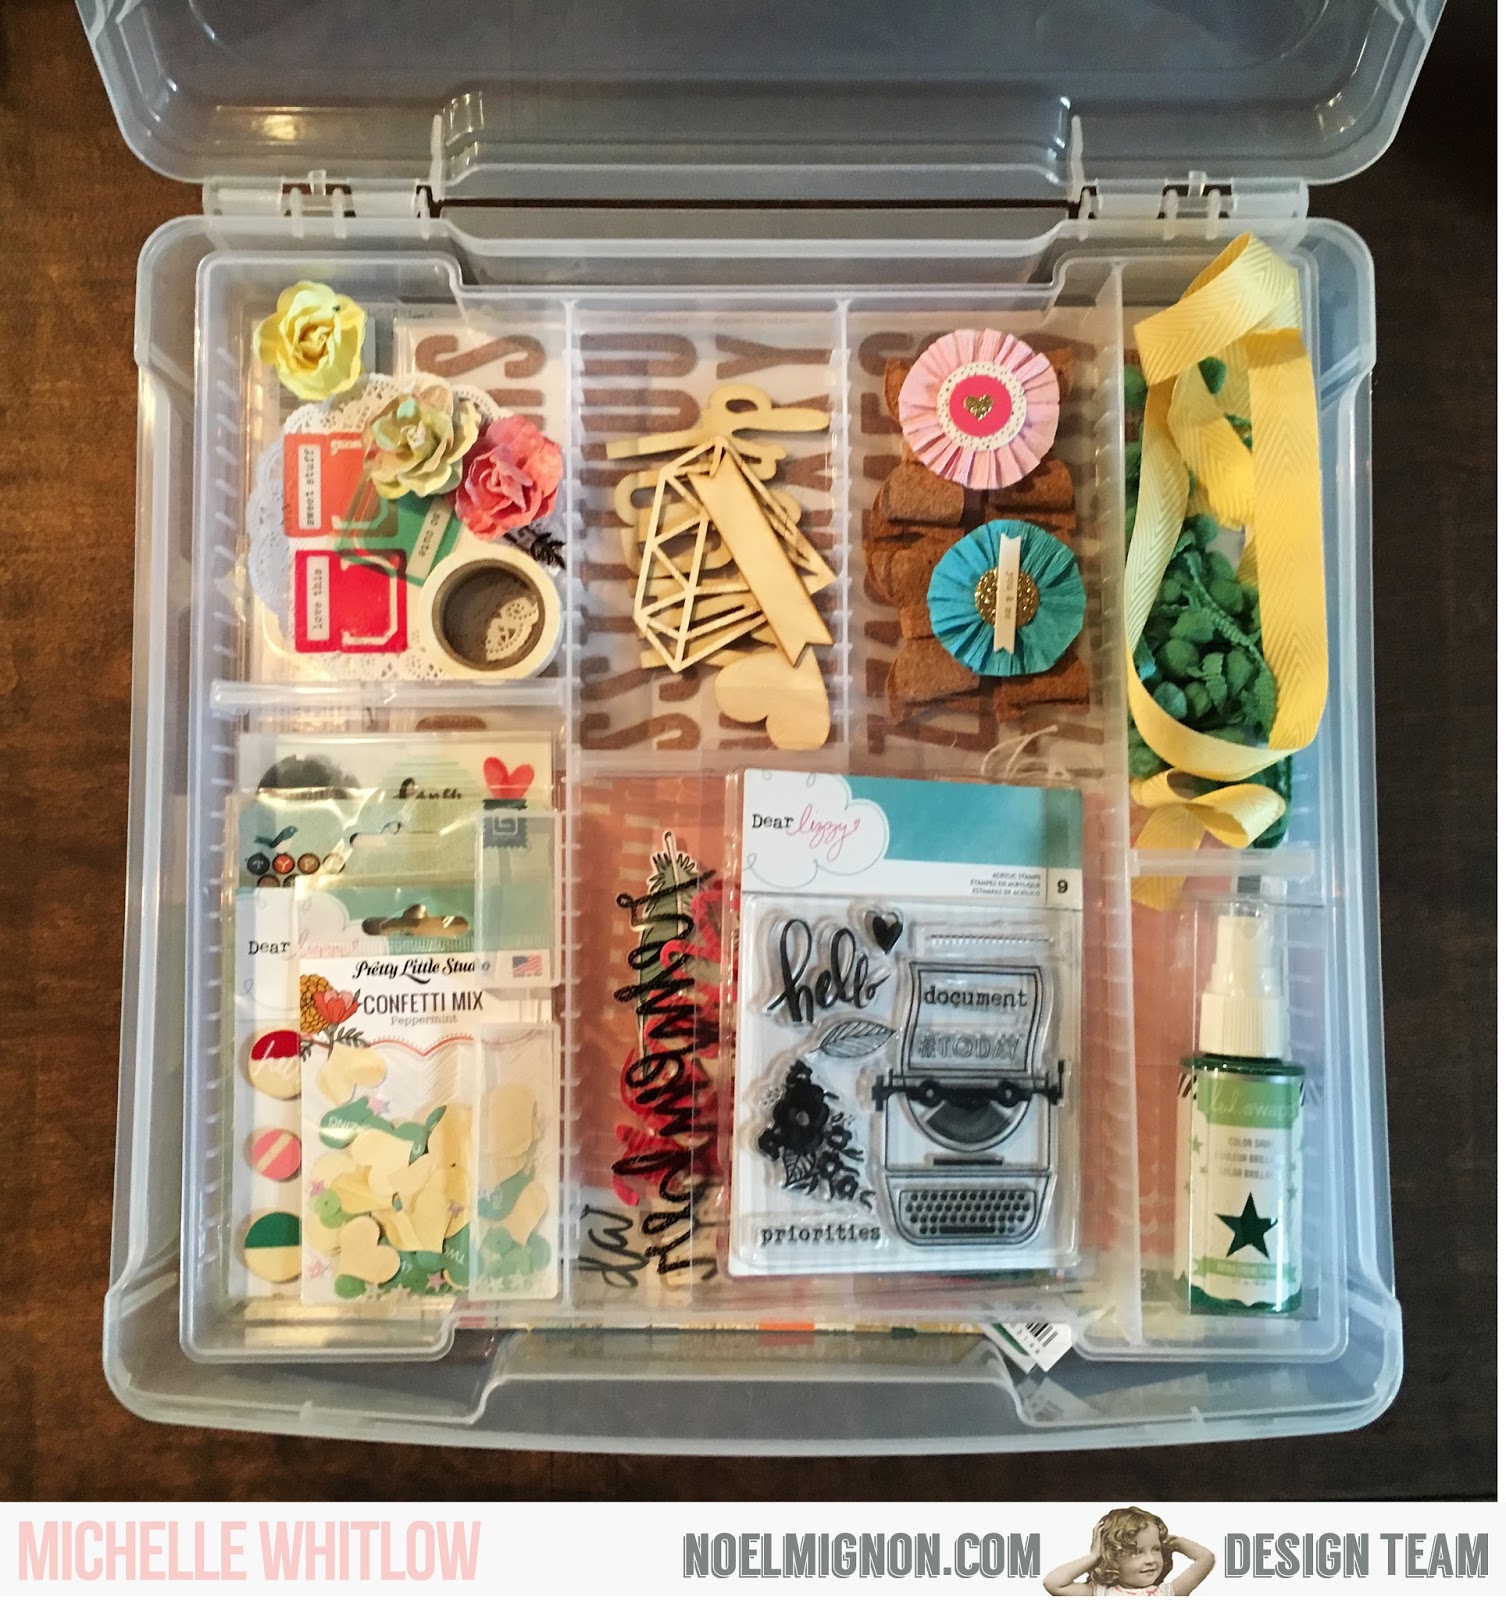
One thing that I try to do in my room is follow the old adage, "a place for everything and everything in its place." This is not to say that the rest of my room isn't a cluttered mess with piles of miscellaneous products on the floor, leftover scraps from previous projects on my desk and a hodge podge of things here and there. I do, however, have some things quite organized and out in the open where I can see them well. 

The problem in my scrap space is that if I don't see something, I don't tend to use it, so I like to have my favorite and most commonly used products within easy reach. 


I like to find cute containers to display some of my favorite things like these two that I got at craft stores. They keep items in view and easy to grab as I need them. 


For these last two items I really lucked out since a friend was getting rid of them and she passed them on to me. On this shelf I have some of my favorite washi tapes, spray inks and other embellishments. I also have some of my favorite punches, some on the shelf and some in the zigzag box.


This rack is a great way to store the washi tapes I use for freelance trade show projects. I slide this into a small space on another of my shelves but can grab it and see what I have right away since the tapes are organized by which release they were from.  

I have vertical organizers for my patterned and cardstock papers, 12x12 storage boxes to keep paper collections together with embellishments and storage bins for things like twine, paper punches, alpha stickers and other embellishments.

Do you have a great organizational tip that you'd like to share? 

We'd sure love to hear about it in the comments or in our Facebook group, "Noel Mignon Members".

Thanks for stopping by the blog today. 


Wednesday, January 6, 2016

Choosing Photos to Match my Noel Mignon Kits

I LOVE the huge variety of papers and embellishments in the Noel Mignon kits so much---today I want to share with you how I organize and match my printed photographs to the kits...

Each month after I stalk the mailman waiting for him to deliver my NM kit...I tear right into that box!  

First, I pull everything out and study every piece of paper and embellishment---oohing and aahing over every last bit.  

Next I face each paper so my favorite side is facing up. 

Then I start dividing up the papers into 2-3 "mini kits".  I divide them according to smaller color schemes and include 5-10 papers and some of the embellishments.  I realize that everything in the NM kit coordinates---but I force myself to create smaller "kits" so that I can match pictures up easier.  For example, this is the entire January 2016 "Sweet Charlotte" Classic Kit...


and here are the 3 "mini kits" I created...


I also have the following embellishments left over that I feel can go with all 3 of the "mini kits"...


Next I choose photographs that best match the color schemes of each of the "mini kits"

Mini Kit #1:

These are 6 sets of photos that I felt matched the colors in this mini kit...


 Mini Kit #2:


 These are the 3 sets of photos I thought matched these papers the best...


Mini Kit #3:


And here is a set of photographs that I feel matches the color scheme of these papers...


I will add my own solid cardstock to use as the base paper for each layout, I choose that cardstock as I create each individual layout.  I may decide to pull papers, scraps, and embellishments from one mini kit to use in another.  This initial breakdown just helps me get started so I'm not overwhelmed with 25+ pieces of paper to match photos to. 

As you can see, I have enough sets of photographs to create 10 layouts using this month's kit.  I know I will have lots of leftovers.  Depending on how productive I am this month, I may go back through my prints and pull some more coordinating photos.  It really depends on whether or not I scrap all 10 of these layouts within the next month.


Here is the first layout that I created with the "Sweet Charlotte" Classic Kit...


I like the way the title came out using the random fonts and one of the tags from the kit.  The "&" sign is something I had to pull from my stash.  To pull the random fonts together for a cohesive look, I backed the Q and the U with the same color coral paper (from another tag in the kit) and cut them out.


I fussy cut the little bouquet of flowers from one of the papers in the kit and added a floral sticker to create this little embellishment cluster...

 
Just a few embellishments pulled together here, a sticker, chipboard, and a crate paper medallion created a cluster with dimension and texture on the layout.


Thank you for joining me today!  Check back here every day this week to see some of the other "organization" tips that our design team is sharing!!!


Tuesday, January 5, 2016

How Sweet it is!

Happy Tuesday! Lynn here to share my first page with the sweetist kit ever -
Sweet Charlotte! The colors in this kit are fresh and so pretty. Teals, pinks, reds and yellows - gorgeous! I am thrilled to be designing with the Classic kit this month. I have lots of layout ideas spinning in my head! I love layering and I typically scrapbook one or two main photos and the photos are rarely larger that 4x4 in size. I love lots of white space! Here's my page.
 
 
 The Pretty Little Studio Confetti Mix is so much fun. There are double sided hearts, star sequins and teal sequins in this mix. The Dear Lizzy wood buttons - LOVE!
 
Now, onto organizing ...
This week the team is showcasing some of our organizational tips. I absolutely LOVE organizing. I would even consider making a career out of it. When I'm creatively blocked, I organize. Organizing gets me reacquainted with my supplies and helps me purge supplies I haven't used in awhile! When I started Project Life I was quickly hooked. I needed some storage for my ever growing supplies. I purchased my first Raskog Cart from Ikea! I loved the cart so much I purchased another one for some of my mixed media stuff! I love the teal color and the fact that you can roll them around wherever you want. Here's the cart after some easy assembly
Isn't the color yummy!! Here's one of my carts full of Project Life collections.
Here's my second cart full of mixed media supplies.
 
Thanks for stopping by today and stay tuned for more projects with the Sweet Charlotte Classic and Daily Diary Kits as well as more organizing tips! Have a great week!

Friday, February 6, 2015

How I create amidst the mess...

Hey guys! I'm rounding out our week of organization and I will be the first to admit that the best has definitely not been saved for last! haha If you came here hoping to see some dream studio you sadly won't find it. But what you will find is some tricks and tips that maybe you haven't thought of and I will share how I scrapbook & craft amidst the mess that is my scrap room/craft room. 

Let me explain...about 3 1/2 yrs ago we moved cross country from Georgia to Washington (and if you follow my blog you know most of this so feel free to skip this paragraph, I won't mind ;) Anyway, we drove 2400+ miles with 2 kids, 2 dogs, a guinea pig, and everything we owned to, once again, move to a state where we new no one and nothing. Did I mention I was 8 months pregnant with our 3rd child at the time?? Fun times!! haha Actually, they were :) So, the last 3 yrs has been spent getting used to new schools, new sports, new friends, new everything, all while navigating with a new baby (who is now 3 1/2). So, needless to say, my scrap room  has been so far down on the priority list that I can barely even see it on the list! My 'space' is in our unfinished basement that has cement floors with an area rug thrown down and cement walls covered with insulation. Not pretty. And, quite frankly, there's a lot of disorganization going on down there! However, I'm happy to say that this spring the hubby is going to work on getting some walls up and carpeting down. Yay!!! So - fingers crossed - I will have a new post on organization in a few months!

All that being said, I made the situation worse by getting rid of the table I used for crafting on. It was too big and I'm going to have my hubby build me a table that works better in the space. So for now I've been doing all of my crafting on either the kitchen table or the desk that's in my living room. This means that whatever I work on has to be moved once I'm done (although, occasionally, I've been guilty of having my kids eat dinner in the living room because I had a project all spread out on my kitchen table!)

And that brings me to my first item of organization that I've been using the last few months...
I found this white tray at Target a few years back. Over the years I've used it for works in progress when I wanted to keep the pieces of a project together (like a mini album or December Daily). But now I use it to hold all of the contents of my current kit so that I can see everything when I'm working on a project. And when I need to I can just take the tray and move it to another room. 
All of the papers fit nicely in the tray and I use vintage tins to hold all of the smaller embellishments and another container to hold the bigger embellishments from the kit. Once I've used up most of the kit I will add the leftover items to the rest of my stash (or put it in a bin for my kids to use).

After seeing Brittny's post this week I had to take a trip to Michaels and get some of those metal containers with the chalkboard on the front. Love chalkboards!
This year I'm using an Erin Condren planner and so this one holds all of my planner stamps, stickers, pens, etc so that I can easily grab what I need to plan out my week.

And yes, I still have my Christmas cover on my planner because I just love the colors :) 
Here's a couple more items that I've had for years. The blue container is from Target. I couldn't get the stupid tag to come off the front (why do companies do that??!!) so I covered it with washi :) The 2 tier wire basket is from a thrift shop. I'm planning on spray painting it when the weather gets warmer (don't use spray paint when it's cold...trust me).
Another one of my favorite items is this divided plastic container. I got this at Hobby Lobby but I know a lot of stores like Joanns, Michaels, etc have them as well. I kind of have a thing for wooden embellishments lately so this is really good for holding those & keeping them all organized.
These boxes are one of my favorite things in my room because they hold all the stuff that needs to be put away or scanned...finished layouts, school projects, school stuff, drawings, etc. I've had these for quite a while and I can't even remember what brand they are but I know you could find something similar at the craft stores.

Here's a few more of my tips for organizing your craft space:

Before you buy anything, take a look at what you have and figure out what you need. What kind of containers do you need? Do you need containers to hold big items or containers with small compartments?? Make a list of your needs! And be prepared that it might take you a while to find everything you need.

Shop thrift stores, garage sales, dollar bins & clearance sections. I have found so many of my items second hand and in dollar bins at Target. It also saves you lots of money. Don't overlook something that's not the right color. There are so many paint options these days that you can paint just about anything (even laminate!).

Shop your house. Go through your house and figure out what's not being used effectively. Would it work better in your craft space than where it's currently at? I'm notorious for moving things around in my house. After 3 1/2 yrs I'm still moving things around because over time our needs change. One of my shelves in my room is the changing table from my daughter (you can kind of tell in the last photo). It works perfectly. No reason to go out and buy new furniture when I had a perfectly good item right in my own house! Once she was done with it it went right downstairs! The best part? I paid just 15 bucks for it at a thrift store about 4 yrs ago.

Reuse & recycle. Sometimes you only have to look at the containers that hold items that you've bought recently. This container had cookies in it that I bought back in December. Why throw it away? I quickly realized it was a pretty great container so I'm saving it to put to good use very soon. I might use it to hold all of my tiny stamps. And I may paint it or just decorate with washi, we'll see.

Hopefully you've found some inspiration this week. I know I have! The key is finding what works for you!