Showing posts with label planner. Show all posts

Wednesday, January 11, 2017

2017 goals

Hey everyone, Michelle here! This week we're talking about goals. And while I don't do the typical New Year's resolutions I do like to have goals that I set for myself throughout the year. And one of those for this year is that I would like to be more consistent with using my planner. Last year I did pretty good for a while, then fell off the wagon, then back on, etc. The weeks that I'm consistent with my planner I feel much more organized and a tad less stressed (for obvious reasons!)
So this year I picked up 2 planners, both Happy Planners. The regular sized planner will be my most used planner with the mini planner just as a calendar that I can throw in my purse. I much prefer to have a physical planner than using the calendar in my phone. Side note - last year I had all of the dates in the calendar on my phone just disappear. It was awful. Once again I was reminded why 'old school' is sometimes best!

So here's a look at last week's spread in my Happy Planner:
I was able to decorate a bit more since we didn't have a ton going on other than the whole back to school routine. Not every week is decorated this much, just depends on what I have going on and how much time I have to devote to decorating my planner. However, using the Little Bird Daily Diary Kit I was able to decorate pretty quickly.

And here's a look at my mini planner:
Pretty basic, I don't spend a lot of time on decorating this one. Just a little washi along the edges and a few stickers from the kit. I write notes in it as the week goes on. Like I said, this one gets thrown in my purse so I have important dates with me when I'm away from home (my regular planner stays home, either on my desk or the kitchen counter). 
I absolutely love the washi in this kit so I enjoyed using it in my planners! It will definitely be making another appearance in the weeks to come!

Sunday, December 4, 2016

Planner Wk18 | Oh What Fun Daily Diary kit

It's Christmas time!  Wendy here today to share a very Christmassy planner page I created with the Oh What Fun Daily Diary kit.  This week's challenge is the "Plaid Tidings" challenge - use plaid somewhere on your project.  The Fancy Pants washi tape was perfect for the challenge and created such a festive look.


The Project Life cards also work great in your planner, filling up blank spots and adding a wonderful jolly touch to the pages.  I also used one of the Simple Stories cards to fussy cut the ornament from it.


The puffy stickers add a nice texture to the page without adding any bulk.


Thanks so much for joining me today and I hope that you will join us in the Plaid Challenge!

Sunday, November 27, 2016

Planning with the Oh What Fun Daily Diary kit

Welcome!  Wendy here today to share my December calendar using the Oh What Fun Daily Diary kit.  I didn't have enough Christmas pictures to work in my Project Life album yet, so I decided to plan instead.  I love that my planner allows me to create in a small place, it is great for a quick creative pick-up.


Here are some close-ups of the details...


I love the clips and flowers that were enclosed in the kit, but the flower was too bulky for my planner.  I took the foam adhesive off the flower and instead adhered it with liquid glue to the clip, giving me a very festive marker for my planner for the month.


This week your challenge is a Recipe challenge; your challenge is to use 1 sheet of cardstock, 2 alphabets, 3 photos, 4 patterned papers, and 5 embellishments.  If you play along, remember to share what you have created on the Noel Mignon FB page, we'd love to see!

Thanks for joining me today!


Sunday, October 30, 2016

Planner Week 12 | Falloween Classic Kit

Welcome to the blog Noel Mignon friends!  Wendy here today sharing a planner spread using the Falloween Classic Kit.  Today's challenge is called the "3-1" challenge - use three of something and one of something on your layout.  


I was totally inspired to use the Falloween kit in my planner as we are having fall here in FL!  It is amazing and we've been able to sleep with the windows open and everything.

I really thought the cute owl and bear needed a place on my planner so I have 3 of the chipboard pieces on my planner.  To make the chipboard work on my pages and not be too bulky, I just removed the layers of the chipboard and glued the flat pieces to my pages.


My one piece, was the wood veneer leaf which I glued to the back of a paper clip to create a marker for my fall pages.


So what are you going to create for the "3-1" Challenge?  Have a great time creating and make sure you share with us on the FB page, we'd love to see!


Sunday, October 9, 2016

Planning with the Buttons and Bows Daily Diary kit

Good morning everyone, Wendy here today to share some planning details to get you off to a great week!  I have been away so I wasn't able to play with the amazing Falloween kits yet, but there are so many goodies in the Buttons and Bows kit I am still going strong.


When the planner trend first began I wanted nothing to do with it!  I've had a planner for years and it is full of appointments, to do lists, kids schedules, etc...  and I didn't see why anyone had the time or wanted to add any more confusion to their planners.  But I bought one at Michaels (yes, with my 50%) off coupon one day, and it sat, and sat, and sat...

One day, I didn't have time to create a page, but I really needed to de-stress and so I grabbed some leftover pieces laying out on my desk and I stuck them down and I wrote a few thoughts I was having.  Poof, I was a planner addict!  I have been recording my thoughts, hopes and dreams, and even disappointments in my planner ever since and I love that I can look back and see what I was going through and how I was feeling.  So if you haven't given the planner trend a try, check it out again, but do it your way, you might actually find you love it!


This week, your challenge is the Scraplift challenge - scraplift a Noel Mignon member or Design Team Member!  Don't forget to let us know who you scraplifted and what caught your attention in the original design.  

I have been away for 2 weeks, so I wasn't able to participate in this challenge, but I will see you next week with a new kit and a new challenge!


Tuesday, March 1, 2016

Hello March, Let's Take A Leap!

 Hello Bloggers and Happy March 1st! Lynn here with a new project using the awesome "Heart of Gold" Classic Kit. In honor of Leap Year our week long challenge is "Take a LEAP of Faith". We are trying something new to us - a new technique or page design we haven't tried before. I have recently joined the planner craze so I thought I would used some elements from this month's kit to create some planner pages. I haven't done this with our kits before, but I'm not sure why. It's a great way to stretch these kits even more. I used many embellishments to decorate this weeks pages in my planner. Here's this week's spread in my A5 planner.
This planner is dedicated to my design team deadlines and blogging schedules. It's my creative planner. I have a separate planner for personal stuff - appointments, get togethers, etc. We received an adorable butterfly clip in this month's classic kit. I removed the clamp and replaced it with a paperclip to put on the top of my page. I layered washi tape and stickers throughout my layout.
 The epoxy stickers made great bullets for my lists.
I have left room for lots more documenting and then I can go back and add more embellishments later. I used some number stickers for the dates and they also added more pops of gold.
To tie the pages together I lined up some washi tape to carry it across both pages.
Here's another closeup of the bottom of my page
I will definitely decorate more planner pages with my kits and I hope this gave you some ideas for your planner pages so you can Take a Leap and try something new!! 
Thanks so much for stopping by and stay tuned for more inspiration for the team! Happy Tuesday!!

Friday, January 1, 2016

hello 2016

First blog post of 2016! Woot woot!!! This week has been all about resolutions and I have to say I'm not a resolutions gal. But I am a list maker. So I decided to make a scrappy dashboard for my new planner to make a list of all the scrappy projects that I need to finish. 
This list isn't necessarily about getting 'caught up'. I don't really stress about that because I look at it this way - if I'm caught on everything what am I going to work on? This is more of a list (or lists) of more specific projects that I would like to wrap up - my December Daily albums from the past couple years which are in different stages of completion, same with my Project life albums, my Disney albums from the past 2 trips (thankfully one is just about finished), a couple mini albums I need to work on, etc.

And then I have a couple other goals I'd like to achieve - organize (and I mean really organize) my scrap room, get all of my layouts into albums, order more albums for all of those layouts, and purge purge purge the items I don't need anymore. 
So back to my project - I used the new Sweet Charlotte classic kit to make my scrappy dashboard. I cut a piece of patterned paper at roughly 8", folded it in half to get a 6x8 piece of paper and used adhesive to hold it closed. I did this as opposed to just cutting a piece of paper that size so it would have a little bit more durability in my planner. Then I used a punch that I've had for years to attach it to my planner. I had to punch it once and then go back and punch the holes a little larger and it ended up working perfectly!
 

I decorated with some accents from the kit. And can we talk about the Dear Lizzy stamp set in this kit??? I was so excited when I opened the kit and saw that! I will certainly be getting a lot of use out of it in the coming projects. Just a note - be careful when taking the stamps on and off of the plastic. They are thin and bendable and stamps like that can rip so be careful :) 

I also decorated a jumbo paperclip with one of the Basic Grey flair buttons. I'll probably be making more of those, too! Then I grabbed some Project Life journaling cards from my stash along with a tag from the kit to make some lists that I then stamped and attached with a Prima clip from the kit. That way I can change lists out and add to them whenever I want. So bring on 2016!!!

Wednesday, February 25, 2015

My Planner System Using the Love Life Classic Kit

So, I don't know about you guys, but I'm guessing, since you're a scrapbooker,  you've probably had a long love affair with office supplies. I'm no exception. Ever since I was little, I collected scraps of papers, pens, tape, and any little office supply I could grab. I remember when I was a teenager and got introduced to the idea of a planner. OH I was in heaven!

I've been a planner addict for a very long time. It's changed what it's looked like over the years. I now really just like a monthly calendar and then copious places for lists and notes. I used to love a day by day planner but I would try to micromanage my time and get frustrated when life wasn't perfectly in my control. Ha! 

Lately, there's been so much beauty out there on social media of the different ways people are creatively adjusting their planners and notebooks with fun scrapbooking products, so I had to jump in and play some too. 


I rummaged around and found my old Memory Dock planner from We R Memory Keepers. (This system was very much like Project Life! Anyone remember it?) I pulled out all the old stuff and then put in a cute new cover in the frame, using my Love Life kit.


Inside the front cover, I store my purse calendar so I can keep both synced. I won't be carrying this big one everywhere I go; it's not convenient for that. I made a dashboard for the front using some papers from the Love Life kit and laminating it. The beauty of it being laminated is that I can tape things to it and then change it out as I need to.


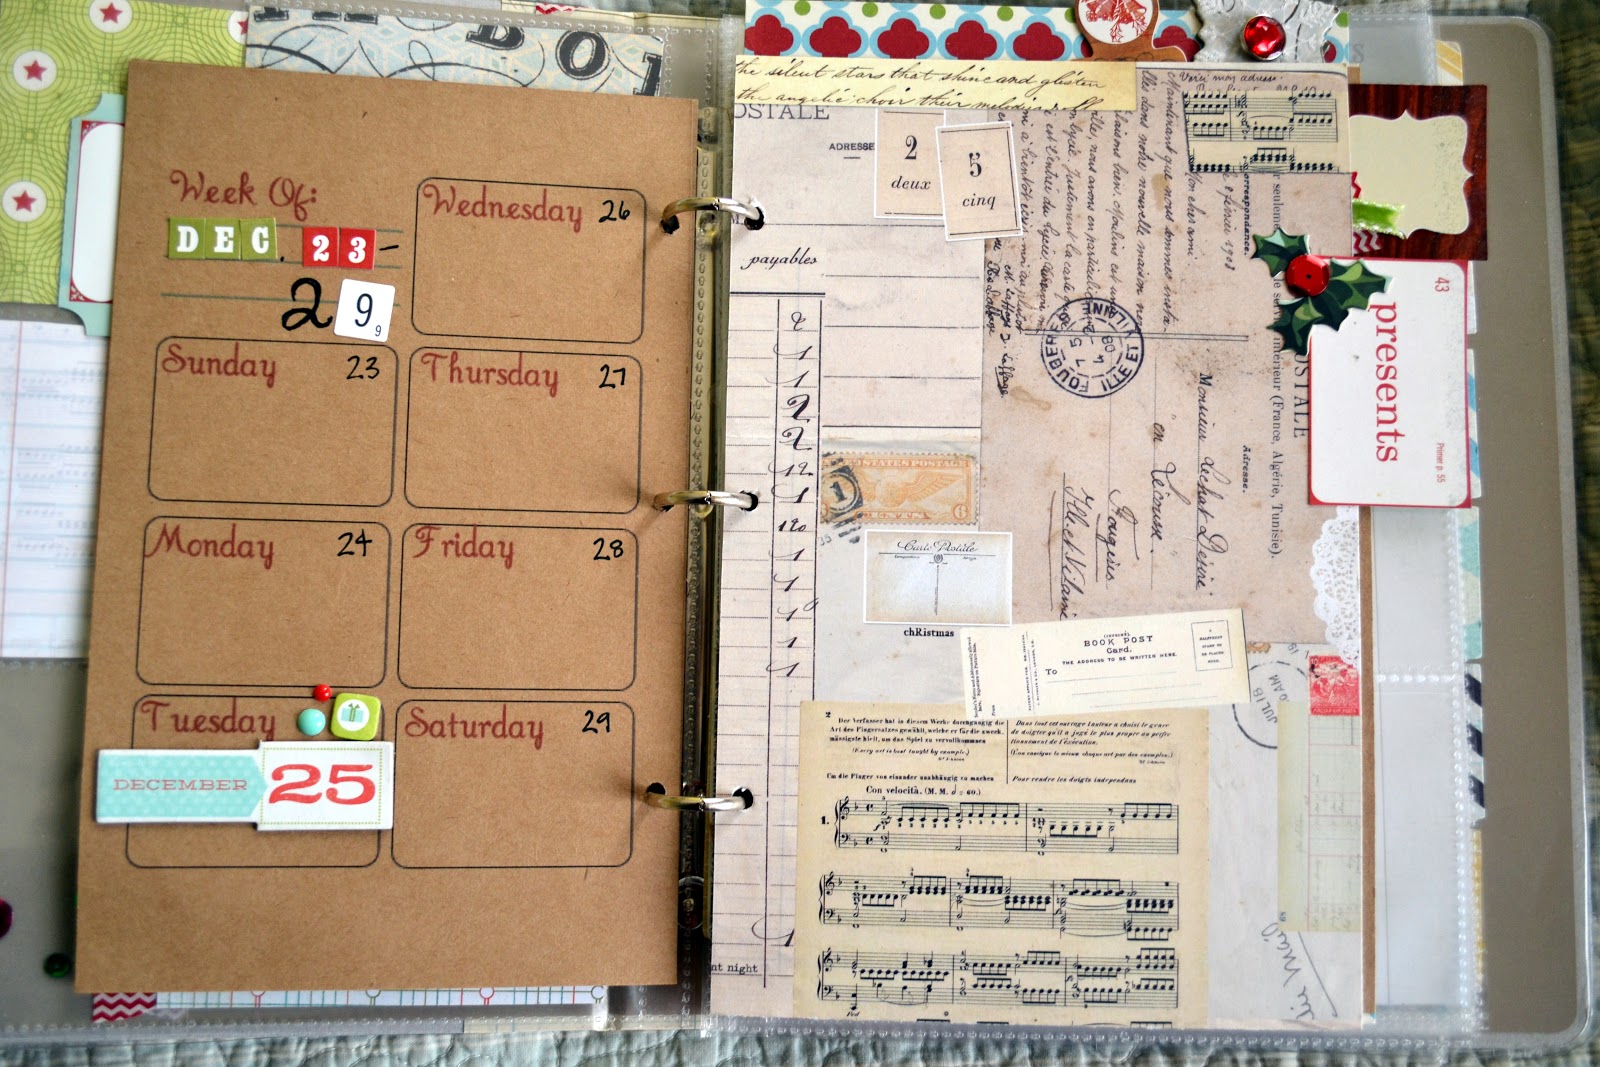
 I printed out a calendar from The Nifty Planner on etsy and added a few pieces of washi tape to the edges and a clip from the kit. My calendar is nice and blank now, but it'll be very full after I sit down and fill it in today! 

My March kit, Shine Bright, should arrive later today so I left room on my calendar to add stickers, tape, and small flat embellishments to my pages. 


All my dividers are laminated so that I can tape small items to them. 


You can see here where I taped a card from the Love Life kit, along with a pretty verse.


I have some weekly planning sheets and menu planners from The Joyful Papery in a second section of my planner. I left the backs intentionally blank so I can attach notes and write lists in it. Another few little cute embellishments from the Love Life kit adorn these pages. The planner stickers are from the Reset Girl Shop.


Behind this last section (using that GORGEOUS paper from the Love Life kit), I'm tucking my art journal. This will be a perfect place to store it when I'm not using it, and I can grab this whole planner and take it with me if I want to bring it all together.


What are your favorite office supplies? Don't you love how scrapbooking and daily life are merging more and more together?!

Friday, December 28, 2012

2013 Pocket Calendars for my Kiddos!


One of the things my kids asked for this year was calendars. They are all getting a grasp on the sequence of time, counting down to special days, etc. and the visual of a calendar is really important to them! 

I found these little pocket calendars in the Dollar Spot at Target, but they don't particularly reflect my kids' personalities, so I thought I'd personalize them. 

I used the new Soda Shoppe Kit (now on sale!) and selected two papers to just simply cover the outside of the calendars. 


One of my girls like simple, feminine things, so this one is for her. 


The other one is more spunky, so I thought this fit her a bit better! :)


I used my decorative tape collection to put a strip of tape on pages that had important dates, like birthdays, vacations, holidays, etc. 


It helps them to see how much longer to those special days! :)


Have you checked out Soda Shoppe yet? It's a beautiful kit that you won't want to miss!

Friday, November 30, 2012

Countdown to Christmas- December Planner


Tomorrow is the 1st of December! Can you believe it?! Are you ready?

I'm not... but I'm trying to be better prepared. Today I want to show you one of my little tricks for (hopefully) keeping me better prepared and organized for Christmas this year. 

I bought a Pink Paislee Portfolio album from Noel a few months ago, and saved it for now. (She's out of stock on it right now, but she has several other albums that would work well!) 

I decorated the cover with the Glad Tidings kit (sold out except for the paper only pack- which is still pretty dang awesome.)


On the cover, I used one of the beautiful designs by Rhonna Farrer for My Mind's Eye. Because my album is smaller than 12x12, I cut part of the design off of the rest of the page and incorporated it into this part of the design because it was all so lovely! (You can see it in the little bird & "all is bright" tag below.) I love that this album has a protective sleeve around the outside.... normally I would take it off, but because I plan on carrying this album around with me, I'm keeping it on to help it be sturdier.


I used one of the inside photo sleeve inserts to make a quick little cover sheet. I may add to this... I don't feel like it's quite "done" yet. Or I may leave it. We'll see. I did put some sequins in one clear pocket and then tape it shut with decorative tape. I love that fun little element! 


Then- the insides! I made some printables to share with you today! I'm not a pro at this but I wanted something customized and couldn't find what I wanted. You could print these on whatever you wanted- I chose kraft cardstock and cut it down to size. 


The next set of pages are pocket pages- I cut paper the right width, but longer than the album, so I could fold up the excess and make pockets. Thank goodness for pretty double sided papers!


The page on the right is for me to jot down anything handmade that I would like to make for our own family traditions or decorations...


and the next page is for handmade gifts or wrapping items. 


The pocket pages will become useful when I stick in other notes, receipts, coupons, and odds & ends as we go through the month. 

I plan to use the rest of the album as a memory album- not exactly a December Daily, but something akin to it with a little less structure. I'm really excited to see how this evolves for me and I plan to share it with you!

If you're interested in using any of these printables, here they are linked below! 

Event Food Planner (with spot below to attach recipe card!): https://docs.google.com/open?id=0ByynLz6eGtoeMWlueXV6dERuTVU