Showing posts with label rub-ons. Show all posts

Monday, April 30, 2018

{Wander} Layout with the "Enjoy the Journey" Classic Kit

Good morning, it's Meridy with you today, sharing my first layout using the May "Enjoy the Journey" Classic Kit.  There are so many great pieces in this month's kit, lots of colors to work with, and fun embellishments.  I decided to go somewhat monochromatic with this layout, using wood grains, black, white, and blue. 


I used the "B" side of one of the Jillibean Soup papers to mat my whole layout.  Next, the wood grain paper in this kit was to die for, so I wanted it to be the background of this layout.  Then I added layers, starting with the vellum paper, my photos, and lots of embellishments.


I mixed a few pieces from my stash in with the embellishments from this month's kit to create this embellishment cluster.  I started with a wooden frame to frame the "tourist" ephemera, then I layered that up with the blue polka dot heart, the palm tree rub ons, and black enamel heart from the kit.


I really liked mixing up embellishments, phrases, and stamping to make this cluster.  Everything seemed to nestle right together along side of my photo.  Finally, I added a strip of the woodgrain paper down the left side of the layout, I added a little color to it with the mini pom pom trim I had in my stash.  I added my journaling to the framed area on the lower right of the layout, and with that the layout was complete.


Thank you for stopping by today!!!


Thursday, January 11, 2018

She turned 12

Today I have another project to share with you using this month's She's Crafty Classic Kit

My second oldest recently turned 12, so this week's layout features her:


I wanted to show off a lot of the patterned papers in the kit without losing the white space on my page so I used a star diecut made using my Silhouette machine and filled each open space with a different pattern. I also started with a clean white cardstock background and misted it with aqua, green, yellow and pink spray mist. 


After that I added strips of paper and tape, some rub-ons (love these!) and then layered tags and journaling spots on the left side of the page. I used the cute black Thickers for my title and accented things with enamel dots. I also used the Ranger "Mermaid" Liquid Pearls to make little dots around the curves of the black diecut circle. A little tip about the circle: instead of tucking one side under and wasting the part that was under the tags, I cut it and used the other piece on the page as well. 


One of my favorite embellishments in the kit is the pack of Elle's Studio acrylic words. I used the "hooray" and heart on this page and used a Copic marker to color over the white. 


Thanks so much for stopping by today!

♥♥

Monday, January 1, 2018

{NYE 2017} with the "She's Crafty Classic Kit"

Happy New Year 2018!!!!!  It's Meridy here, and I have my first layout with the "She's Crafty" Classic Kit.  It's (fittingly) a layout of NYE 2017.  The colors in this month's kit are so bright and fresh, and they went great with my pictures of last New Year's Eve, so I decided to make a double page layout.


I used an 8x10 collage so I could include 10 photos on the right hand side of the layout and then focus on my 2 favorite pictures on the left side of the layout.


I started with this amazing teal patterned paper as my background, then added a few layers of patterned paper, photos, and a couple of die cuts from the kit.  I journaled a little straight on the label die cut.  I used a date and time stamp I had in my stash, and drew attention to it with the arrow stamp from the roller stamp in the "She's So Crafty" Classic Kit.


I wanted the page to really blend with the adjacent side of the layout, so I added the gold rub on "chains & beads" from the amazing rub ons from the kit.  I mixed the black Thickers with a die cut label and an acrylic word to create my title.


I loved this beautiful patterned paper that I used on the right hand side of the layout and KNEW it needed to be used for a celebration layout---what better than NYE!!?!


I added a few simple scraps, die cuts, and rub ons to this side of the layout in order to make the 2 pages coherent.  I sketched around the tab and sketched a little around some of the layers in black thin pen, and with that, I decided the layout looked complete.


Thank you for stopping by today.  Have a wonderful 2018!!!


Monday, November 13, 2017

{41 and Blessed} Layout with the "Home Sweet Home" Classic Kit

Happy Monday!  It's Meridy again.  I have a layout to share with the "Home Sweet Home" Classic Kit and it's rich autumn colors.  Today I'm sharing a layout of my birthday 2016.

The colors in my photos are really rich and deep, so the colors in this month's kit complimented them wonderfully!  I started with a neutral cream background since the photos are so colorful, and just added patterned paper in small amounts.  I really like the way the dark maroon paper grounds the photos. 


I LOVE pumpkin spice lattes, so I was drying to use the stamp set in this month's kit, and since they got me a PSL for my birthday, it was the perfect embellishment for this layout!  I added a chipboard circle and gemstone brad to dress up my stamped, paper pieced image.


Next, I went to work on the title.  I mixed and matched Thickers from this month's kit with the word "blessed" fussy cut from a patterned paper, along with an alphabet stamp and a couple of word stickers from my stash.  I dressed it up with a couple of rub ons and some chipboard stickers.


Next, I added the little "pumpkin spice" coffee cup chipboard sticker towards the bottom of the layout, another gemstone brad, and a couple of stamped sentiments.  And that waps up my layout for today!!!  Thank you for stopping by!


Thursday, November 9, 2017

Mad about Plaid

It's a cold day here in west Texas, a perfect day to cuddle up under a warm blanket in front of a toasty fire. But, since that isn't on the agenda for today I might settle for some hot chocolate and catching up on the blog here ☺

Today I am sharing my first project created with the Home Sweet Home Classic kit, and since it's Plaid week here at Noel Mignon, I have a plaid layout to share with you. This kit is still available in the shop so head on over to purchase yours!


I started out with a corner piece of this fantastic plaid paper. This sheet is one that caught my eye when I first went through my kit. I know it might seem weird but when I go through the papers I stack together the ones that I like the most and make sure to use those on my projects. This was one of my favorites. I then added some strips of other patterned papers and a piece of the ribbon from the kit. 

Can I share a tip? Since the patterned paper isn't wide enough for the paper strips to go all the way across the paper diagonally I simply cut them in half since the middle would be hidden by the photo anyway.


I added lots of chipboard pieces and some of those cute rub-ons along with a mix of the alphas and word stickers in the kit. 


Have a fantastic day!

Monday, June 12, 2017

{Cool Summer Swimming} with the "Dive In" Classic Kit

Hello friends!  It's Meridy here, and I have a double page layout to share with you today using the "Dive In" Classic Kit.  As the name of this kit suggests, it is perfect to use with swimming photos.  This week the design team will be sharing layouts all about water, swimming, the beach, etc. 

I used a few 3x4 photos and one 4x6 photo of my kids swimming last summer on this layout.


I grabbed a few papers that used the same blues, pinks, and yellows in the photographs.  Once I choose the patterned papers, I pulled various coordinating embellishments from the kit. 

I really loved the flamingo trim, so I used it as a strip down the left hand side of my layout and cut a few flamingos from it to use as "stand alone" embellishments as well.


I wanted the look of rippling water, so I used some of my old decorative edge scissors to cut a few "waves" from various shades of blue paper.  I stacked those bits across the bottom border of my layout.


Next, it was time for me to add titles, journaling, and embellishments to the layout.  I started with my title "Cool Summer Swimming" and created it with a set of Thickers, a set of alpha stickers, and a chipboard sticker all from this month's kit.  Then I added a few enamel dots, some of the gold rub-ons, a few buttons, and some vellum stickers from the kit.


I added the same types of embellishments to the opposite side of the layout to balance the 2 sides of the layout.   I pulled a couple of extra buttons from my stash for this embellishment cluster.


I added a subtitle of "Making a Splash Jump" on this side of the layout to balance out both sides of the layout a little more.


And that wraps up this layout.  I would love to see what you create with your "Dive In" kits on Instagram #NoelMignon.  Have a great week!!!


Monday, November 28, 2016

A Recipe Challenge with the "All Fall" Classic Kit

Hello all!  Today I will be sharing another layout I made with the "All Fall" Classic Kit.  I'm happy to say, I got quite a few double page layouts out of this month's kit, and a couple of single pagers too!   

This week's Design Team's Challenge...it is a recipe challenge, and I think these types of challenges are so fun. The recipe we are following this week is: 

1 sheet of cardstock
2 alphas
3 photos
4 patterned papers
5 embellishments

Well, I kept finding things that I needed to add to my layout in this month's kit, so some of these things I used "at least" that many.  For example, I used more than one piece of cardstock.  

Here is the layout I created...


1 sheet of cardstock---check!  Well, actually 3 sheets.  Both the maroon and the yellow cardstock came from this month's kit, the cream cardstock was a scrap from a past kit that I punched with a border punch.

2 alphas---check!  The word "just" is from a set of Thickers from my stash, the word "us" came from the Pretty Little Studio Mini Alphas in this month's kit.

3 photos---check!  These photos were some maternity photos from last November, just 4 weeks before the baby was born.  I knew this would be my last pregnancy, so these pictures are really special to me.

4 patterned papers---check!  I just love the hounds tooth and wood chevron papers in this month's kit.  I added another woodgrain branding strip from the "All Fall" kit and a scrap of brown patterned paper from October's kit.

5 embellishments---check!  And then some... I started with a few rub ons, a wooden chip, a couple of brads, some enamel dots, a label sticker, a printed chipboard sticker, and finally a punched heart.

Here are a few close ups of my layout.


Thank you for stopping by today!  I can't wait to break into my December "Oh What Fun" Classic Kit.  Stop by all week to see the rest of our design team's recipe challenges.  Have a great week!!!


Monday, June 6, 2016

"Happy Days" Classic Kit

Happy Monday!  It's Meridy again, I'm here to share a layout I made with the "Happy Days" Classic Kit. This week the design team is using camera motifs to make 'picture perfect' layouts.  I am passionate about photography, therefore I LOVE all things camera.  The "Happy Days" classic kit has quite a few camera embellishments, so it was perfect for me!


 I started this week's layout by double matting my pink background paper.  I tried to really pull all of the colors from the bright Amy Tangerine patterned paper and get ALL of those colors in my layout. I used the Tim Holtz Distress Ink that came in the kit to ink the edges of all of the various layers.


The first camera I used on this layout is a stamped image that I fussy cut and colored with marker.  I decided to mask half of the wood veneer hearts with washi tape, and paint the exposed side with acrylic paint.  It was a very simple touch and I got to use some of the acrylic paints that I have in my stash.  I also added a few splatters of Heidi Swapp Color Shine from a past kit.


For my next camera embellishment, I used one of the tags that came in this month's kit.  I surrounded it with another painted wooden heart, an Amy Tangerine rubber heart, some self adhesive sequins, and one of the Amy Tangerine rub-ons.  

This wraps up my layout this week.  If you would like to share some of your layouts using your Noel Mignon kits, hop on over to our Facebook page, I would love to see your creations.  Have a great week!


Saturday, June 4, 2016

Shaping things up with the Happy Days Classic Kit


Hello!

It's Becky here with you today and I am really excited to share a new page with you that I created with the brand new Happy Days Classic kit. I believe we still have some of these kits left so if you like what you see head on over to the store and get one before they sell out!

When I saw this kit my eye was immediately drawn to the beautiful blue and white striped pattered paper. Yes, this is June, but I knew I would probably use it for a patriotic layout. Instead of making it a patriotic-themed page, though, I created an everyday page with the good ol' red, white and blue to go with my pictures from a past 9/11 flag display in my town. 


I started by cutting the middle of the blue/white paper out leaving about a 1 1/2 inch border all the way around. I then mounted that frame on white cardstock and added droplets of spray mist. 


There was some packing paper in the box with my kit, as I am sure you all received as well. I tore a piece of one sheet of this paper, crumpled it up and glued it to my page, then mounted the pictures with foam adhesive. I wrapped the photos with red and white twine from my craft supply and then cut some stars from patterned paper with a small star-shaped punch. I tucked the stars under the photos and placed a few others around the page. 


I added some bits of chipboard, a wooden heart, some adhesive sequins and some rub-ons as embellishments to finish off the layout. 


Have a wonderful weekend and come back to see us next week for a new challenge. 

♥♥


Monday, April 25, 2016

Here Comes the Sun-"Trailblazer" Classic Kit

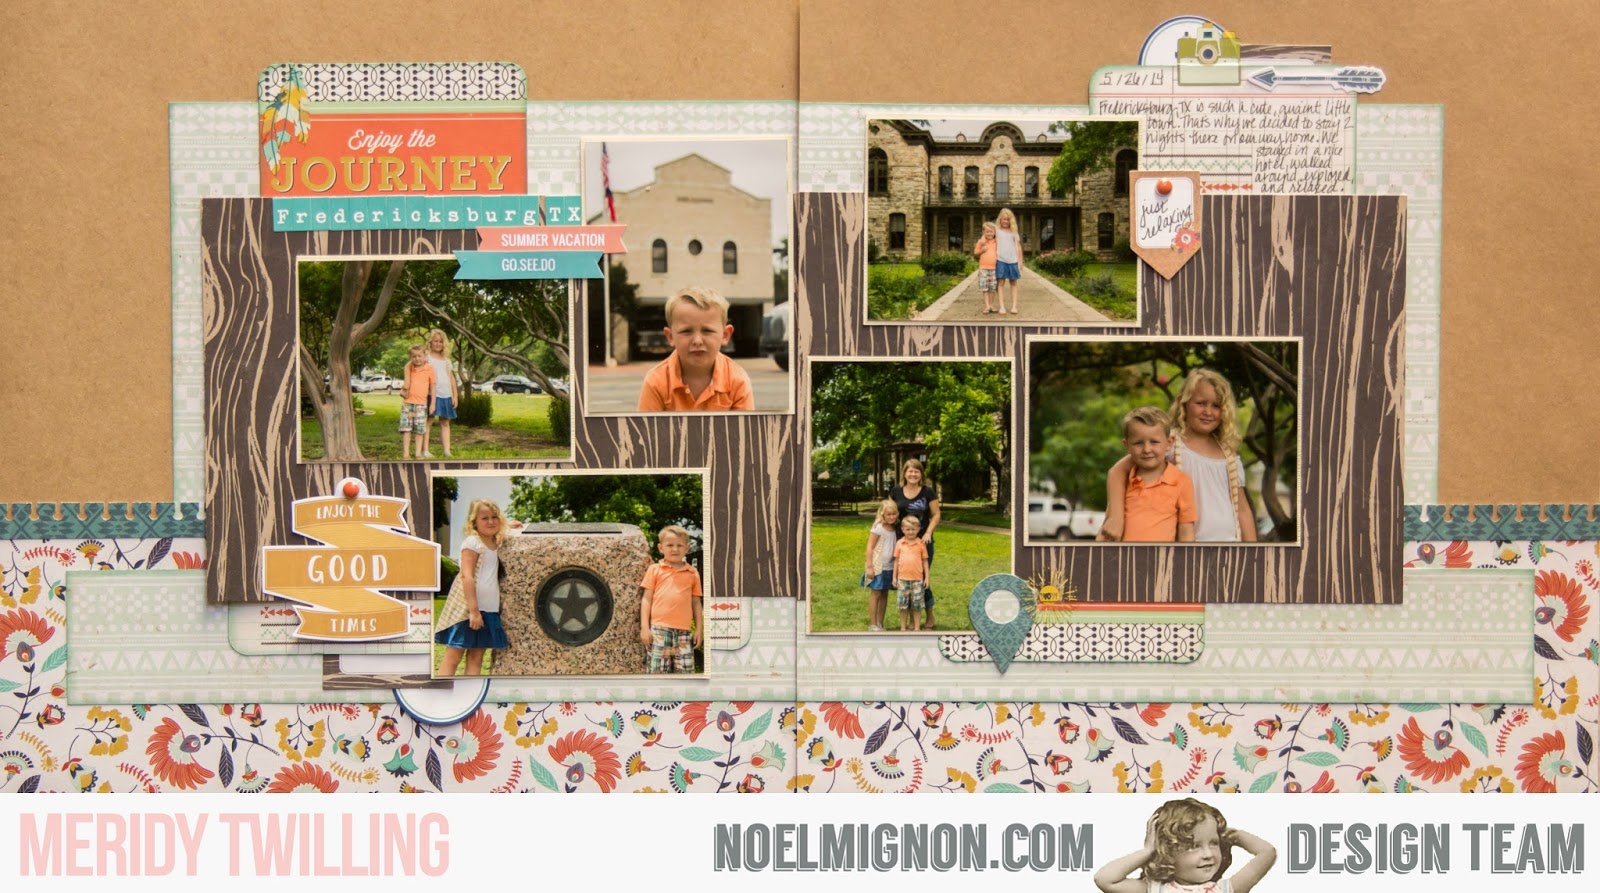
It's Meridy here with another layout using the "Trailblazer" Classic Kit.  This week's theme is "Here Comes the Sun"...so see if you can spot my hidden sun on this layout.   You have to look close, it's hiding!!!

I decided to create this double page layout using photos from a vacation to Texas in 2014.  I felt like the colors worked well with my photographs.


I loved the October Afternoon "Tiny Type" alphas that came in this month's kit.  I use them quite often in my titles, so I am always excited to get a new color.  The teal in this month's kit was beautiful and versatile.  I also took advantage of the Elle's Studio cut apart banners.  They give an added little pop of color when I need it.  On this page I used the "Summer Vacation" and "Go. See. Do." banners.


I added one of the brad/die cut combos in this corner of the page along with an October Afternoon label sticker and a few rub ons to create a small embellishment cluster.  I also decided to ink the edges of the lighter papers to make them really pop against the background.


I created my journaling on the right side of the layout and surrounded it by embellishments to draw your eye to it.  I think you can spot the "hidden sun" in this photo---it came from the MME rub on package that came in the kit.


This little green camera was my favorite rub on in the package, because I am a sucker for cameras!!!  I just love photography and taking pictures, so naturally, I am drawn to all things camera related.


Thank you for joining me today.  There are a couple more "Trailblazer" Classic Kits available in the store.  They work great for a variety of layouts including vacations, camping, adventures, outdoors, and boys, just to name a few.

I will see you tomorrow with another "Trailblazer" layout!!!