Showing posts with label sketch. Show all posts

Monday, March 5, 2018

{Disney Day 4} layout with the "You Go Girl" Classic Kit

Hello friends, it's Monday with Meridy.  Today I am sharing a layout I made with my new "You Go Girl" Classic Kit.  Before I even received my kit in the mail, I could tell from the photos of it that it would go wonderfully with my Disneyland photos.  And I was right!  I have already pulled photos for 6 Disneyland layouts to make with this kit...perfection! 

Today's layout was really inspired by a Stuck Sketches sketch, found here (the second sketch in this link).  The layout is of our 4th day in Disneyland, our Alice in Wonderland outfit day.


I started by pulling bits and pieces from the kit that really coordinated with the colors in my photo.  Then I went to the sketch to cut the banner background shape,the washi scallop across the top, and the small embellishment cluster placement on the upper left.


Next, it was time for me to start layering scraps of paper and washi strips under the photo, and pile on the embellishments.


My "day 4" title was a chipboard sticker that read "today", so I trimmed off the "to" part and it was perfect!  Adding embellishments went pretty quickly on this layout because there were so many beautiful ones that really matched the colors in the photo so well.


The butterflies were cut from a patterned paper in the kit, and I popped the wings up with pop dots, to add a little dimension.


I have absolutely LOVED working with this kit and my Disneyland photos this past week, I can't wait to share more of my creations with you over the next few weeks.

Thanks for stopping by!


Monday, January 1, 2018

{NYE 2017} with the "She's Crafty Classic Kit"

Happy New Year 2018!!!!!  It's Meridy here, and I have my first layout with the "She's Crafty" Classic Kit.  It's (fittingly) a layout of NYE 2017.  The colors in this month's kit are so bright and fresh, and they went great with my pictures of last New Year's Eve, so I decided to make a double page layout.


I used an 8x10 collage so I could include 10 photos on the right hand side of the layout and then focus on my 2 favorite pictures on the left side of the layout.


I started with this amazing teal patterned paper as my background, then added a few layers of patterned paper, photos, and a couple of die cuts from the kit.  I journaled a little straight on the label die cut.  I used a date and time stamp I had in my stash, and drew attention to it with the arrow stamp from the roller stamp in the "She's So Crafty" Classic Kit.


I wanted the page to really blend with the adjacent side of the layout, so I added the gold rub on "chains & beads" from the amazing rub ons from the kit.  I mixed the black Thickers with a die cut label and an acrylic word to create my title.


I loved this beautiful patterned paper that I used on the right hand side of the layout and KNEW it needed to be used for a celebration layout---what better than NYE!!?!


I added a few simple scraps, die cuts, and rub ons to this side of the layout in order to make the 2 pages coherent.  I sketched around the tab and sketched a little around some of the layers in black thin pen, and with that, I decided the layout looked complete.


Thank you for stopping by today.  Have a wonderful 2018!!!


Sunday, July 2, 2017

Project Life Cards from Sketches

Hey guys! This week we've had fun playing with sketches, and I decided that I'd like to make my own pocket cards using some sketches as inspiration! Below is my inspiration piece (and the link I found it on):


Using the awesome Dive In Daily Diary kit, these are the cards I came up with! 


If you haven't picked up this kit, you should grab it. It's my favorite summer kit I've used! I love the retro vibe and the West Coast summer feel. :) 


Thursday, June 29, 2017

Another sketch layout with the Dive In Daily Diary kit

Hello again!

I hope that you are enjoying the sketch layouts shared so far this week and that perhaps you have found some inspiration to create!

I did a Google search for sketches and found some great ones and decided on this one from Shimelle.com.  It is an older sketch but the great thing about sketches is that they can be pretty timeless. I really liked this one and the challenge that it presented for me to do a more simple page design.


This sketch design calls for a large photo on the lefthand side of the page. I opted to fill that space with patterned paper instead, and used a bit larger photo than the sample. One thing to remember about sketches is that you don't have to follow them exactly. Use them as a jumping off point to inspire your project. You can use them as-is, rotate them, change elements around to suit your preferences. 


I kept the title and journaling block on the right side of the page as in the sketch and instead of stars did some handcut hearts that I added to my page. Because I am down to the end of my Dive in Daily Diary kit, I made good use of the scraps I had left. 


The "love you" is cut from one of the 4"x6" cards in the kit. 


Because I am on a bit of a gold kick lately I added some gold glitter washi from my personal supply as well as some of the striped washi from the kit. 


I finished off my page with this cute flair and handwritten journaling on a 2"x3" card. 

Thursday, January 26, 2017

Adventure Awaits (Little Bird Classic Kit)

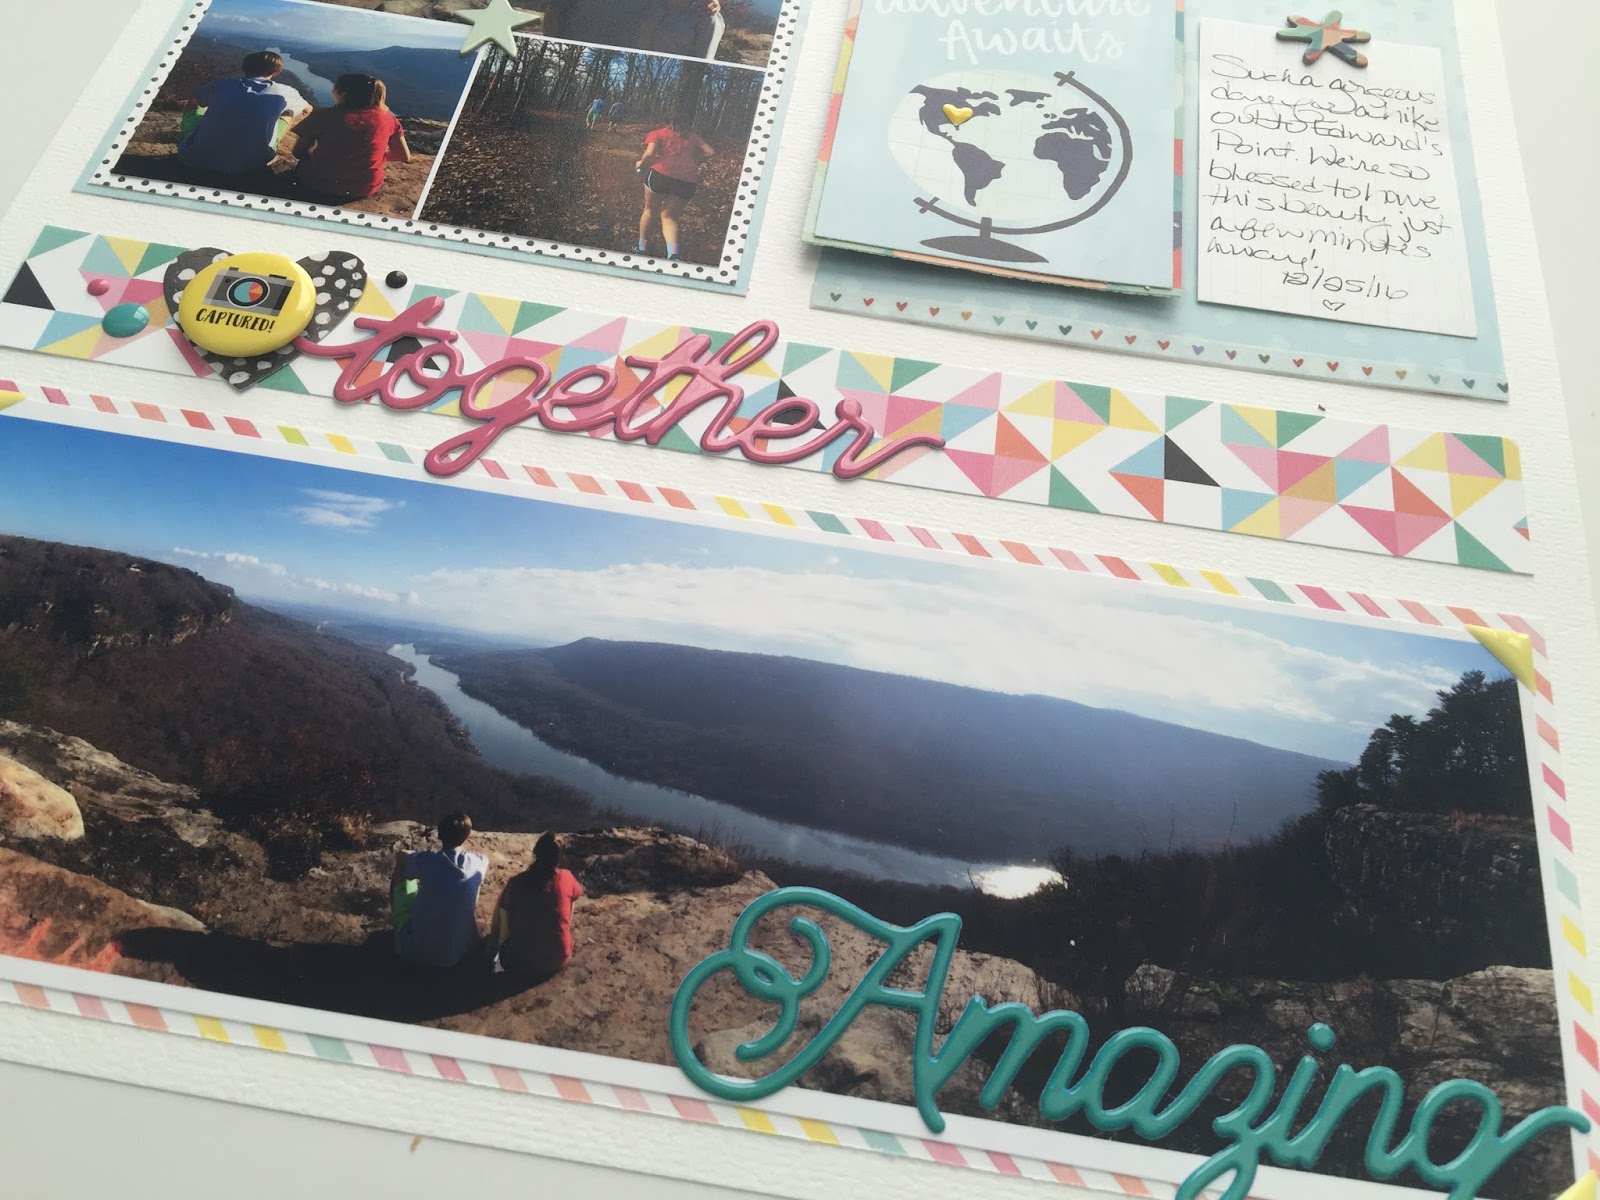
Hello, friends! Sherry here and today's layout is inspired by a sketch. We took a hike on Christmas Day and I had a beautiful panoramic shot that I wanted to include on my layout. As I was searching for a sketch, I made sure to look for one that would easily incorporate a panoramic photo. The following is the layout and the sketch I selected:
Since the photo has so many beautiful colors, I decided Fancy Pants Joy Parade (Wrap it in Color) would be a fun place to start. Even though the paper is really busy, it pops when using a small amount, such as the long strip in the center of the layout. The Fancy Pants puffy words were perfect for these photos. I can't wait to use more on another project!
I created a photo collage in PicMonkey to mimic the four squares on the sketch. Originally, I had planned to cut them apart but when I laid the photo down, I loved the way it looked, so I ran with it.
To balance the grid I cut a mat the same size and used it as a base for my journaling card and the fun globe from the Hazelwood paper. I also used the adorable heart washi tape from Hazelwood to border my mat.
If you're in a creative slump, a sketch is always a fun way to jump-start your creativity! As always, thanks for stopping by the blog today!

Monday, September 5, 2016

Sketch Challenge with the "Buttons & Bows" Classic Kit

Hello again, Meridy here with a couple of layouts to share with you using the "Buttons & Bows" Classic Kit.  This week the Design Team is working with a sketch designed by one of our talented designers, Laura Whitaker.  You can visit Laura's blog for more sketch inspiration at http://scrappinaroundtheclock.blogspot.ca/ and her Instagram at http://instagram.com/whitakerlaura.

I decided to create 2 layouts using Laura's sketch, pictured here.  


The first layout I created is a single page layout that mimics the sketch pretty close.  I decided to us the sketch as Laura created it, and you can definitely tell that the sketch was the inspiration of this layout.


Below are a few detail shots, you can see I've used the puffy stickers and ribbon from the kit as well as some of the die cuts.


I really liked the way the title turned out.  The puffy stickers in the kit worked well for this title, and the flair in the kit is super cute!!!


The next layout I created using Laura's sketch for inspiration is a double page layout.  I simply 
S-T-R-E-T-C-H-E-D the sketch out and used 3 larger photos to make this sketch work for a double pager.  Another option would be to use 6 smaller photos, instead of  the 3 larger ones.  


Here you can see each side of the layout in a little more detail.  I just loved the fact that the papers in this month's kit matched my son's "Wild Thing" photo shoot from earlier this year.


I fussy cut the words "WILD" and "brave" from one of the patterned papers to create my title and subtitle.  I used a few stickers, puffy stickers, and the roller stamp to embellish the title.


The leaves were the perfect addition to the layout, I twisted the "stems" around a toothpick to create the curly que look.


Thank you for stopping by!  Noel is giving away a Daily Diary kit to one lucky US resident.  All you have to do to qualify for the giveaway is create your own layout based on this month's sketch and put a photo of your layout in this  album on the Noel Mignon  Member's Facebook page.  Noel will draw a random name from the entries on September 30, 2016.    You must be a US resident to qualify for the prize, you do not have to use a Noel Mignon kit to create the layout (but I would love it if you did!!!)

Have a great week!!!


Sunday, September 4, 2016

Take Heart | Buttons and Bows Daily Details

Good Morning Noel Mignon friends!  Wendy here today to start the week out with some new inspiration.  This week we are having a sketch challenge for you to play along with.  I created this page using some leftovers that I have been hoarding from the Vintage Charm Classic Kit and some brand new pretties from the Buttons & Bows Daily Details kit.


And the sketch which we will be working with this week...


The sketch was created by DT member Laura Whitaker, you can find her blog at http://scrappinaroundtheclock.blogspot.ca/ and her instagram is http://instagram.com/whitakerlaura.

I chose to rotate the sketch for my layout.  Now a few detail shots...


And now the details...
Noel Mignon is offering a prize of the Buttons & Bows Daily Diary kit for one US RESIDENT ONLY.  One person who shares their layout on the September sketch album on our FB page will win, click here to load your layout.  You will have until September 30th to enter.


Tuesday, April 12, 2016

Let's Get Sketchy with the Trailblazer Classic Kit

Hello Tuesday and Welcome Bloggers. All this month the Noel Mignon Design Team is teaming up with Let's Get Sketchy, a fun sketch site with TONS of inspiration. I am a huge fan of sketches and have been on several sketch Design Teams. Sketches are a great foundation to build a page on. We are designing with two of Let's Get Sketchy sketches this month and here's the sketch I worked with.
Isn't this a fun sketch?! I can see myself using this one again! I used the last bits of my Picture Perfect Classic Kit for my page. I stayed true to the sketch except I substituted the sequins for the ink blotches. Here's my version of the sketch.
I filled the Maya Road Resin Frame with sequins and used it as a large embellishment.
I die cut two vellum circles and tucked them under the photo and patterned papers. I love the soft look of vellum and how the papers still show through.
Noel Mignon is the sponsor this month on the Lets Get Sketchy site. Noel is offering the "Trailblazer" Classic Kit as a prize ...
 ...so head on over to the Let's Get Sketchy blog for details on how to win this gorgeous kit!!
Thanks for stopping by today and I hope I've inspired you to try this sketch and enter in for a chance to win!!! Have a great week!!!!