Saturday, May 31, 2008
Thank you!
Just a quick little thank you to everyone who applied to be on the new Design Team! I have about 100 applications to get through over the next week, and if I haven't emailed you personally yet I will. But I wanted to let you all know how honored I am that so many of you would like to design here. I'm speechless at the level of work I have been getting...seriously fantastic stuff! THANK YOU!
Friday, May 30, 2008
Cotton Candy Kit!

Click photo to enlarge
It's a bit more than the previous kits (3$)...but this pretty baby is packed!! 21 pieces of PP alone!!
Kit includes the following:
Papers
Pink Paislee Office Lingo Collection
-Lunch Hour
-Outside the Box (Shaped)
October Afternoon Daydream Collection (double sided)
-Garden Chair
-Paper Lanterns
-Rain Boots
-Poppy Garden
-Patio Umbrella
-Freshly Mown Lawn
Crate Paper Blue Hill Collection (double sided)
-Grass
-Flower
-Rain
-Breeze
Basin Grey Cupcake Collection
-Crepe Paper
-Twister
-Confetti
Cosmo Cricket Honey Pie Collection (double sided)
-Megan
-Ella
Prima Tea and Silk Collection (double sided)
-Daigoji
Making Memories Noteworty Collection
-Addie DieCut Circle
Hambly Screen Prints
-Grandma's Wallpaper (cream)
KI Memories Lace Cardstock
-Bouquet Cosmo
Bazzill Basics Cardstock
-Sugar Cookie
-Mango
-Baby Pink
-Parakeet
-Kevin
Embellishments
-1 Sheet October Afternoon Daydream Journaling Cards
-1 sheet Cosmo Cricket Honey Pie Journaling Cards
-1 sheet Crate Paper Blue Hill Impression Die Cuts
-1 pkg Crate Paper Descriptions Rub-ons
-1 Fancy Pants Glitter Die Cut Circle Frame
-1 pkg Scenic Route Man/Woman chipboard shapes
-2 Fancy Pants crocheted Blossoms (color and size will vary)
-4 Fancy Pants Crush stick pins (colors will vary)
-12 BasicGrey Cupcake buttons (colors and size will vary)
-1 Prima Journaling #5 acrylic stamp
-1 American Crafts memory marker in Bubblegum
-4 assorted BasicGrey Cupcake brads
-2 Prima acrylic Bird shapes
-2 Making Memories velvet brads (pink and aqua)
-2 Jenni Bowlin felt butterflies
-4 American Crafts photo turns with brads in Tangerine
-4 Every Jot and Title Journaling spots
-1 pkg American Crafts Vinyl Thickers- Poolside
-1/2 yard of American crafts felt rick rack in pink
-1 yard of Prima lace in baby blue
-2 7 Gypsies Journaling Cards (Let's Celebrate! and Happy Everything!)
$40.99....click here to order!!
Monday, May 26, 2008
Fun in the Sprinkler

This is my take on the new Pencil Lines Sketch (#86). I used a bunch of stuff on this. The papers are all from the Tree house kit, except the mini Jenni Bowlin accent paper. This is my 8th LO using the papers from this kit, so make no mistake, you get a lot for your money in this kit!! I also used the new Sassafras Lass "In Stitch" buttons and blossoms! Oh, these are so much fun to play with!! I included a few ArtChix butterflies, a journaling circle and the Scrapworks letter stickers. Last but not least are the FABULOUS new American Crafts Glitter Thickers.... swoon! Thanks for looking and feel free to leave a comment....thanks! :)
Simple Stamping Fun
Stamps are a really fun way to make accents for your scrapbook pages and cards. Using just a black stamp pad and a few supplies you probably already have on hand, you can create several different looks with your stamps. And the best part is, you can customize the look of your image to match your project perfectly!
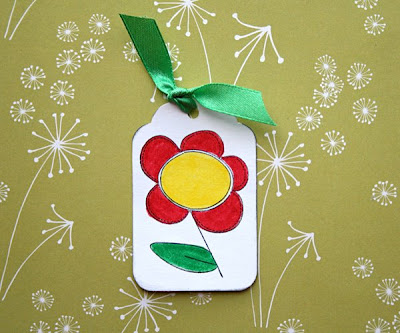
 Use COLORED PENCILS to color in your image. Yep! Your kids Crayola or Prang work just fine!
 MARKERS give a more vivid, bright look.
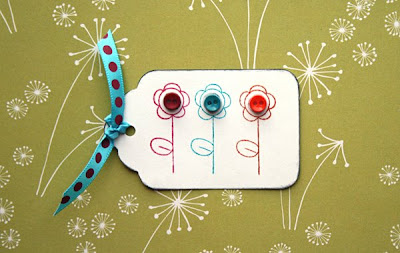
 You don't have to have several different colors of ink pads to get a colorful look. Try using MARKERS to ink up your stamp.
 This image was colored in using a combination of COLORED PENCILS and MARKERS. I colored in the image with the colored pencils and then used the markers to add bright doodles on top to add a little more depth.
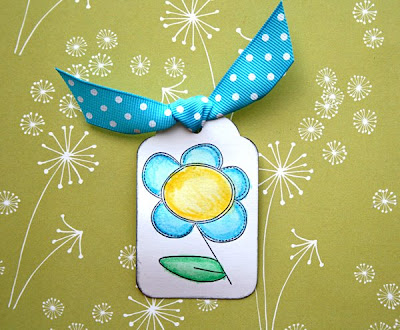
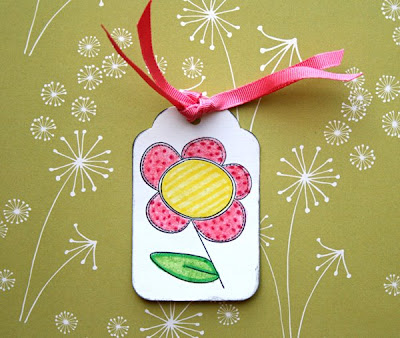 For a softer, more fluid feel WATERCOLORS are a great alternative. Be sure to use a permanent ink pad, like Staz On Ink, so that your stamped image won't run when it comes into contact with the water.
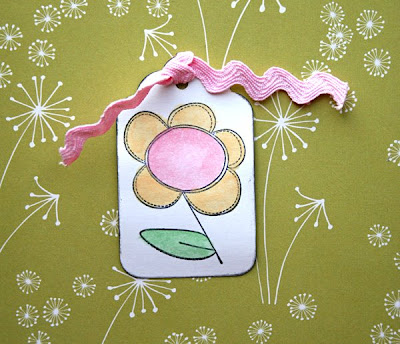 This image was colored in using WATERCOLOR PENCILS. These are found in an art store. I colored just the outer edges of each section and then used a paintbrush loaded with water to drag the color inward. This helps give the flower some dimension.
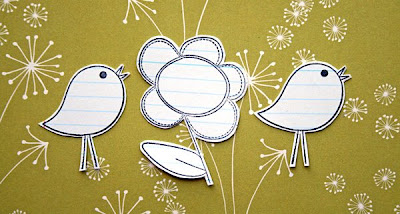
 Do you love the look of doodling? Try stamping your image onto NOTEBOOK PAPER. Cut out and apply to your page for a neutral accent. I especially love how it looks on boy pages. If your page has a lot of colors and patterns going on already, try using this technique to create a neutral accent.
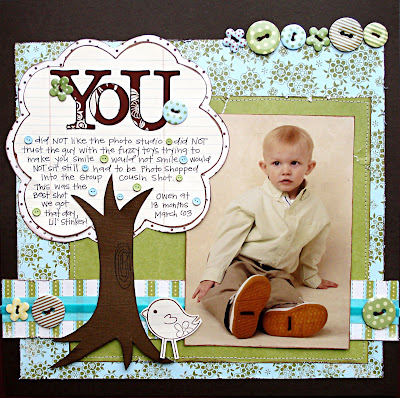
Or you can DOODLE right on top of your image! Stamp your image in light colored ink and trace right over the top. No one will ever know you didn't draw it freehand! :)
 STITCH over your stamped image for a handcrafted look.
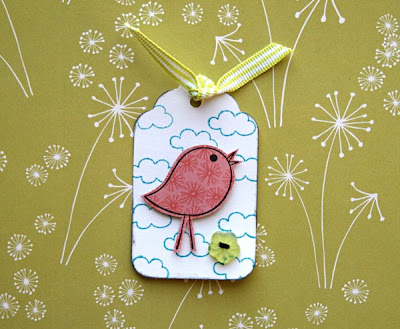
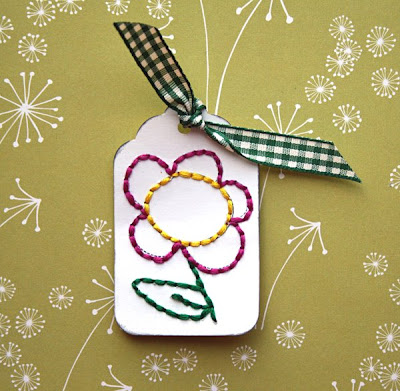 Don't know what to do with smaller stamps? Try stamping them several times to CREATE A PATTERNED BACKGROUND.
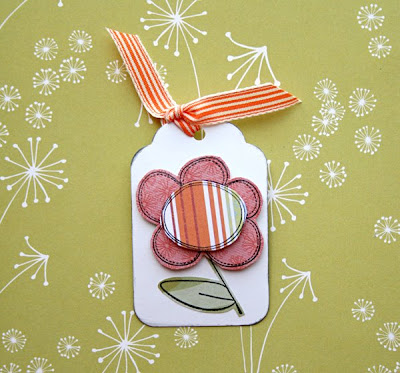
 I created this accent by stamping the same image onto several different PATTERNED PAPERS. I cut out each "piece" and layered them together using foam dots to add dimension.
 Try using the end of a border stamp to create grass. Here I stamped the image several times before reinking to create several different SHADES of green for the grass. Wouldn't this make a cute accent on a card? You can also ADD BUTTONS AND OTHER EMBELLISHMENTS to your images for additional dimension.
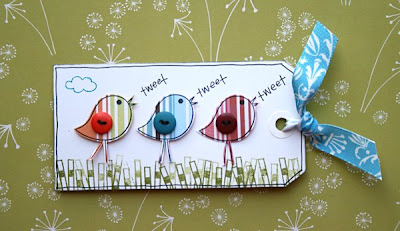 So, go ahead! Blow the dust off your stamps and try creating one-of-a-kind accents for your pages. It's a lot of fun!
Saturday, May 24, 2008
Memorial Day Sale!
Happy Memorial Day everyone! To celebrate the day, I'm having a 3 day sale over at the shop. Everything is 5-55% off!! New arrivals include the JUST RELEASED AC GLITTER THICKERS (scoop these beauties up!!), Sassafras Lass "In Stitch" cute stuff, Jenni Bowlin project kits, Making Memories Noteworthy II stuff, Prima acrylic shapes (CUTE!!), and the new SEI Chick a doo and Chick a dee! Also, I have all the new BG lines still available and the super cute Heidi Swapp butterflies are back in stock!!
Hope you all have a fantastic 3 day weekend! Yay, summer's almost here! :)

Hope you all have a fantastic 3 day weekend! Yay, summer's almost here! :)

Thursday, May 22, 2008
That Smile
So this is how my day has unfolded thus far, and it's only 2pm right this second. Got up, made coffee and scrambled eggs, checked email, got dressed, got my 6 year old dressed and brushed his teeth, made his lunch and took him to school. I let the twins go in their PJ's. Came home, finished my coffee, got the twins dressed and brushed, packed a box to ship, and then out the door to the store to mail out my box and get some much needed food for my family.
Got to the store, which offers free "play care" while you shop. It's the best thing in the world and I drive extra far to this store because they have a postal center and this free play care so I can shop in peace. So after getting the box on it's way I noticed we were to early to get into playcare....we had about 15 minutes to kill. So I let the boys pick out some fruit roll ups and then I found my way to the magazine isle to try and kill some time. Luckily it's right next to the toy section so I could browse without anyone hanging on me.
I found this!! And when I got home I unloaded my groceries, made the kids lunch, ate some myself, and then opened this up and got to page 14 before I found a sketch I wanted to do.

So then I spent an hour doing this! I realized it's perfect for the color challenge too! I used papers and the label from the Tree House kit. Ribbon is from SEI, chipboard from Heidi Swapp. I also used a random journaling spot and the edges of the Jenni Bowlin boy icon tickets.

Now off to pick this boy...who is now 6...up from school! :)
Got to the store, which offers free "play care" while you shop. It's the best thing in the world and I drive extra far to this store because they have a postal center and this free play care so I can shop in peace. So after getting the box on it's way I noticed we were to early to get into playcare....we had about 15 minutes to kill. So I let the boys pick out some fruit roll ups and then I found my way to the magazine isle to try and kill some time. Luckily it's right next to the toy section so I could browse without anyone hanging on me.
I found this!! And when I got home I unloaded my groceries, made the kids lunch, ate some myself, and then opened this up and got to page 14 before I found a sketch I wanted to do.

So then I spent an hour doing this! I realized it's perfect for the color challenge too! I used papers and the label from the Tree House kit. Ribbon is from SEI, chipboard from Heidi Swapp. I also used a random journaling spot and the edges of the Jenni Bowlin boy icon tickets.

Now off to pick this boy...who is now 6...up from school! :)
Scenic Route Providence LOs
Yes, I am now obsessed with this line of paper.
Thank you Noel.
Just a couple more pages made with the new Scenic Route Providence Collection.
 My son in all his glory, the rubons on the arrow are Scenic Route Boys will be Boys.

 I really love the way this page turned out.
I traced a butterfly from the raw chipboard butterflies and cut out 2. Then added some stickles to make it just a tad sparkly and mounted them one on top of the other, just at the center.
The top butterfly is slightly bent at the wings to give it more dimension and a piece of paper lace was used as the antennae.
American Craft Cjipboard Thicker Accents really made the butterfly stand out on the page.
Thank you Noel.
Just a couple more pages made with the new Scenic Route Providence Collection.
 My son in all his glory, the rubons on the arrow are Scenic Route Boys will be Boys.
 I really love the way this page turned out.
I traced a butterfly from the raw chipboard butterflies and cut out 2. Then added some stickles to make it just a tad sparkly and mounted them one on top of the other, just at the center.
The top butterfly is slightly bent at the wings to give it more dimension and a piece of paper lace was used as the antennae.
American Craft Cjipboard Thicker Accents really made the butterfly stand out on the page.
Wednesday, May 21, 2008
Color combo challenge

I did this one for the color combo challenge Jana is hosting over on the challenge blog! The papers are all MME. Felt florals, trim and big brads are from Creative Imaginations. Felt butterfly is from Heidi Swapp. And the saying and small tag are both available in the Tree house kit.
Monday, May 19, 2008
Just a quick note...
...to let everyone who is interested in the DT spots that your submissions do not need to be new, never before seen, stuff. It can be your favorites. I have had about 20 emails asking that so I thought I would make a post so everyone would know! Keep the entries coming....you are all sooooooo talented! I'm humbled :)
Sunday, May 18, 2008
Use those scraps!!
Thursday, May 15, 2008
Gone Fishin'

I wanted to try and get at least one more LO done for the "My guy" challenge. And I remembered these photos from last summer and they went well with the colors from the Tree House Kit. Almost everything is from the kit, except the magpie letters on the left, the JB rub on up on the top right, and the SEI Dill Blossom Ribbon
(LOVE THIS!!)
Wednesday, May 14, 2008
My Mini Garden
 Just a little garden I picked up at the Target $1 spot a few weeks ago. It's really the only garden that I can actually grow anything in!
There's a tomato plant, sunflower and even some chives popping up there.
I used the Scenic Route Providence line to create that little garden stake. The Scenic Route chipboard butterfly was perfect on the little craft stick.
And I used Making Memories boho chic mini letters as well.
The antennae is a piece from the KiMemories lace paper and I added a little glitter for a bit of sparkle.
Saturday, May 10, 2008
Mother's Day Special!!
Happy Mother Day to all the mom's out there! In honor of our special day I am having a 2 day sale. All older kits are 50% off today and tomorrow only! Come on over and grab a few to celebrate your special day!
Pen Stitching
There are a lot of reasons to give pen stitching a try. Maybe you don't have access to a sewing machine, . . . maybe you don't want to spend a ton of time hand-stitching something, . . . or maybe you want to create an intricate design or stitch in a space where a sewing machine head won't fit! That was exactly my scenario on the layout below.
I had already stitched some buttons to the layout when I decided to cut the background into a bracket frame shape. I wanted to give it some more detail and thought of outlining the edge with a black pen. But then I thought, "Wouldn't it be fun to stitch around the edge?!"
I knew it would be time consuming to follow the curvy edge. Also, I had buttons sewn close to the edge that would prevent my machine from making a decent stitch. That's when I decided to use pen-stitching. Below I'll show you how to make it look real!

First you want to go around the edge with a paper piercer. Pierce holes in even increments. It takes a little bit of time, but is well worth it in the end when you have a pen stitch that looks real!
 Next, use a pen to draw lines in between your pierced holes. Be sure to "follow" your stitch into the hole so the ink gathers a little bit there, creating your authentic-looking "stitch". Don't worry about them all looking the same. It will look more realistic if they vary a bit.
 When you are finished you have a stitched border that looks like you spent hours creating it!
 Here is another example of pen-stitching. You can create intricate-looking swirls and other designs! Let your imagination go wild with this technique! Have fun!
Friday, May 9, 2008
New DT call!
Hi Everyone!
I am holding an open DT call for 4 new DT members. This will be a 6 month run from July-Dec. The call will be open from today until May 31st. I am asking for 5 items from each entrant, 3 LO's and 2 cards. In addition I would really like to get to know a bit about you. What DT's you have been on before or presently, what MB's you frequent, do you have a blog, why you paper craft, how often, and what your "scrapping style" is.
A little about me....I am VERY laid back as far as assignments and deadlines go. The assignments usually go something like this "do 4 or 5 LO's sometime before the end of next month"...LOL. I'm basically chill. But I will be recruiting new members to help me come up with ideas for challenges and product input. There is a tips and technique blog that I ask additions to every month or 2. I don't have a MB so there is no requirement for daily posts...etc. There will be an addition of an online gallery to the site sometime in the next few months. But I have no plans for a MB, there are already a billion to choose from. I don't need to add another to fill your days with, or mine for that matter!
If you are chosen I will be sending out boxes of supplies to you every 2 months (3 total) with varying papers and supplies.
I will be announcing the winners on June 9th and the first boxes of supplies will be sent shortly thereafter. Please email your entries to me at noel@noelmignon.com and title the email "DT call", or better yet just copy and paste from blogs or online galleries so my inbox doesn't get fried from all the MB's coming through... :). And also...please try and keep the files on the smaller size...too big crashes my mail server.
So excited to get to know all of you....I know I have a lot of lurkers (at least 45 per day so my blog counter says) so I can't wait to see who's interested in joining the new team!
~noel
PS....work does not need to be new, it can be favorites of yours. Just so I can get a sense of the style of scapping you do. Thanks! :)
Wednesday, May 7, 2008
My Lil' Buster Brown
I think this photo of my little guy looks like those old ads of Buster brown, hence the title of this. The PP is from Pink Paislee and was in the Apple Blossom kit (sorry sold out). Embelli's include the new felt butterflies from HS, SEI green and blue puffy letters, imaganisce bling blossom, and a Jenni Bowlin rub on that I put on a small piece of hambly which is from the Tree House kit.

I really like how the rub on looks on the transparency. If you have never bought the JB rub on's don't hesitate, they are some of the best and easiest to use!!


I really like how the rub on looks on the transparency. If you have never bought the JB rub on's don't hesitate, they are some of the best and easiest to use!!

Tuesday, May 6, 2008
Even More Now

 Here's my page for the Guy Challenge.
I was so unsure about the new Scenic Route paper but Noel assured me I would be floored by the colors and prints and man, was she right!
I can't get enough of this paper now, I am using it like crazy. I used the Scenic Route Providence Line as well as the cool chipboard piece which I embellished with the little punched heart.
I also used the American Craft Chipboard Thicker Accents and this is another one of those must-have products right now, can I just say...the fact they already have adhesive makes me love them twice as much.
And those green letters are also Scenic Route, the paper pack came with Orange ones identical to these but I just had to have the green too!
What I truly love about the Scenic Route is how well all their lines seem to compliment one another so perfectly, making this some of the best paper around!
Monday, May 5, 2008
I Love This Man
The "My Guy" challenge that is currently going on over on the challenge blog was a personal one for me. I really needed to get at least one photo of my husband scrapped...lol! Anyway, this is done almost all with the Tree House kit (only 4 left!!!). I also added a sheet of the new MM noteworthy 2 journaling papers, a large SR chip circle, 1 MM metal sign, and a Jenni Bowlin heart ticket. Everything else is included in the kit.


Sunday, May 4, 2008
A Father's Love

I decided to have a little bit of fun with brads on this one using them to adorn each scallop of the green Bazzill. Most everything is from theTree House Kit. The brown cardstock, brads and flowers are from my stash.
Thursday, May 1, 2008
More Tree House Kit
 Tried a little hodgepodge of everything on this one! Everything is from the Tree House Kit except the number stickers, notebook paper, and thread.
Subscribe to:
Posts (Atom)


