Friday, September 29, 2017

Must Have Books: Study Guide DD Kit

Hi!  Sarah here with the best challenge ever...BOOKS!  If you all know me, you know I have a passion for books and reading.  I even have a YouTube channel dedicated to books.  I love reading and sharing the books I love (and don't love sometimes).  I adored this challenge and wanted to do a layout about just wanting to buy all of the books all of the time.

 
I had a friend take some pictures of my with some of my favorite books of all time.  It was the perfect way to use this kit!  I used up a whole bunch of scraps from papers that I used on other layouts.


I loved layering the papers behind my photo and used up some of the die cut labels and a Freckled Fawn chipboard piece.


The Jillibean Soup bookshelf paper and library card paper were just begging to be used on this layout.  Those two papers are my life!!!  I loved cutting them into strips to really maximize the use of them.  The labels on the Echo Park sticker sheet were perfect to just tuck behind my layers to add a little something extra.


I really love how this layout came together and the Thickers were just perfect.  I paired them with some Teresa Collins tiny alphabet stickers (from my stash).

Thanks so much for joining me today.  I just love books and I love scrapbooking about books.  This kit just spoke to me!  

Don't forget to add your layouts to the FB group so we can see them!!!


Thursday, September 28, 2017

Must read all the books!

This week's designer challenge is to make a layout about school, books, etc. 

Because my girls are bookworms I have a few pictures of them while reading ☺

The layout below is actually the first layout that I created this month with the Study Guide Classic kit, but because it was for this week's challenge I have been saving it to share it with you this week.

When I saw the cute Jillibean Soup book paper I knew that I wanted it to be a focal point on my page. I cut around the books to help them stand out at the bottom border. I used the library card paper to add more color to the upper part of the layout. I also used some of the cute alphabet ribbon to carry on the book theme. I added two fabric pennants to the top of the page with my tiny attacher stapler. 


I used one piece of the library card paper to back the cute apple diecut. I then added some labels and other stickers and embellishments to the page. 


I finished off my page with cork stars and colorful alphas. 

Thanks for stopping by! 

Wednesday, September 27, 2017

Back to School pages

I cannot believe we're at the end of September already! This month has just flown by. And with Halloween and all of the festivities that go along with that I know October is going to do the same.

With the end of the month fast approaching, I wanted to finish up some back to school pages. My kids change so much over the course of the school year and I want to make sure these memories are documented. 
I've created a back to school layout of my son using the papers from the Study Guide Classic Kit along with embellishments from the Daily Diary Kit (there's still a few of these left!)
One of my absolute favorite items in the Daily Diary Kit, aside from the AC thickers, are the Jillibean Soup cardstock stickers. I've used those stickers on just about everything! 
I also created a pocket page for my family scrapbook of the first day of school with some of the photos I hadn't used on other layouts.
That apple flair I attached on the outside of the page protector to keep the plastic from bending around it. 

Now I just need to create one more page of my oldest daughter's first day of school!

Tuesday, September 26, 2017

First Day with the Study Guide Classic Kit

Happy Tuesday!  I hope you are all having a fabulous week so far.  It's turned chilly here in UT the last week and although fall hit us hard, I personally am enjoying the much cooler temps and the leaves beginning to turn.

I have this week another layout of my boys.  Every year on the first day of school I make them pose on the doorstep before they head off.  The oldest isn't always happy, but he still cooperates.  


As we start packing for our move I have quickly learned what my go to tools are and what I can actually live without.  I have to admit though that I miss my Silhouette and had to instead hand cut stars from the orange pattern paper.  I went a little old school and even pulled out the AC marker from the kit and outlined them to make them stand out against the stars in the background.

It was refreshing to only use items to the kit and it made me have to get a little creative with odd shaped pieces of pattern papers that I had left still in the kit.

I thought by now that my house would be all packed up and ready to move, but I am actually really grateful that I have been slow to pack up my computer and a few of my crafting supplies.  I have used it as a way to escape a little of the madness.  I have my "emergency supplies" ready to go though and I will soon be creating with my freshly opened October kit in our new/old house! :) 

I hope you are fairing well wherever you live and are able to spend some time creating.
Happy Scrapping!


Monday, September 25, 2017

{My Boys} with the "Study Guide" Kits

Hello, it's Meridy here today.  I have one more "first day of school" layout to share with you using the "Study Guide" Daily Diary Kit and paper add on.  This layout is a bit more masculine, since it's starring my "boys".  


I really love the 3x4 cards that come in the Daily Diary kits, they are perfect for adding lots of layers, colors, and patterns to my layouts.


I also LOVE that all of the Noel Mignon kits are so versatile, I used a couple of tags from past kits to add a little more embellishment to this layout.  Instead of doing a multi color title, I decided to use all of the same color navy Thickers from the kit for my title on this layout.  I thought the navy color really worked with the colors in this masculine layout.  


That wraps up my layout for today!  Thank you so much for stopping by.  Have a great week!


Friday, September 22, 2017

Small Town Bar: Study Guide DD Kit

Hi!  Sarah here with another layout using the September Study Guide daily diary kit.  This week I'm documenting a small bar that is in our small town.  My girlfriends and I decided to go check it out one night and as we sat down, we took a fun little picture of us being a little nervous about going to a new place (spoiler alert: we had a blast!).


I really like the ombre paper and the effect it makes on the page.  I kept everything centered so you can really see that paper.


I didn't have an "R" in the Thickers, so I used a "P" and added on a piece from another letter to make the R work for me.  I loved using the layers above the title.


There was a piece from the cut apart sheet that had "Let the ADVENTURES begin" and I just loved that for a spin on this topic!  I used two stickers from a sticker sheet that were intended to be labels or banners and used them as layers under the photo.


I loved being able to use the globe on this layout.  Even though it's not a travel themed page, I used it since we were going to a certain place.  It worked nicely!

Thank you so much for joining me today!  We would love to see how you're using your September kits, please post them in the facebook group so we can see them!


Thursday, September 21, 2017

Last fall in Ruidoso

One of my favorite quick trips is to Ruidoso, New Mexico.

It's only a few hours' drive from us and is a nice breath of fresh air (quite literally) and such a beautiful and peaceful place.

We traveled to Ruidoso for a gymnastics meet for my oldest daughter and rented a cabin to stay in while we were there. I took advantage of the beautiful surroundings and got some new pictures of my girls there.

Looking at this picture of my kids at a park in Ruidoso makes me a little antsy to head back to those forested hills.


I used a variety of papers from the Study Guide Classic kit, stacking the strips on top of one another and then added that cute ruler sticker. I tucked a little tab sticker under my photo to add my date. 

The kit is great for back to school but the beautiful floral I thought was perfect for fall and goes well with my photo. 


I once again used my black Sharpie on the chipboard alphas to get the look I wanted for my page. 

I added some cardstock star stickers and a couple of beautiful paper flowers from the kit. 

The Jillibean Soup paper with the library cards was a sheet I used on a few projects. I like how it adds just a little more color to my page, but in small doses. 


It's the last day of summer. 

I hope that it's a great one for you!


Tuesday, September 19, 2017

Home with the Study Guide Classic Kit

Our lives are about to get a little crazy around here as we close on a house and move.  Like all good scrapbookers I decided to document a few of our thoughts on this new journey we are beginning.


I started first by cutting a house shape from the floral pattern paper.  I filled the heart shape cut out with stickers from the Pink Paislee Turn the Page stickers.


I used a combination of the Pink Paislee stickers and the chipboard thickers to spell out my title.

Once I laid everything out I decided to make the house die cut stand out a little by outlining it with the American Craft marker.  I then finished my layout off with strips cut from pattern paper, the bird die cut, and the paper florals.

Thanks for stopping by the blog today.  I'm off to go pack some more boxes and prepare for the big day that is fast approaching.  :)

Happy Scrapping!


Monday, September 18, 2017

{DSMS} Layout with the "Study Guide" Kits

Happy Monday!!!  It's Meridy and I've got a single page layout to share with you today using the "Study Guide" Daily Diary and paper add on kits.  

Today's layout is grounded on this great "falling star" patterned paper from the kit.  I absolutely LOVE the wavy phrase paper by Pink Paislee too, but I like it better in small doses, so I cut one strip and placed it across the bottom of the layout.  Next, I built up my photos, a few layers of patterned paper, cardstock scraps, and a tag from the kit.


The embellishments in this kit were amazing, I especially loved the layered paper clips.  I mixed them with a few chipboard pieces on the left hand side of the layout.


And, of course, I had to use my favorite Thickers from the kit to create my title.  They are just so cute, I have to use them on EVERYTHING. 


The final step in creating this layout was to add a black outline to each layer with a journaling pen.  I thought this made the layers and various patterned papers pop a bit.  


Thank you for stopping by today!  I would love to see what you've been creating with your Study Hall Kits on our Noel Mignon Facebook Members page or on Instagram #NoelMignon.  Have a great week!!!

Friday, September 15, 2017

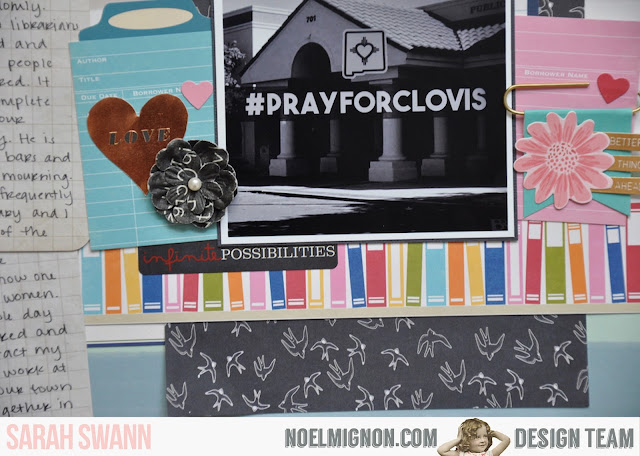
Pray for Clovis: Study Guide Daily Diary Kit

Hi!  Sarah here with a layout focusing on our challenge this week: Creative Writing.  This week we are working on telling a longer story and stories that we have a lot to say about.  For this one...it was hard for me.  The story I was telling was not only a tough story, but it's fresh.  I do tell the whole story on my YouTube channel, you can watch that here if you want the whole thing.  But, basically we had a pretty bad tragedy happen at our local library here in town involving a mass shooting.  I wanted to talk about it soon after while my thoughts and feelings are fresh, but it was a tough one.


I wanted to keep this one a little monochromatic with a little color.  I used the beautiful Pink Paislee grey and blue stripe paper as my background.  Since it is about the library, I wanted to bring in the bookshelf paper from Jillibean Soup and cut a couple of library cards from Jillibean Soup paper to use around the picture.


I used the Fancy Pants black and white bird paper, along with the label card to record the date that the event happened.


I cut out a heart from a Project Life card and added a black flower.  The paperclip with the flower was great because the sentiment on it says "Better Things Ahead," which is exactly what we as a community are trying to focus on.  Also, the "Infinite Possibilities" sticker from Echo Park was perfect here.


My journaling was long and I spread it across three Project Life cards from the kit.  

Thanks so much for stopping by today!


Thursday, September 14, 2017

Using patterned paper for journaling

Hello again!

For our designer challenge this week we were supposed to make journaling the star of our project.

There are many ways to add journaling to a project. You can use hidden journaling on a card behind your photos. You can handwrite it, type it, use stickers or phrases on pocket cards.

There is a piece of Pink Paislee Turn the Page patterned paper (Paper 14) in the Study Guide Classic Kit that I used for my journaling. I handcut strips from that page, which added visual interest along with lots of journaling. I also added handwritten journaling to my page as I usually do. The papers, though, said exactly what I would say to my daughter about her recent gymnastics experience.

I added cork stars to each strip of journaling to add some texture to the page and a bit of contrast to the bright colors.


I love the colorful papers in this kit and they were the perfect backdrop of the black and white photo of my daughter. I used the small gold alphas from last month's kit to create my long layout title. 


Here is one more close-up of my page: 


Thanks so much for stopping by today. 

There are many ways to incorporate journaling into your project- just make sure to include some. I forget the little details sometimes, so I love adding info to my pages. 


Share your journaling projects with us on the Noel Mignon Facebook page. 

Wednesday, September 13, 2017

Waiting

Hey all and happy Wednesday!!! This week the design team is focusing on the journaling on our pages. Now I will admit that I'm not a big journaler. Most times I stick to the facts, add a personal line or two, and that's it. This week I pushed myself to do a bit more journaling and I'm pretty happy with the result!
I used the Study Guide Daily Diary Kit to create my layout along with the papers from the Study Guide Classic Kit. For my journaling I grabbed some of the cards from the daily diary kit and tucked them under my patterned paper.