Thursday, March 19, 2009

Wedding Cake Challenge Layout & Quote Book

Here is the layout that I created for the current Wedding Cake Challenge!


Ironically enough, I always seem to stumble through my own challenges. LOL! This one was no exception, but I like being pushed out of my normal "routine". I mean, . . . isn't that what a challenge is supposed to do? :D

I used papers by Jenni Bowlin, Graphic 45, Pink Paislee and Making Memories. The pink flowers are from the dollar store. I added bits of glitter here-and-there to dress them up and to match the other glittery embellishments on my page (3-d stickers by K & Co.) I like that the glitter is hinting toward the sugar of the cake! ;)


This is another project I made this week. I've been wanting to make a little book to keep my favorite quotes in. I used a mixture of the Homeroom kit (sold out) and the Extra Credit kit (only 3 left!). I used a binder punch (by Stampin' Up) to punch all the random journal cards, etc. that I had left over from the kits. Then I used the other bits and pieces to decorate the pages. I really LOVE how it came together! It's fun, a little crazy looking, and the perfect size to leave next to my computer. Have a great weekend!

Moving....

So our family will be moving in less than 2 weeks. We are very excited to be in a new place - but less than excited to be paking ALL of our things up. I decided to make our address change cards. I used bits and pieces of the Nightingale kit. These were so easy and fast to make. To make the house stand out a bit from the bird I used some versaink to stamp a watermark pattern on it.


And of course my layout for the super fun challenge that we have going on. I took a literal interpretation of the cake ---- so fun! Check it out here.


That's all folks!
Michelle

Wednesday, March 18, 2009

Tea Party

The second I saw the inspiration for our current challenge, I was intrigued by the shape and the "unbalanced" look that the cake had. I knew I wanted to mimic it, and I played around with several different ideas until I settled on doing a playful cake paper piecing on my layout.
I used some fun new Cosmo Cricket Girl Friday papers and lots of Stickles! Each layer of the cake is outlined with Stickles to make it look like frosting. How fun would this be to do "cupcakes" like this too?

Thanks for the fun challenge, Jana & Noel!

Tuesday, March 17, 2009

Some Random Stuff!

Happy Tuesday everyone! I wanted to share a couple of LO's that I did a couple of weeks ago. I still haven't scrapped all of my Christmas photos.....so I am trying to get them done. I take so many darn pics......that it takes me forever to get them all in albums. Anyway, this was a picture of my niece and nephew looking at the windows on Michigan Avenue in downtown Chicago. They were quite fascinated with them! I love that you can see their sweet reflections in the window! I used Noel's Winter Weather kit. (Except the large snowflake.....which was actually attached to a present I opened......and the letters)


This next LO features my cutie pie pup, Skippers playing in the snow. He is pretty photogenic isn't he? I used Noel's Nightingale kit with a bit of vintage book paper from my stash and the journaling card. I love the background paper......it is actually flocked! : )
Have a wonderful week!

Sunday, March 15, 2009

Photoshop Tip

Ever have a picture that would be perfect if it didn't have such and ugly or distracting background? or ever have a picture that you want to highlight something in it while minimizing the view of the rest of the photo? Well here is how you do it.

Now i am using PSE 5 but the instructions should still be pretty much the same.
Now i know it looks like a lot but trust me...this can be done in a matter of 5 minutes. I just did every step to show you without missing anything. it truly is only about 3 major steps. So don't feel overwhelmed.

here we go: **note** you will probably have to click the pics to enlarge it..this was the best i can do. grrrrr!!!!

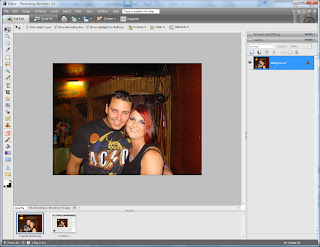
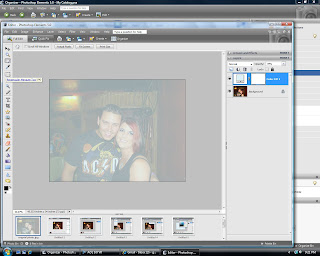
This is my original pic


Step 1:

Open your photo. And make sure when you hit the edit button you are on full edit see the top left hand corner?


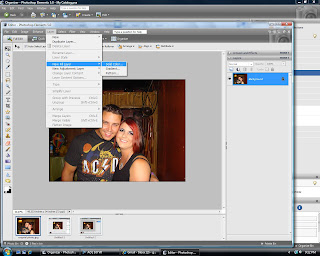
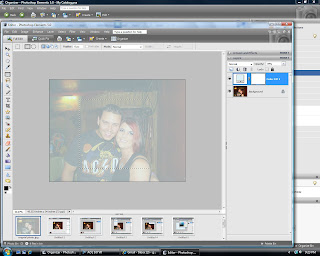
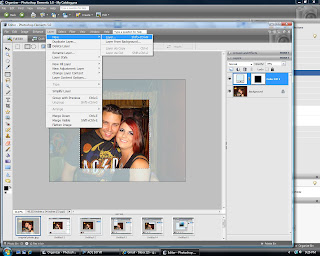
Go to Layer > New Fill Layer > Solid Color to create your photo overlay.


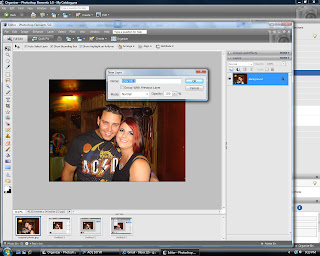
Click OK to create a new layer titled color Fill 1.


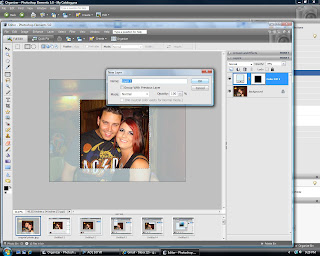
The color picker tool will appear. Select the color you would like your overlay to be and click OK.


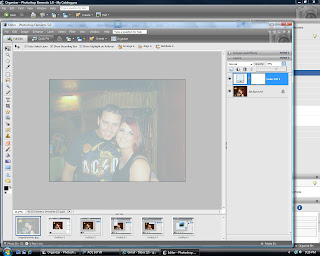
Your photo will fill with the foreground color you chose.


Slide the opacity slider at the top of the layers palette (top right hand corner) to about 50% ( i used 70% for this picture) You should see your original image to show up underneath the color overlay. Adjust the opacity to your likings.


Select the Rectangle Marquee tool if you want square or the elliptical if you want oval or round. While holding down the shift key, draw a circle or square (whichever you choose around your photo's focal point. make sure the box in the lower left corner that has a black and a white square that BLACK IS ON TOP..if it is not hit the "d" key to change it.

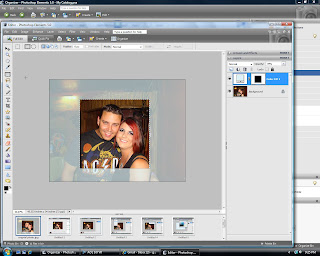
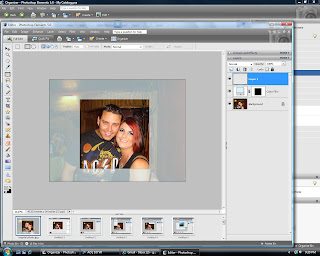
go to Edit > Fill Selection. in the fill dialog box choose foreground from the dropdown list and click ok. Mine is already done like this so i didn't have to change anything. You should see the overlay within the selection disappear, revealing the photo underneath. DO NOT deactivate this because we will be using it next. Your screen should look like this

now go to Layer > New > Layer

click ok.

Now your forground color should now be White. If it is not white click "X".
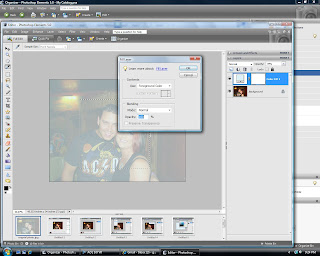
Go to Edit > Stroke (outline) selection.

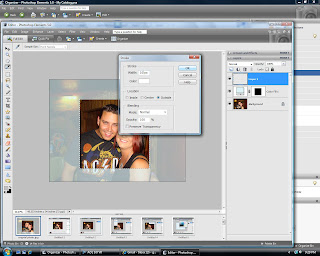
In the Stroke dialog box type 10 pixels for the width.

Click ok and print as you normally would do. You can flatten your image if you want to save a copy of the picture you just created.

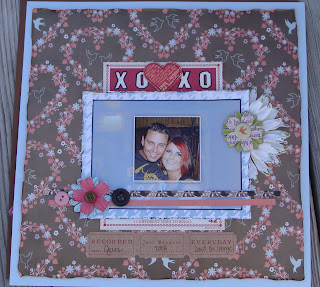
This is my final layout i did. What i actual did for this was printed 2 pictures just alike. I cut the box out of one picture and adhered it with pop dots to the other picture for more dimension.


Any questions feel free to shoot me an email (greta(dot)adams@gmail.com and i will try and help you.
have fun and I would love to see what you do using this tip!

More Nightingale


If you haven't picked one up yet head over. This kit has been soooo fun to play with. I have been using it for boy or girl and also very vintagy!

The 5 things in 5 months layout is for the new prompt up at Forward Progress.

The layout of me and oneil was an Inspired Blueprints sketch...i think #9...that pic of us was taken 3 years ago...time is flying by!!

See you next week with some more from this fab kit.