Wednesday, December 12, 2012

Sketch Time!!!

Photobucket

Just a few days away from the middle of the month . . . time for a new sketch!!!  Hope you will all be able to jump in & play along!!!

Photobucket

I dove into my December Glad Tidings kit & started creating!!!  This kit has so many beautiful patterned papers - a great mix of traditional & non-traditional colors.  I snapped this pic of my son after one of his recent "ho, ho, ho" sessions :)  He only has a handful of words he says on a regular basis, and "ho, ho, ho" is one of them!!!  It's so cute to hear his little voice chant it over & over :)

Photobucket

I LOVED the glittery red alphas for my title work, but decided to "dress them up" even more by adding some festive brads in the center of the "o's" and switching out one "o" for the "merry, merry" flair.  In the bottom right hand corner, I clustered up all sorts of fun stickers & chipboard found within the kit.

Photobucket

Are you ready to jump in and try out this month's sketch???  Grab your scrappy goodies & get started :)  Your entry to this challenge is due January 4th.  Typically the challenge runs for about 2 weeks, but I am adding in an extra week because of the holidays.  The sketch thread will be up later this afternoon in the forum.  Once you have completed your entry, be sure to post your entry under the December Sketch Challenge thread.  One lucky participant will be randomly selected to receive a $10 gift certificate to the Noel Mignon store!!!  Looking forward to seeing what everyone comes up with - Happy Wednesday!!!

Tuesday, December 11, 2012

Quick & Easy Holiday Home Decor


Hello, Hello! Are you enjoying the holiday season? I have been crafting up a storm and can not quit making framed art for my home. I have two pieces to share with you today, both can be whipped up with items from your kits in about 30 minutes per project. These are perfect for decking the halls in your own home or would make a wonderful gift.

This first one was made using the velvet trim in the Boardwalk kit and the Carta Bella Brads in the Glad Tidings kit.

To create the tree, I trimmed the velvet trim into strips and laid them out into the shape of the tree. I used the brads as ornaments.

The Merry Christmas was added using a Lettering Delights font and the sketch pen feature on my Cameo.

Who likes the movie "Elf?" This next piece was inspired by one of my favorite quotes from the movie and a free printable that I pinned from Pinterest.
Using my Silhouette software I typed the words in various sizes and font and then cut it out on my Cameo. Next, I backed the words with patterned papers from the Glad Tidings kit.

Would you like to make your own "Elf" Subway Art. You can download my cut file right here!

Have a great week! Make it a crafty one! :)

Monday, December 10, 2012

Monday 2 For 1 Post


hello everyone! happy Monday!
 
I accidentally missed my post last Monday and I apologize!
So because I did... today I'm doing a "2 for 1" post.
Meaning...I have 2 things instead of 1 to share with you today!
I hope you enjoy:
 
Both layouts are made using the December's Glad Tidings kit.
 
First up is:  Photo Shoot -

this was So fun to do. I enjoyed every bit of this kit. especially the Studio Calico mask.
Noel added some FUN stamp markers & instead of using the usual mist or paint that I use
for a mask - I decided to color some of the stars from the mask.
My kids are always obliging me with photo's... I love them!


and the next layout:  You've Been Framed:

My sweet boy - allowing his mom to not only shoot him (take a pic)
but also frame him  - ha!
 
Here I had the best time using the Basic Grey banner going down the side of my layout
and tying it all together by taking some jute & free forming a whimsical shape with glue at the
bottom to "frame" out my entire page. 
 

and just a little journaling to end my page creation..
 
I hope you've enjoyed this post today!
Make it a GREAT week!
Merry Christmas!


Friday, December 7, 2012

Easy Snowman Magnet (with free Silhouette files!)


I saw this on Pinterest a while back, and while she made hers into pins to wear, I wanted to do some little magnets for our fridge! 

I did a test run with my Mom's Day Out class earlier this week and just loved the results. I had the kiddos help draw the little faces and glue on the pieces. It was a simple craft they could do but it ended up looking really cute.

The trick with these is to use glue dots! It makes it fast, easy, and clean! 


Stickles add a little dimension and sparkle. 


And look how cute he is when he is lit up! 

I made some Silhouette template files for this, however, I have no idea how to share them on here for you to use. If you would like the files for cutting out the face, hat, and scarf for the tealight snowman, just send me an email at 2blackflipflops@gmail.com and I will send it to you! :) 

Wednesday, December 5, 2012

Wonderful time of the year . . .

Photobucket

I LOVE this time of year!!!  There is so much I enjoy about the holiday season but what I treasure most is the traditions we have created within my own family.  Growing up my parents were big on traditions & continue to be so even now.  To be able to share these with my own children & create new ones of are own is such a gift!!  Each year we head over to a nearby nursery that sells Christmas trees.  I used Noel's Glad Tidings kit to document our trip there . . .

Photobucket

The kit has such a wide array of gorgeous patterned paper that I layered up but I REALLY enjoyed playing around with the title work.  I used my Silhouette to cut out the layered "wonderful" and topped the "o" with a chipboard star & decorative circle by Carta Bella.  Such a fun accent!!!  Below I added the rest of my title using the adorable scrabble tile letter stickers within the kit.

Photobucket

Whether you are working on your December daily albums or simply your everyday albums - make sure to take some time to document those special traditions your family does year after year.  Such fun memories to scrap!!  Thanks for stopping by :)

Tuesday, December 4, 2012

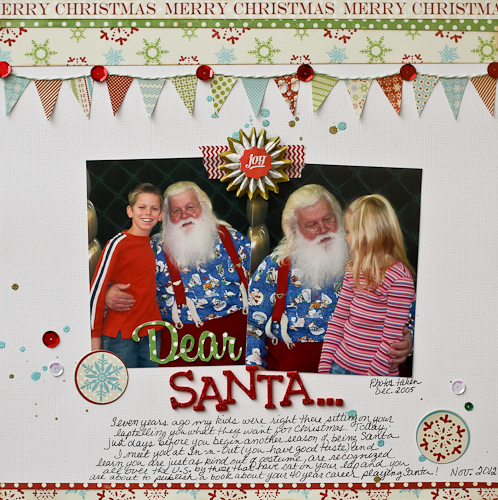
Dear Santa...


The years when my kids wanted to sit on Santa's lap have come and gone {insert sad face here}, but something interesting happened right before thanksgiving...we saw Santa at In-n-Out right late one Friday night after a football playoff game. THE very Santa that my kids told what they wanted for Christmas so many years ago. So, when I ran across these photos of my kids sitting on his lap, well, I had to tell the story of our meeting with the off-duty Santa.

The journaling reads: Seven years ago my kids were right there sitting on your lap telling you what they want for Christmas. Today, just days before you begin another season of being Santa I meet you at In-n-Out (you have good taste) and learn you are just as kind out of costume, are recognized all over the U.S. by those that have sat on your lap and you are about to publish a book about your 40 year career playing Santa!

He really was one of the best Santa's that we had while the kids were growing up so it was fun to meet the man behind the beard (well, it was real but you know what I mean)!


Every thing used to create this layout is from the Glad Tidings kit, except for the twine on the banner which is from the Student Council kit. The Glad Tidings kit is sold out now, but if you missed out you can pick up a Glad Tidings paper only kit, which is pretty amazing too. Seriously, amazing colors and prints...you won't be disappointed!

What kind of stories will you be telling with your Glad Tidings kit? I can't wait to see...post them in the forum!

Friday, November 30, 2012

Countdown to Christmas- December Planner


Tomorrow is the 1st of December! Can you believe it?! Are you ready?

I'm not... but I'm trying to be better prepared. Today I want to show you one of my little tricks for (hopefully) keeping me better prepared and organized for Christmas this year. 

I bought a Pink Paislee Portfolio album from Noel a few months ago, and saved it for now. (She's out of stock on it right now, but she has several other albums that would work well!) 

I decorated the cover with the Glad Tidings kit (sold out except for the paper only pack- which is still pretty dang awesome.)


On the cover, I used one of the beautiful designs by Rhonna Farrer for My Mind's Eye. Because my album is smaller than 12x12, I cut part of the design off of the rest of the page and incorporated it into this part of the design because it was all so lovely! (You can see it in the little bird & "all is bright" tag below.) I love that this album has a protective sleeve around the outside.... normally I would take it off, but because I plan on carrying this album around with me, I'm keeping it on to help it be sturdier.


I used one of the inside photo sleeve inserts to make a quick little cover sheet. I may add to this... I don't feel like it's quite "done" yet. Or I may leave it. We'll see. I did put some sequins in one clear pocket and then tape it shut with decorative tape. I love that fun little element! 


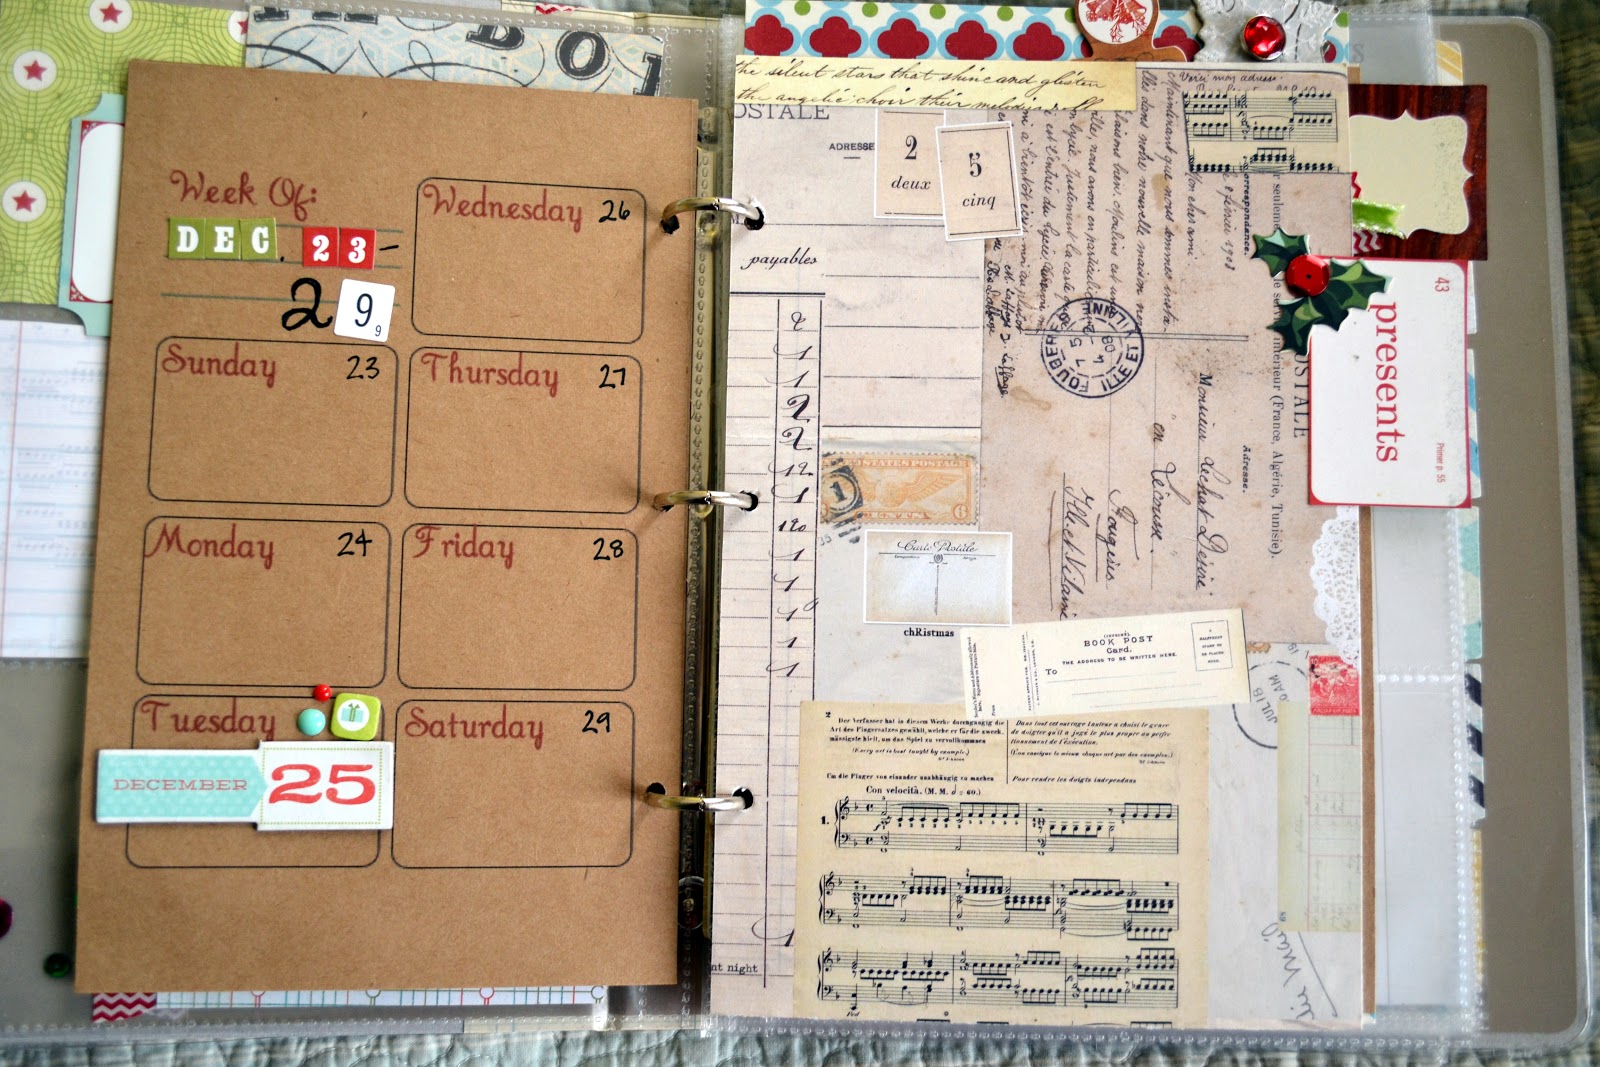
Then- the insides! I made some printables to share with you today! I'm not a pro at this but I wanted something customized and couldn't find what I wanted. You could print these on whatever you wanted- I chose kraft cardstock and cut it down to size. 


The next set of pages are pocket pages- I cut paper the right width, but longer than the album, so I could fold up the excess and make pockets. Thank goodness for pretty double sided papers!


The page on the right is for me to jot down anything handmade that I would like to make for our own family traditions or decorations...


and the next page is for handmade gifts or wrapping items. 


The pocket pages will become useful when I stick in other notes, receipts, coupons, and odds & ends as we go through the month. 

I plan to use the rest of the album as a memory album- not exactly a December Daily, but something akin to it with a little less structure. I'm really excited to see how this evolves for me and I plan to share it with you!

If you're interested in using any of these printables, here they are linked below! 

Event Food Planner (with spot below to attach recipe card!): https://docs.google.com/open?id=0ByynLz6eGtoeMWlueXV6dERuTVU