Showing posts with label Maple Creek Kit. Show all posts

Tuesday, December 9, 2014

December Memories!

Heellllllooooooo!!! So today I wanted to show you what I have so far in my December Memories album. I was doing pretty good for four whole days, and am falling behind now. Life. But tonight I am catching back up and will post more of my album later on in the month.


 I made this chalkboard a while back and have been doing a new design for each season so far this year. LOVE IT! Usually I print and trace on my designs, but this one, I am proud to say, is entirely free-hand. It's definitely not perfect, but I'm learning!

 
Usually, I have a wreathe for the season hanging on the hook at the top, but I decided to switch things up for December and hang my December Memories on it.


 I decided to use the Maggie Holmes flip album and a few of the included pages. The meat of the album is going to be made using a mix of the Cable Knit and all past kits from NoelMignon.com. The kits all coordinate so well, it was an easy choice to make! For the cover, I used my Cameo to cut the 25 out of cardstock and then glued on the sequins. LOVE that little wood snowflake from the Cable Knit Daily Diary kit!


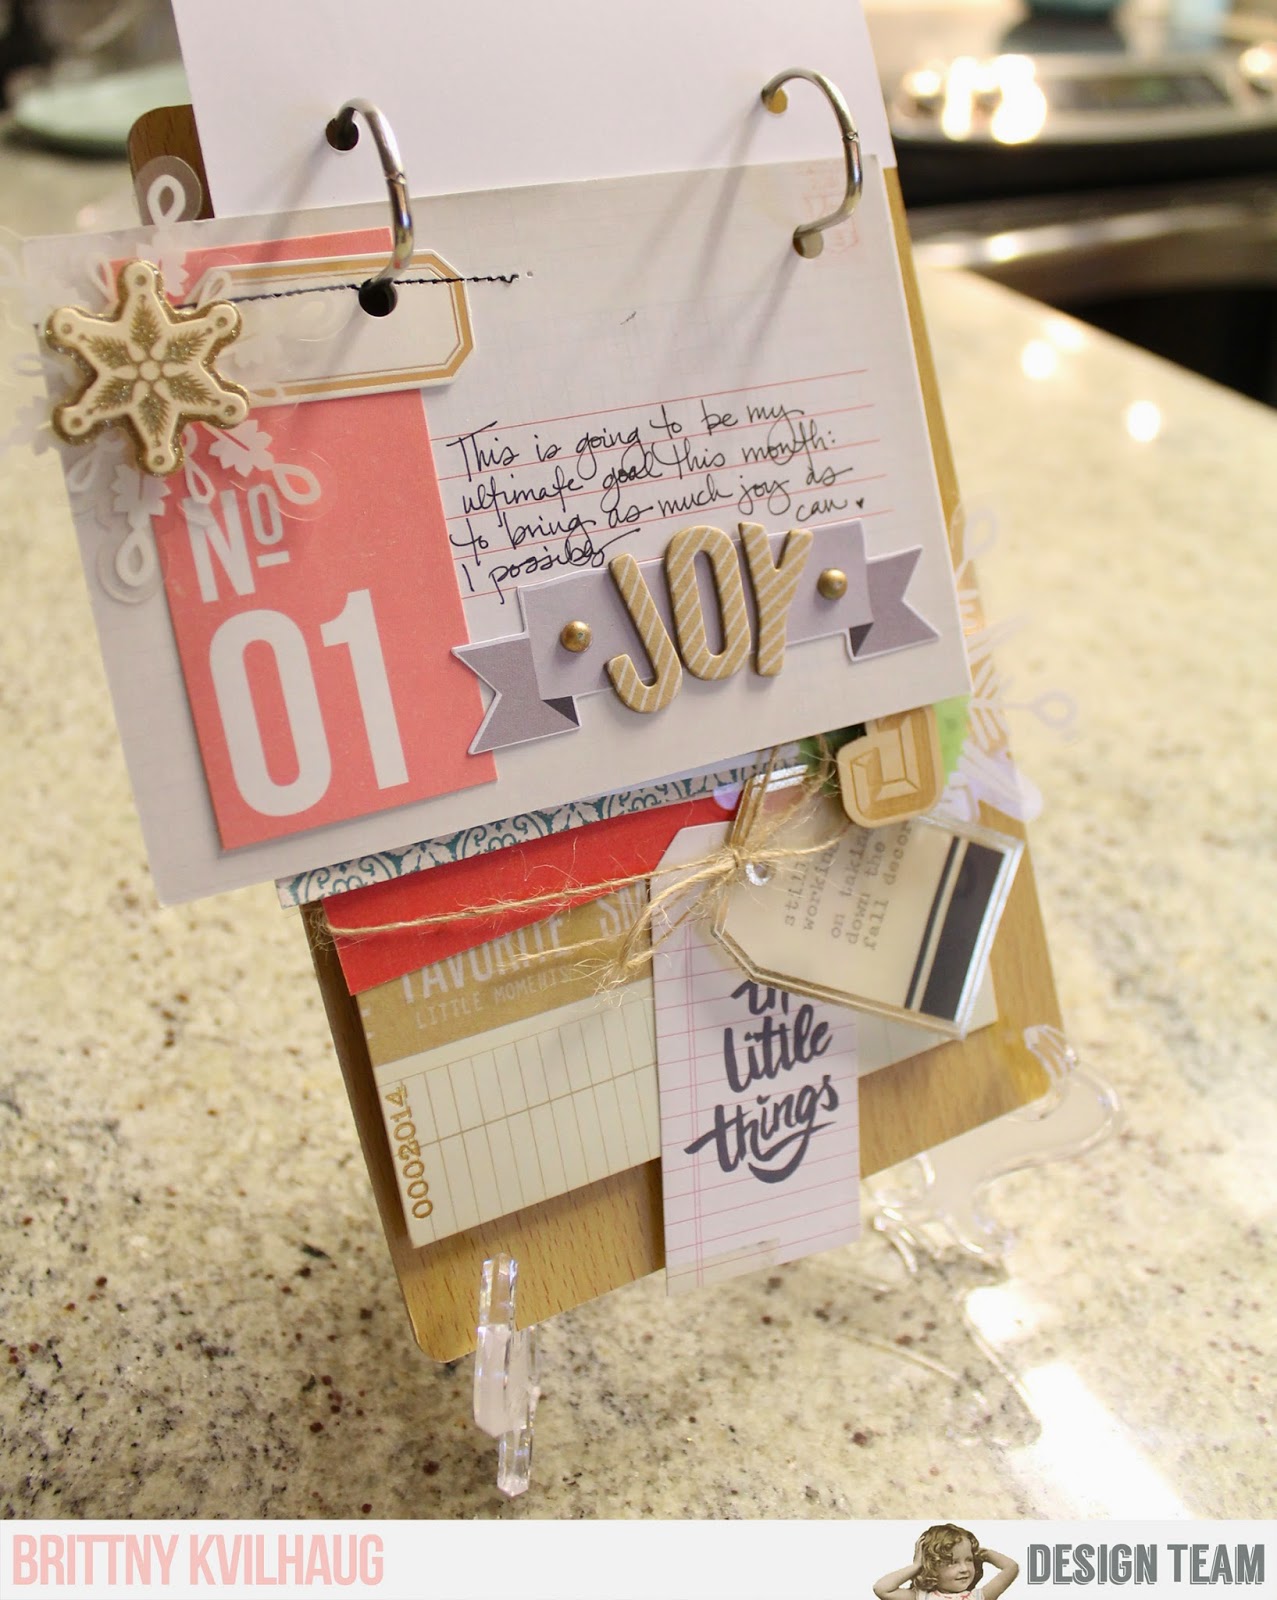
 I am attempting to follow the December Photo A Day list from onestorydown.com and the first day was joy. Of course, I didn't make this decision until late in the day when I was in no mood to actually take a picture, so I made the executive decision to just use the word, if I'd rather tell a story than show a photo. This should make life a little easier. I have been hoarding this 4x6 card from the Tea For Two Daily Diary kit, and it was an obvious choice for Day One. And could those Thickers BE anymore perfect?


 Again with the keeping-it-simple approach. Just a simple number 2 rubon from those adorable Crate Paper rubons in the Maple Creek Kit. And um, day two was supposed to be "hanging" but I um couldn't find anything that worked, so I changed it to "shoes" for day 30. Whatever. It's just a guideline, right?


 Day 3 is "home decor" and I was still working on taking down all of my Fall decor. Thank God my mamala came this weekend and took over all of the Christmas decorating for me, cast and cane and all, poor thing! For this page I grabbed a few little bits and pieces from my stash, and those tab stickers and paper scraps from the Maple Creek kit.


This is another piece I have been hoarding that was perfect for this album. Day 4 is "handwriting" and so I took a picture of the mirror in our bedroom that I wrote out an anniversary card to my hubby on in soap! Yep, that's me. Super corny. And I had some journaling that I wanted to keep private, so I just clipped them together with that beyond adorable arrow clip and slid them inside the envelope.

And that's all from me today! I hope you will post your December memories up over at the Facebook page - we love seeing the kits at work!


Friday, November 28, 2014

Blessed: A family photo

Happy Black Friday friends! I hope you're enjoying the day whether you've been out shopping, if you're cuddled up at home or if you're still surrounded by lots of family. I hope you are enjoying the moment.

I thought I'd capture one of our big family moments with this layout using the Maple Creek kit. The photo is of my husband's ginormous family. Me? I come from a very small family. But HE has a huge one, and somehow we all managed to fit into a photo. So of course I had to scrap it. The Maple Creek kit was perfect for that!

I really love the bold colors of Basic Grey's geometric pattern. I pulled the gold color from it and chose to use that color as my background especially since it was also the color of the house. Then I flipped to the backside of the geometric paper and chose to use its pink color too.  Then I accented the page with rub-ons, the blessed tag, the wooden die cuts, and Elle's Studio tag.

On this Black Friday--whether you're in a shopping frenzy or enjoying a lazy day off--I hope you remember to tell your loved ones how cherished they are, and even capture them on a scrapbook page. That is, afterall, what scrapping is all about. Right?

Happy Black Friday!


Tuesday, November 25, 2014

Two Post Tuesday!

Hey everyone! I am so excited to tell you that I got the newest Daily Diary kit yesterday from Noel for December! It's called Cable Knit, and it's adorable! I am going to be making a little reveal video here in a minute, but wanted to hop on to show you a layout I made using the Maple Creek kit first.


I had such a great time at the pumpkin patch this year with Reed - he was a total champ for pictures! And I certainly took my fair share!


I love combining lots of elements, on different layers of the page, and especially love when little bits peek through, like the thankful cork piece there, behind the vellum. I've been waiting for the perfect place to use that little hello rubon for a while now! Love combining kits!


I used the leftover scraps from some leaves that I cut out for a banner I made using the Early Autumn kit to create the background for the page. Just tucked in some paper behind a couple for a little contrast, then added lots and lots of layers on top. It's ridiculous how much I love that wood leaf!


I used that adorable striped ribbon at the bottom to anchor the page, and those arrows from Pink Fresh were totally perfect to move your eye inward. So many different ways to use those little guys!. And can we talk about layering rubons? DO IT!


Here I tucked a couple of leftover leaves I had cut and layered a little flower I had leftover from my wreathe project on top of that cute butterfly sticker - another little guy I have been hoarding :)

And in the immortal words of Forest Gump, that's all I have to say about that.

So. Be sure to check back later today for the reveal video for the Cable Knit Daily Diary kit - it's a goodie!

Bye for now!


gratitude cards

Hello!

It is so nice to be back here!

Lately as we've had some ups and downs at home I have had time to reflect on some of the things that I am most grateful for.

What are you thankful for?

It is so important to share and thank others for their friendship and for the blessing they are to us.

I decided to create some "thankful" cards to share with y'all this week:


Each of these cards took just minutes to make. 

I used kraft cardstock as my card base. 


For the card above I used spray mist to create the colorful background and added some Jillibean Soup tape and leftover leaves from the wreath I shared last week. 


For this card I used a few more leaves, a doily and a couple of stickers. 


For this last card I used an embossing folder on the white cardstock. I also added a diecut and some ribbon from the kit along with more leaves I had leftover from my "give thanks" frame. 

Don't forget to thank those who have made an impact in your life. 

Coming soon you will see lots of Christmas holiday projects!

I can't wait for my kit to get here!!!


Happy, happy Thanksgiving from all of us at Noel Mignon!


Friday, November 21, 2014

I treasure you!

Hi friends! I've got a quick card to share with you today that I plan on giving as a part of the hostess gift I plan to give our Thanksgiving hostess. This kit, Maple Creek, is so perfect for this kind of sentiment. I love all the rich colors that work so well with the season.


I chose to layer my sentiment on top of a punched shape, and on top of a tag so that it would stand out on the card. I also chose to punch the bottom edge of the brown Basic Grey patterned paper with a scalloped border punch. I went back and layered the yellow reverse side of that same paper underneath the brown to add more emphasis and texture. I'd forgotten how much I love my punches and it was fun to pull them out again! To finish off the card, I added brads to the right of the tag, and a snippet of the checkered ribbon through the tag. Now I'm all set to hand this off, probably with a Thanksgiving hand towel or a bottle of wine, to Josh's grandmother who will be hosting us this year.


Thursday, November 20, 2014

We Are So Blessed

Welp, I gotta say, people, I am blessed. Truly.
These last couple of weeks have been a doozy! A lot of work and running around, and not knowing quite how I would get it all done, but luckily, I am blessed with a stinkin' awesome kid, amazing and supportive husband, and a super fun and giving Mamala! And a couple of hours magically appeared on Tuesday night to be able to pull together this little layout. It's funny how right when you need a little miracle, one can just magically appear, isn't it?


After a long weekend visiting my Mamala, I got a phone call in the wee hours from her in her bedroom to come and help. And there she was, with a couple of funky-looking toes! So it was an unexpected extended vacation, without all of the things one normally packs for a two-week getaway. You know, like my Noel Mignon kits! LOL! Luckily, my amazing hubby made some time last weekend to come down and visit us, and bring me my kit box so I could make up this little guy, just in time for Gratitude Week here on the blog!


The title of this layout is "We are so Blessed" and man, we are! Even though it has been a hectic couple of weeks, I feel so lucky that I am able to take this time to help when it's needed. Not everyone can do that, and I am so grateful to my hubbs that I am able to be a stay-at-home mama and live-in nurse when the Mamala calls!


I have been in a very layery mood the last several months, where my layouts are concerned. And all of the cute little individual bit of ephemera that Noel puts in the kits are so perfect to tuck and stitch into place. And I love the translucency of that gorgeous vellum! LOVE it! But I basically love all things gold right now, so I super love those cork star stickers with a little Zazz on them!


And speaking of Zazz and cork - I mean, come on! Was that a no-brainer to do with those super cute We R stickers? Um yes.


And I can't tell you how grateful I am for RUBONS THAT ACTUALLY WORK! I mean, you know what I'm talking about, people! There is nothing more irritating than going to rub down an image and - NOPE - not going on! Very grateful that we get the best goodies in our kits, that I can always count on to work perfectly!

So that's all for me today. Thanks for stopping by, and I hope you are having a great week so far!


Tuesday, November 18, 2014

Family Gratitude Journal

Happy CHILLY morning from here in Alabama- it's a breezy 20 something degrees here! Brrrr! 

This morning I have a simple Gratitude journal that I made with the Maple Creek kit. It is super easy and fun to put together! I cut different sizes of papers and folded them in half and nested them inside of each other. To hold them in, I used the beautiful kraft tape from in the kit to attach each page in. I love the layered look of this little book! 


As you can see, there's lots of little tabs and pages peeking through here- perfect for little spots to adhere in gratitude cards my children have been working on!


I hope to keep adding to this now through Thanksgiving so we have a nice fat book of reminders of all the blessings we have. 


Thankful for YOU, all our NM family! :)


Friday, November 14, 2014

Easy and simple Thanksgiving Decor!

Have y'all been loving the "out of the box" decor items that the design team has been sharing this week? I know I have! I absolutely love brightening up my home with the papers and scrappy products that I enjoy using. 

I know as a busy mom, it's sometimes daunting or overwhelming to think about adding seasonal decor- trying to find the time, supplies, creativity... it all can get too much! I have something VERY simple and yet so charming that I think any woman out there could make quickly to add a personalized touch to their fall decor! 


I made this adorable jars by using some of my favorite papers from the Maple Creek kit. To make the letters, I used my Silhouette machine, but you could truly just use a letter sticker or handcut out the letters in a short amount of time. I thought about decorating each jar with embellishments and extra layers, but to be honest, once I wrapped the papers around the jars, I loved the simplicity of the look that I left them this way. Just a bit of adhesive on the back and some twine wrapped around from my stash completed the look.


I love how they look with the candlelight glowing through them. The bonus to wrapping double sided pattered paper around the jars is that the other side of the paper shows in the inside of the jar, glowing beautifully when the candle is lit.


I hope this gives you a simple idea to brighten up your decor in a few minutes! 


Thursday, November 13, 2014

leaf garland


There have been some beautiful fall decor posts this week and if you haven't had a chance to take a look at them I would encourage you to go check them out! Today I have a super simple and easy way to decorate for the fall...and a way to use up those scraps from your kit!

I cut a bunch of leaves out of different patterned papers from the Maple Creek kit (and I think one of them might have been from the Early Autumn kit). I also punched out some leaves from vintage sheet music. Then I simply ran them through my sewing machine to make a super easy garland! If you don't have a sewing machine you could easily attach them to ribbon or twine. 


I don't have a fireplace so I always string garland on a big chalkboard we have in our family room. That always seems to be the festive spot in our house :)

Wednesday, November 12, 2014

Give Thanks

Hello again!

How do you like what you've seen on the blog so far this week?

It is fun to step out of the 12x12 box sometimes and do something different.

I loved Britt's idea of creating a wreath for every season and displaying it on that amazing board!

Today I have another home decor project to share.

In the past I have created things for this scrapbook display frame and for this week's post I decided to create a fall/Thanksgiving-inspired one.


I started out by gathering my supplies. I picked a few patterned papers from the Maple Creek kit and using a metal die I cut out leaves from each paper. In addition to the kit I also used some white/gold twine from my stash. 


After punching all of the leaves I used a white 12x12 piece of cardstock and traced with pencil around a lid (very fancy, I know!) to make a circle in the center of my page. I erased the pencil line so that it was very faint so that the pencil wouldn't show through the vellum leaves. 

I cut a 1/4" strip of green striped paper for each edge of the paper and adhered that before I got started on the rest of the project. 

Using liquid glue I added the leaves around the circle, putting glue just in the center of the leaf so that it wouldn't lay flat, giving more dimension to my project. 

I added leaves all the way around the circle and because I had lots of extra leaves I started tucking leaves under the first layer to create a second ring of leaves. 


After I added all of the leaves to the page I used the white/gold twine from my craft supply and wrapped it around in a circular motion near the border of the punched leaves as you can see above. I used Tombow liquid adhesive for this as well. 

The last step was to add the chipboard alphas for the "give thanks" in the center of the leaf ring. I decided that it needed a little "something" to fill in the white space above the saying so I added some gold rub-ons and then some dots of the gold glitter glue underneath. I also used the glitter glue to make a border all the way around the frame which gave it the finishing touch that I thought it needed. Plus, I love the gold! 

Here you can see more of the layering of the leaves: 


Don't forget that kit subscriptions are open now but time is running out! Make sure to head to the kit subscription page in the Noel Mignon store to get renewed/signed up so that you don't miss out on any future kits! ♥


Have a wonderful day and thanks so much for stopping by! 


Tuesday, November 11, 2014

The Little Wreathe That Could


A while back, I found five little wreathe forms at a yard sale, and KNEW they would come in handy one day. And rather than sit in my studio closet forever, they ACTUALLY DID COME IN HANDY! Wonder of wonders, right?

A few weeks ago, I got a major wild hair, and decided that I needed to build dozens of signs. I just felt like working with tools for a change. So I put together this little lady as an experiment before I went all out, and built the 36"x48" version. Better to test things out first, right?


After I got this little lady all stained, I decided the perfect thing to do would be to use it for seasonal decor. And what better than a little wreathe for each season to take their turn on this sign? So for Autumn, this is what I came up with, using the Maple Creek classic kit. And I am in love! That Gold Zazz gives the flowers and branches the perfect sparkle, and the epoxy brads make great flower centers!


Best of all? This is super easy to do! We've probably all made these little paper rosettes before, and cutting leaves and branches is easy peasy with your Cameo! Just make sure not to scorch your fingers with that glue gun and you'll be juuuuuust fine! A little tip, though? Squeeze on the Zazz AFTER you glue your flowers on. I did it before, and it worked great, but took a long time to dry. Next time, I'll be sure to leave the drying paint until the end of the project, so I can move on to something else.


Once everything's dry, just loop a length of ribbon around the top of the wreathe, and staple it to the top edge of the board. Cut another length of ribbon and tie a bow around the loop to secure the wreathe in place. And, if you have some Fray Check, USE IT! That will really help to keep your cute notched ribbon ends from getting beat up.

That's all for me today! Hope you are all enjoying this cooler weather!