Showing posts with label Cabin Fever. Show all posts

Monday, June 25, 2012

Brace Face


This week it was my turn to work with one of the new Cricut cartridges . . . so of course I pulled out one of my trusty Noel Mignon kits for the papers and embellishments! I used the Jack & Jill kit and added a few blue papers from the Cabin Fever and Homespun kits.


My two oldest children recently got braces on the same day together. I used papers from my scrap bin to cut out my Cricut images and Cricut title. I used stickers and decorative brads from the Jack & Jill kit to accent each cut and the striped Basic Grey PB & J paper brings all the different colors together. I also added the candy sticker from the October Afternoon 5 & Dime Word Stickers along with a red paper clip from my stash.


Thanks for letting me share!

Happy Monday!
Jana Eubank

Wednesday, February 22, 2012

2 kits, 2 cards, NO tape runner!

So have you heard about the This or That challenge for February??!
You have to either give up your paper trimmer or your tape runner.


Tough one, huh??!
Well I didn't get a chance to do the challenge in January so I definitely wanted to this month's.


I just didn't realize how tough it was going to be!!


After much deliberation I decided to give up my tape runner.
Even though I don't absolutely love my current paper trimmer, I figured my infatuation with brads and my stapler would make the no tape runner thing do-able.


So here is what I made and the proof that I did it honestly!
:)


Card #1 using the delightful Charm School kit...


The hearts & the "hugs & kisses" sticker are adhered with foam adhesive.
The striped paper is attached brads.
The cardstock matting the "hugs & kisses" sticker was stapled to the card first before I added the sticker.


Here's my proof...


And card #2 using the Cabin Fever kit...


The brown cardstock and the green/blue paper were stapled to the card very strategically.


Then the "baby, it's cold outside" sentiment was adhered over the staples using foam adhesive.
And here's the proof again...


(sorry for the poor quality of my "proof" pictures. i decided too late to take those pictures and had no sunlight at all!)
*****
You still have time to play along with us.
You have until the end of the month to make something without your tape runner or without your paper trimmer!
*****
Happy Wednesday!

Friday, February 17, 2012

This or That Challenge- February!

Last month, we started a new challenge series for 2012 - a "this or that" challenge. You have to make a choice on what you use for your project. Last month, we challenged you to choice between mist or a paint dauber, and an edge distresser or a a sewing machine! We did a random drawing and message board member Annette won with this layout: 

We posted a new challenge this week. You have until March 14th to put 
your submissions on this thread

Now, I know some of you might be thinking we're crazy, but just try it! It's always when you're doing something out of the ordinary that you discover a new technique! :D 
Here's my example for a no paper trimmer layout; just used the ol' scissors! You could use a die cutting machine, punches, an exacto blade, tearing, masking, tape.... there's tons of options! 

Made with the Cabin Fever kit

Make sure to stay tuned for Monday... I think you'll be in for a big treat! ;)


Monday, February 13, 2012

Valentine's Day Postalettes


Tomorrow is the BIG DAY and I'm here with a quick and easy idea to help you send a Valentine note to your loved one . . . Valentine's Day Postalettes! The inspiration for this set came from a stationery set my mom owned when I was a little girl. She had the cutest set of postalettes that you would write a note on, fold into thirds and close with a coordinating sticker. There were also additional round stickers that you could fold over the side to make it more enclosed. I LOVED them! Opening one of those notes was like unwrapping a little present! I decided it would be fun to use that same idea to make cards with the Charm School Kit for each of my children to open on Valentine's Day morning.


First, I cut out an envelope shape using my Cricut machine. You could also use an envelope template found on the internet. When selecting your envelope shape, be sure to choose one that has shallow side pieces. You will be cutting those off to create the postalette and you want the top and bottom "flaps" to be long enough, and wide enough to cover your note inside.


Next, I covered each panel on the outside of the postalette with adorable patterned paper from the Charm School Kit. I decorated the back with a label shape to house the receiver's name, and then created a decorative piece to use as my "sticker" to close each postalette.


I also tied a length of twine (from the Cabin Fever Kit) around each postalette making it even more of a treat to unwrap and open! :) Inside I adhered a square of cream cardstock stamped with hearts (Charm School Kit) in gray ink. The stamps will frame my message perfectly!


So if you find yourself without a card to give your loved one, instead of fighting the crowds at the greeting card store, pull out your kit and create a darling postalette! It's more special than a store-bought card anyway. *wink*

Happy Valentine's Day!

Jana Eubank

Tuesday, January 31, 2012

Cabin Fever Pillow!


Happy Tuesday!! Lisa here today!

I love the fabric in the Cabin Fever kit. They both have such a beautiful pattern and are so soft.

I decided to make a little throw pillow so I could enjoy the softness. And the burlap!! Oh, I love burlap. I want to get burlap pillows for my couch, but for now this will do!

I have to tell you upfront I suck at measuring things. I just wing it so there are no dimensions on my instructions for the pillows. If you want to measure you can and still follow these steps below!

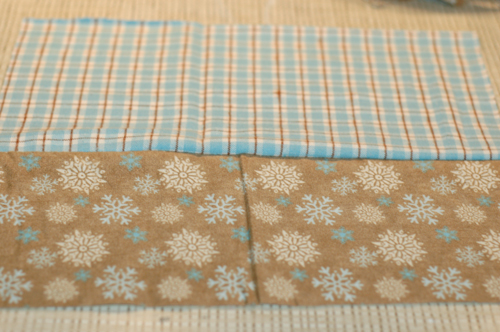
Make sure both pieces of your fabric are the same length. I left the blue one wider than the brown so there was more blue pattern since I left the back of the pillow all brown.

Put your fabric together so the outsides face each other. Then sew a 1/4" seam along the inside of the 2 pieces.


Then once your 2 pieces are stitched together you can open them up and you'll see the front of your pillow starting to take shape. You could iron the material at this point, but with this type of material I didn't worry about it since the wrinkles will settle on their own! 


Then cut a piece of the burlap (yum) to the same length of your two pieces and stitch it to the top of your pillow piece. I stitched right along the inside hem of the burlap on the top and the bottom. I used a neutral thread, but it would probably look really pretty with a contrasting color like red too!


Once your burlap is stitched on sew 5 of these beautiful buttons on to the burlap!


Ok, now this next step is very important. If you don't follow it exactly you might get all done sewing and find out you stitched it together inside out and have to take it all apart and start over...I'm just saying...it's not like I'd do that or anything ;) 

So now cut a piece of the material you want to use for your back that is the same size as your finished piece for the front.

Then (and this is the step you need to follow!) put your 2 pieces together so the pieces you want facing out on your pillow are facing each other on the inside. Basically it's like putting a shirt on inside out. This step allows you to hide the stitching and create your pillow!


Now stitch a 1/4" seam along all the edges leaving about a 5" opening on the bottom of the pillow. If you don't leave an opening you won't be able to turn your pillow right side our or stuff it! To get a nice corner make sure your needle is down when you turn your fabric 90 degrees.


Then turn your pillow right side out and it should look like this. You'll need to poke all the corners out.
 

Then stuff a generous amount of pillow stuff into your pillow, making sure you get the corners good!


Once all the stuff is hand stitch shut the open seam. This is why you want to keep the open section the bottom of your pillow. It's easier to hide the hand stitching that way!


Now display it some place proudly! I put it on the couch and when my husband came home he asked me where I bought it from...I was just happy he didn't instantly think I made it! 


My son quickly took it and thought it looked better on my bed! I have to agree!


Please let me know if my instructions aren't clear or anything!! 

Happy Tuesday!
Lisa

Tuesday, January 24, 2012

Family Time with Cabin Fever...


Hey there, this is Lisa today! Happy Tuesday!

One of my resolutions/goals this year is to have more quality family time. The coziness of the Cabin Fever kit was perfect for putting together a layout to document this resolution.


I created a quilt like background to add to the cozy family feel. I cut out some 1"x1" squares and just put them in a diagonal patterns. I love the addition of the burlap! I used the fabrip on the seams of the layout and bunched them up and stuck a cute Maya Road pin through it!


Happy Tuesday! 
- Lisa

Friday, January 20, 2012

Being challenged


We have a new series of challenges on the message board we are doing- a "Would you rather..." sort of challenges. The object is to make a choice and implement it on your layout! 

Here's the first set of choices:

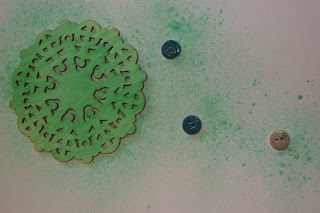
I chose mist, and grabbed that great mist out of the Cabin Fever kit, a couple of buttons, and the wooden doily. 


Spritzed.


Results! I love the easy way to do some random polka dots! You can do them with all sorts of different sized buttons, different patterns... so fun! 


 The second set of choices: 


I decided to really challenge myself and do the sewing machine, since it's something I love the look of but rarely take the time to do on my own projects. 


I'm so glad I did! I moved my sewing machine to a more easily accessible place so now I can use it more often. I really love it! 


Come check out our message board challenges and join in! They start on the 15th of every month and you have a whole month to participate. :) 

Wednesday, January 18, 2012

Try this!

Hi!
And happy hump day to ya!!
I have something fun for you to try today!

A couple of weeks ago I made a few cards for the Bella Blvd blog.
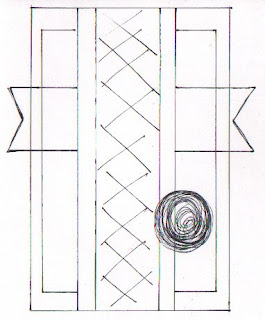
After being stuck in a little rut, I ended up coming up with an easy sketch to help me make the cards.

Here is the sketch I drew out...


And here is one of the cards I made from the sketch...

The more I looked at the sketch, the more I thought it might work for a layout too.

So I tried it!

I grabbed Noel's Cabin Fever kit and went to work!
Here is the resulting layout...

I like it!
I think the sketch can work for cards and layouts!
Now you try it!
See if you can use that sketch to make a card or make a layout...either one!
Just go make something!!
*****
Have a great day!!
gretchen

Tuesday, January 17, 2012

Cabin Fever Cards


Hey everyone, this is Lisa today! Happy Tuesday!

I made some cute everyday kind of cards with the Cabin Fever kit. I've challenged myself this year to make a set of cards out of every kit. I'm really bad about actually sending out cards because I don't have them on hand. So many times I want to write a quick thank you or something, but I don't because I don't have the right card. This is my solution!


I love the colors of these cards. I especially love that while most of my cards tend to be more girly that this can work for both...because yes, sometimes men need to get a card too!!


I used the Jenni Bowlin stamp that is in the kit to have a quick spot to add a sentiment inside the card. 


Easy peasy! Now I have 4 cards fresh in my growing stash to send a quick note!

I hope your week is off to a good start!