Showing posts with label Silhouette Machine. Show all posts

Thursday, January 11, 2018

She turned 12

Today I have another project to share with you using this month's She's Crafty Classic Kit

My second oldest recently turned 12, so this week's layout features her:


I wanted to show off a lot of the patterned papers in the kit without losing the white space on my page so I used a star diecut made using my Silhouette machine and filled each open space with a different pattern. I also started with a clean white cardstock background and misted it with aqua, green, yellow and pink spray mist. 


After that I added strips of paper and tape, some rub-ons (love these!) and then layered tags and journaling spots on the left side of the page. I used the cute black Thickers for my title and accented things with enamel dots. I also used the Ranger "Mermaid" Liquid Pearls to make little dots around the curves of the black diecut circle. A little tip about the circle: instead of tucking one side under and wasting the part that was under the tags, I cut it and used the other piece on the page as well. 


One of my favorite embellishments in the kit is the pack of Elle's Studio acrylic words. I used the "hooray" and heart on this page and used a Copic marker to color over the white. 


Thanks so much for stopping by today!

♥♥

Tuesday, November 14, 2017

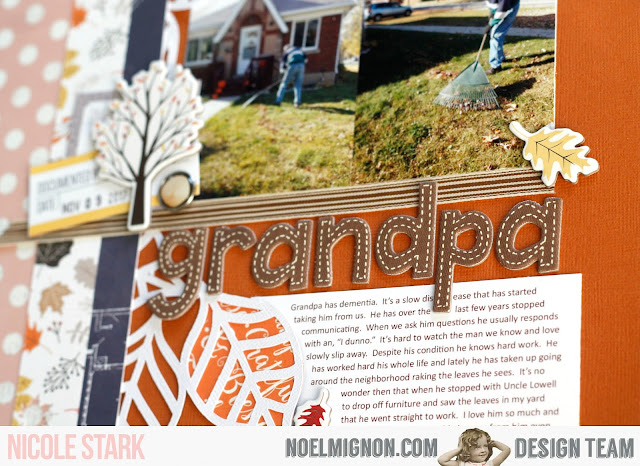
Grandpa a layout made with the Home Sweet Home Classic Kit

Hey all!  I hope you are all having a wonderful Tuesday.  I bring you another layout this week using the Home Sweet Home Classic Kit.

Last week as the leaves in my yard started falling my sweet grandpa stopped for a minute with my uncle to drop off some furniture to my house.  He has dementia and is beginning to slowly go down hill. He still gets around pretty well, but his memory is going.  Before I knew it he started raking the leaves in my yard.  This is such a classic example of my hard working grandpa and I knew it needed to be documented.


I began with a the die cut leaves background that was cut with my Silhouette machine.  I played a bit with the placement and even cut it apart.  I then backed to of the leaves with pattern paper before adhering it to the cardstock.  

I then cut several strips of pattern paper and placed them along the left side of my layout.  I liked that it broke up the layout a bit.  I then placed down my photos, ribbon, and title.  I then found several of the Elle's studio tags and a chipboard tree to cluster next to my photos.  


I finished my layout off with a some chipboard leaves and a brad.
I am sure loving this months kit.  It's perfect for documenting all sorts of fall/thanksgiving/thankful type moments in our lives.  How are you using yours?  We would love to see your projects!  Be sure to share on the Noel Mignon Members Facebook group.

Thanks for stopping by the blog today!


Tuesday, August 15, 2017

Wall Decor with the Weekend in Paris Daily Diary Kit

Hello everyone!  I hope you are having a wonderful week.  I have been busy with my boys fitting in a few summer activities before school starts next week.  I'm sure I will miss a little of the summer carefree days, but right now I'm ready to be back on a routine.

This week with the kit I created a décor piece for my wall.  I have a wall in my living room filled with 12x12 prints of my boys.  Awhile ago I had new pictures printed to replace some of the older pictures and when I went to rearrange them I couldn't bear to take down any of the pictures.  I got all mommy sentimental and instead my gallery wall grew from 6 pictures to 12.  Unfortunately there is a light switch on this wall and when I hung them up I ended up with a space in between the last row.

I have had that weird gap for a couple of months now trying to figure out what to hang.  I finally decided that I would have to make something to fit that space and while digging around in our shed I found an old piece of wood that would do.  It fits the space and is what I used as my foundation for todays projects.

I pulled the lined/graphed 3x4 cards from the kit and lined them up to cover the length of my wood.  The wood didn't have a totally smooth top and it's actually one of the reasons I picked this piece.  I really like the texture of the grain along the top.  To leave the grain showing I cut all the cards down to fit the smooth top.

One of the journaling cards has the sentiment "you make me happy".  Instead of covering it up I decided to use this as part of my sign.

I used a couple of sheets of 12x12 paper from the paper pack and cut a strip of  Fancy Couture sheet from Carta Bella and placed it along the bottom.  I then fussy cut flowers from the Maggie Holmes flowered paper for my accents.

I used the gold thickers from the kit to spell out "so very" and the swirl font from the Silhouette store to cut out the word happy.  I had my silhouette cut out the word in black cardstock fives times and I stacked these on top of each other to add dimension to the cut.  

Here is a look at my wall with my décor hung in the weird gap left for the light switch.  I have to say I like the wall a whole lot better now.  


Do you use your kits to make home décor projects?  I would love to see if you have.  

Thanks for stopping by and happy crafting!


Tuesday, July 18, 2017

Pin'apple Salsa Love with the High Five Classic Kit

Hi all!  Nicole here today to share a sweet and spicy layout.  My son and I love pineapple salsa and our nearby grocery store makes a great one in their deli department.  He recently saw some when he was out with my husband shopping and picked some up for the two of us to share.  I have been making myself more aware to document these little moments and the tropical prints and colors were perfect.


I first started with the lined pattern paper and layered the pink Distress Ink from the kit with an ink dauber.  I then added a few ink splotches with a water color brush.  I then cut a large pineapple die cut with my Silhouette and backed it with pattern paper.


The title represents the way my son says pineapple.  It makes me laugh and I knew it needed to be included.  I altered one of the stickers with some pattern paper and the small American Crafts letter stickers to finish off my title.

I finished off with the pineapple die cut from the kit, a brad, and more stickers.


I hope you are all enjoying your summer and don't forget to record the little moments that might not seem to significant - even enjoying some pin'apple salsa with a loved one.

Happy Scrapping!


Thursday, June 22, 2017

Hello, everyone! 

How are you enjoying your summer so far? 

What are you doing to stay cool? 

It's Becky here with you today to share another project made with the Dive In Daily Diary kit.  There are still a few of this kit as well as the Classic kit and you can find that cuteness in the Noel Mignon store. 


For my layout this week I started with a sheet of white cardstock cut down and mounted on this cute striped sheet of patterned paper. I misted the cardstock with a mix of blues and greens and added little bits of pink and some orange in there as well. There are lots of mist colors available in the shop


I used a Silhouette file for the big sun and #loveyou diecuts and used bits of patterned paper to fill in some of the spaces. From there I added my photo and cut down a journaling card that I tucked under the picture. 


These little pennant stickers are so cute! I added some foam adhesive to the backs and strung a piece of twine from a previous kit across the top and tied it at the ends. 


To finish off the page I added the black and white tape (also from a previous kit), a brad and the cute little pink alphas to go with my journaling. 

Come back tomorrow for more inspiration from the design team. 

Tuesday, May 23, 2017

Band Geek with the Spring Fling Classic Kit

Hi all!  Nicole here on the blog today to share my latest layout with the Spring Fling Classic kit.  This weeks theme is embellishments.  Noel always includes a great mix of embellishments each month and this time around the embellishments inspired the layout.  My son is a huge bank geek.  He really established that this school year.  I decided to use the Jillibean wood veneer check marks in my journaling to highlight a few things that make him a band geek.


The base cardstock I pulled from last months Let's Get Lost Kit.  I really wanted a dark base to help showcase the bright colors in this months kit.  I used my silhouette to cut my title.  


I backed the large part of the title with a music staff die cut (cut with my Silhouette) and pattern paper.  I used a mix of the cardstock star stickers and wood veneer to sprinkle stars along the staff.  I decided after all my embellishing was done I wanted to make the word BAND stand out more so I used the yellow paint around the edges of each letter.  The word sticker "literally" is from the Dear Lizzy sticker sheet and was a fun addition to the cut title.


My pictures and journaling blocks I set up in Photoshop and printed.  Once attached to my layout I added the check marks to each box and finished with some of the Elle's studio cut aparts and cardstock stickers.


There you have it my layout about my band geek son.  I love that products and embellishments can lead the design of a layout.  How are the embellishments in this months kit inspiring you?

Thanks for stopping by the blog today.  Come back tomorrow for even more inspiration!


Tuesday, April 25, 2017

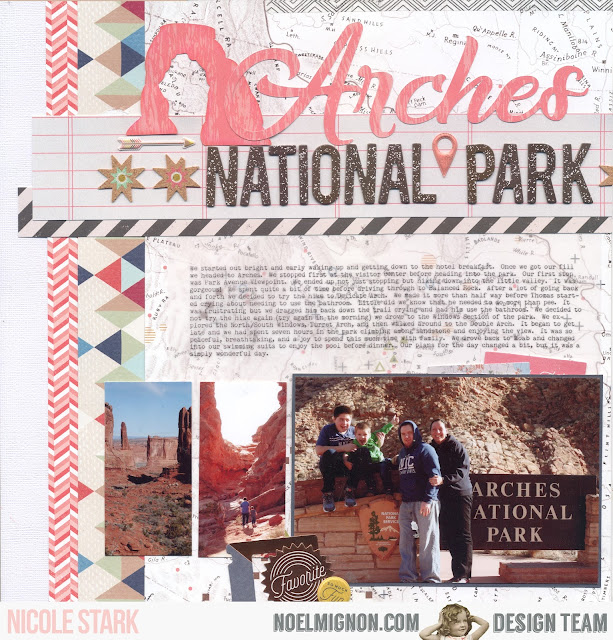
Arches National Park with the Let's Get Lost Kits

Hello everyone!  Nicole here today to share with you something that hardly every happens - a double page layout.  I used both the daily diary and classic kit to put together this two page spread and I'm really loving the results. 


I started with the pattern paper.  I had two pieces of the map pattern paper and chose this for the majority of the background.  I then cut strips and placed them on both sides of my spread creating framing in my pictures. 

I then started my title.  I paired the thickers with a silhouette cut to spell out my title.  I also cut the iconic delicate arch from the same pattern paper and placed them all together.  I finished embellishing with the cork/puffy stickers. 


My journaling I ended up printing out on vellum so I wouldn't have to cover up the pattern paper. 


The second page I kept simple and added a small cluster with the date and three of the Queen and Co. lollies.  My last touch to tie the two pages together was by running a piece of washi tape along the top of the spread. 

I really love the way this turned out and really need to try and do double spreads more often - love how many photos I used!  Thanks so much for stopping by the blog today.  Happy Scrapping :)


Friday, February 24, 2017

Saguaros - February Classic Kit: Happy Together

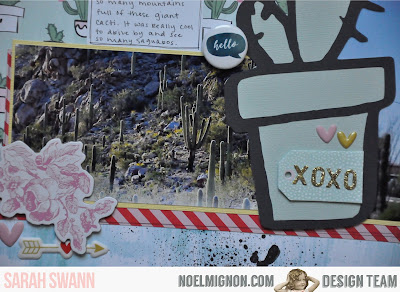
Hi!  Sarah here with my last layout using the February Classic kit called Happy Together.  Our challenge this week is to make a layout that is NOT "love themed."  For this one, that cactus paper really spoke to me.  Luckily, I used to live in Tucson, Arizona so I had some pictures of cacti that I hadn't documented yet.  This paper gave me that push to get those pictures scrapped!


I used two of the cardstocks from the kit and ran it through my Silhouette using a cut I got from a Facebook group a few months ago.  It's a cute cactus in a pot.  While these cacti in the picture are in nature, it still ties it all together and I really like it.


I used a mix of the two alphas included in the kit to create my title.  The horizontal picture is a mountain where there were a ton of saguaros.  Those were all over Tucson!


I used some of the Heidi Swapp chipboard to frame out the photos and some little embellishments to help highlight the Silhouette cut.  Also, that Illustrated Faith paper was fantastic with the little ink blots on them.  It reminds me of being in nature.


Finally, I used a piece of white cardstock for my journaling and used the washi tape from the kit to help shelf my title.  

I hope you enjoyed this layout and that you're using your February kit to create layouts that are not "love" themed.  Thanks so much for stopping by today!


Thursday, July 17, 2014

Baby Reed's Album Continued...

So here's my desk today. Still working on Reed's spreads for month five.


I used more of both of the Sweet & Simple kits to fill up this pocket page, and then added in a journaling page from Becky Higgins - I love having tons of stories for Reed to go through later.


I kept it pretty simple - just added some stickers and cut out the stitched heart. Ran it through my sewing machine, and of course, added some enamel dots. Because that's mandatory, folks.


Here's a little zoomed view...


 I love this.


I had these two little Instagram shots that I wanted to include. The one on top is okay, but the one underneath is one of my less flattering photos. I just loved the honesty in it though - and I think Reed will like it later. So, I just slid that one into the sleeve, and fastened the good image on top of the sleeve, with a little strip of that adorable gold striped washi in the big kit.


 This card is simple enough - just a little sticker and washi, stitched on with some enamel dots. The gold foil "#lovethis!" is a Heidi Swapp stamp from the daily diary kit (sold out) that I made into a cut file, then stamped straight onto with Black StazOn ink. Seriously in love with the gold foil. For a little tutorial on how to make this cut file, just head over to my blog tomorrow to check it out!


So that's it for me today. I hope you're having a great week so far!


Monday, February 17, 2014

Snow much love!


Hi friends! I have a quick little layout to share with y'all today... I'm surprising myself because for the first time in a long time, I've almost used up everything in a kit! Whoop whoop! I've been working with the Fresh Start kit and only have a little bit left to try to knock out before the next kit (the "Wishing Well" kit for March- make sure to check out the sneak peeks on the NoelMignon facebook page!). 

We've had a record amount/number of snows here in Alabama lately, so of course my camera has been busy documenting it. I love having pretty snow pictures to work with! I made a very simple page using some recent mpix prints I ordered and a large title cut with my Silhouette machine. 

To add a little something "extra" to the title, I mixed some mod podge, a little water, and a dab of liquid watercolors for a light colored wash. I sprinkled glitter on top of it while it was wet. This is a technique I was inpsired by Kim from Happy Like Yellow with... and I can see that I'll be having lots more fun with it!