Hey guys, today I'm playing with the Delightful Daily Diary Kit and a little bit of the Happy Together Classic Kit. I will often 'shop' from previous kits if I'm looking for a particular embellishment or certain colored paper. I didn't have much left from the Happy Together kit but I did manage to grab the red/pink striped paper that added a nice little hint of contrast for the background of my layout.
I also added some of the alphas from both kits for my title. You may notice that I altered a "T" to make an "L"...I've used this alpha set so many times that it was bound to happen that I'd run out of letters! I'm ok with it not being perfect - embrace the imperfection!!
I loved the cork clouds & they tied in perfectly with the cloud paper from the classic kit. I used red line tape to hold it in place and it seems to be holding well so I'm keeping my fingers crossed!
And
I couldn't resist using that gorgeous pink ribbon along the bottom of
my page. Originally I thought about tying a bow but was worried that it
would add too much bulk to my page. So I opted for the 'messy' look that
I've done before on pages...no rhyme or reason, I simply add some
adhesive, press the ribbon down, & the stitch to keep it set on the
page.
Happy March 1st friends!! Michelle here with my last layout from the Happy Together Classic Kit before I start playing with the new Delightful kits! By the way, my kit came yesterday and it is absolutely fabulous!! I've already started printing photos for it.
For my layout today I went back a few years to a photo I found of my youngest giving one of our pups a much needed brushing. All of my pups are pretty tolerant of being groomed by the kids since they've all grown up together for the most part. But Copper, my golden, is especially tolerant...he's quite the attention hog :)
The floral patterned paper is very gorgeous but a bit busy so I added some of the pink/white chevron paper on top to help break it up so that my photos weren't lost in the papers. I also took some leftover strips of paper to add some layers on page. Those chipboard alphas and accents are probably my favorites from the kit for sure!
And if you didn't get a chance to pick up this kit, it is unfortunately sold out but there's still 2 - TWO - of the Happy Together Daily Diary kits left that you could pair with a pack of the Happy Together papers!
Hello all! It's Meridy here today to share one last layout with the "Happy Together" Classic Kit. I decided to scrap one more set of Valentine's pictures with this kit.
The bright colors in the papers in this kit really pulled in the colors from the photos I had of my kids creating their Valentine's cards for their classmates.
I started with the colorful background paper, and really wanted it to stand out on the layout, but it was a little too busy for my photos, so instead I decided to use it to mat my entire layout. Next, I layered up a few other patterned papers and cardstock to build up my photos and make them stand out. I wanted to use those cute banner stickers from the Pebbles sticker sheet, but they were not large enough to fit all of my journaling. Instead I placed the banner stickers on the background, and built up some white strips of paper that were a little longer than the banner stickers and added my journaling to those.
I used both alphabets from the "Happy Together" Classic Kit to create my title. I also added a few of the Pebbles stickers and puffy stickers to embellish my title a bit. Finally, I outlined most of the layers and stickers with a thin black marker to make them really "pop".
Thank you so much for stopping by today! I would love to see what you made with your "Happy Together" kits!
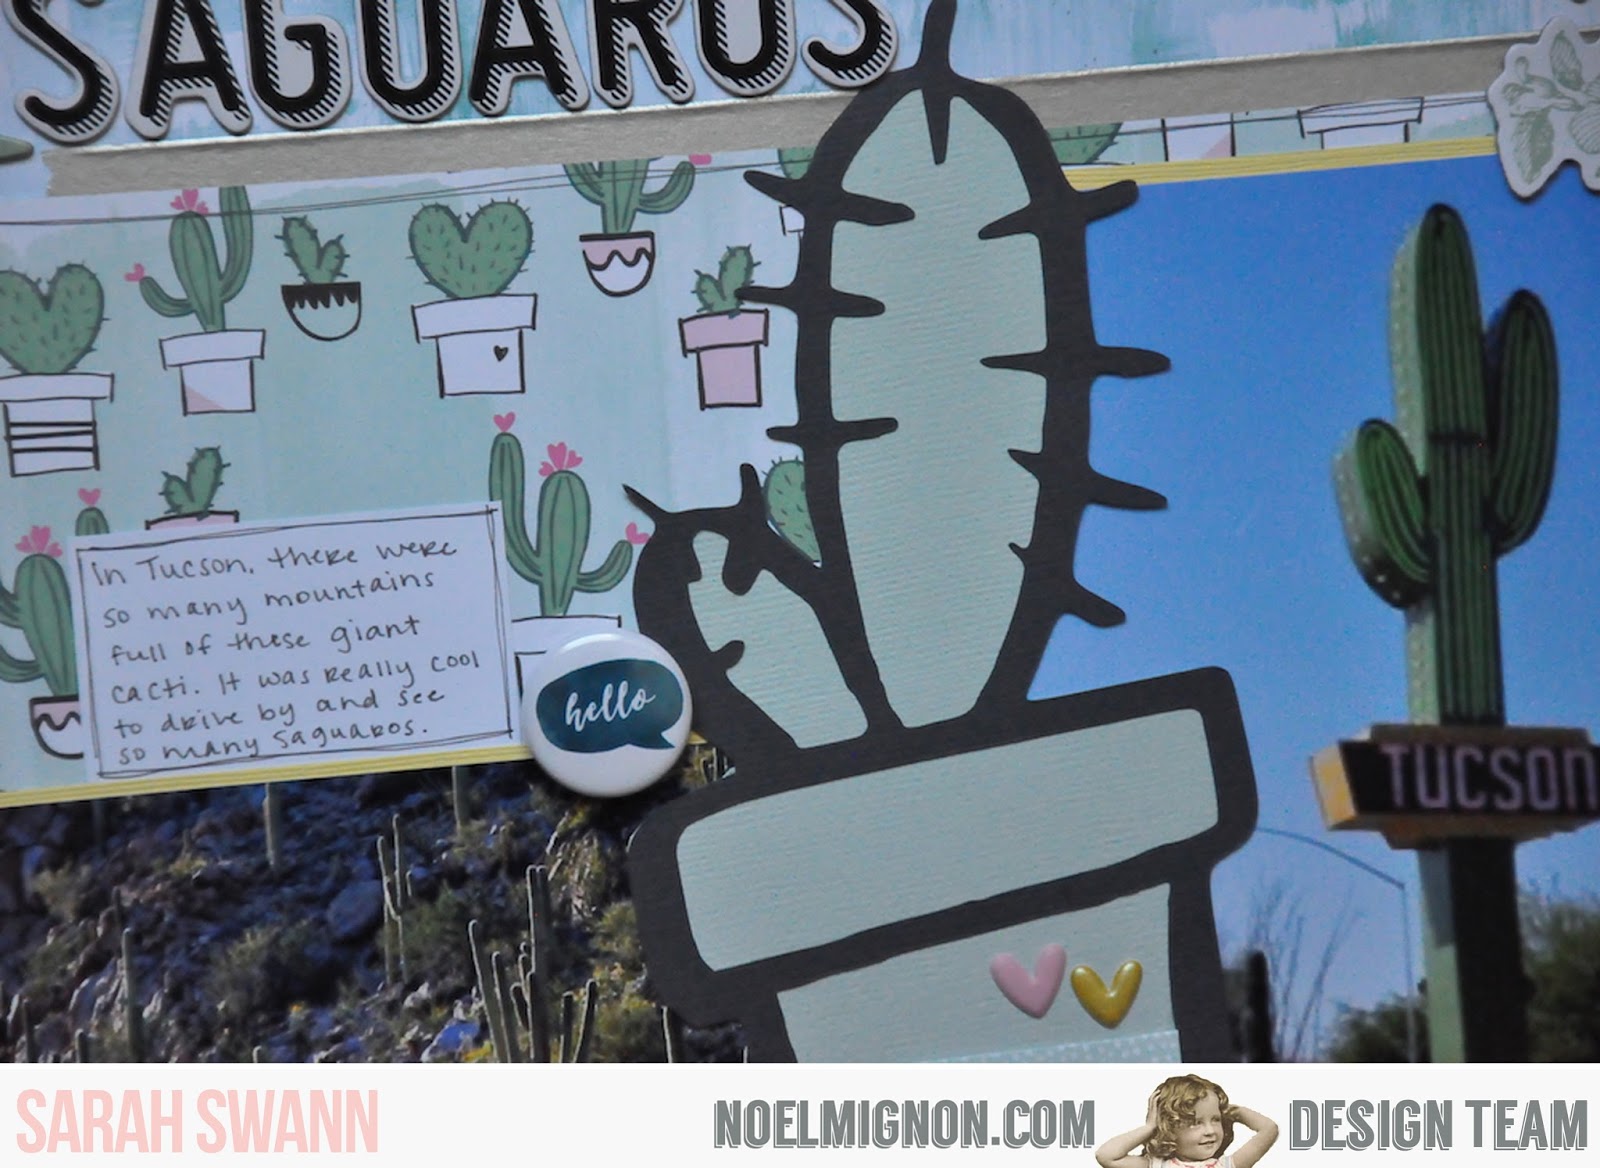
Hi! Sarah here with my last layout using the February Classic kit called Happy Together. Our challenge this week is to make a layout that is NOT "love themed." For this one, that cactus paper really spoke to me. Luckily, I used to live in Tucson, Arizona so I had some pictures of cacti that I hadn't documented yet. This paper gave me that push to get those pictures scrapped!
I used two of the cardstocks from the kit and ran it through my Silhouette using a cut I got from a Facebook group a few months ago. It's a cute cactus in a pot. While these cacti in the picture are in nature, it still ties it all together and I really like it.
I used a mix of the two alphas included in the kit to create my title. The horizontal picture is a mountain where there were a ton of saguaros. Those were all over Tucson!
I used some of the Heidi Swapp chipboard to frame out the photos and some little embellishments to help highlight the Silhouette cut. Also, that Illustrated Faith paper was fantastic with the little ink blots on them. It reminds me of being in nature.
Finally, I used a piece of white cardstock for my journaling and used the washi tape from the kit to help shelf my title.
I hope you enjoyed this layout and that you're using your February kit to create layouts that are not "love" themed. Thanks so much for stopping by today!
Hello everyone, Michelle here! I just got back from a scrapbook retreat last weekend which was a much needed break. I feel like my creativity has been renewed and I'm ready to scrapbook everything! Good thing too, since we just had the new release last Sunday!!
My youngest daughter & husband went to a daddy daughter dance a couple weeks ago so I knew the Happy Together Classic Kit would be perfect to use for those photos.
That strip along the side with the stripes & flowers is actually cut from one of the other patterned papers that had 3 or 4 12" long images. I outlined the red alphas to make them pop a bit more from the background paper. And those chipboard alphas...I can't get enough of those! I seriously need more!!!
Hello Noel Mignon fans! If you were at the March kit reveal party on Facebook last night, you know we are up for some beautiful creations coming your way with next month's kit...but for now, I'm still getting plenty of layouts out of my 'love-ly' February "Happy Together" Classic Kit!!!
This week the design team is going to use the February kit for layouts and projects that are NOT Valentine's related. The Noel Mignon kits are so versatile, that you can use them for all sorts of topics and themes in your scrapbooking, cardmaking, and pocket pages.
I decided to make a page for my daughter's 9th birthday party this week.
I was able to use the "Happy Together" Classic Kit, although her party didn't have anything to do with Valentine's Day. It took place in the middle of July, and was Parisian themed. But the colors of the paper and embellishments matched my photos perfectly!
I really loved the different textures in this month's kit, I used chipboard, embroidered lace ribbon, and cardstock die cuts as embellishments on my layout. I even added in a few self adhesive sequins from a previous Noel Mignon kit.
I embellished my title with another chipboard sticker, one of the CUTE glittered bows, a flair button, and painted the wood veneer "Happy" pink to match the colors in the layout. I used the black Thickers that came in this month's kit for my title and continued using the adhesive lace ribbon and sequins to keep the layout looking cohesive.
I finished off my layout with a piece of vellum for my journaling, pink stitching around the entire page, a paper ribbon with part of the branding strip on the upper right hand side of the layout, and a few light pink mist splatters.
Thank you so much for stopping by! I would love to see what you are working on with your Noel Mignon kit over on our Member's Facebook Page, so please stop over and post your creations.
Hi everyone! Sarah here with another layout using the February Class Kit called Happy Together. This time I wanted to showcase more love, but for my best friend. This girl is my person. She's my best friend and I lovingly call her my lobster, which is a quote from the TV show Friends.
I LOVE the watercolor hearts paper from Pink Paislee that came in the kit and knew I wanted to feature it as a background. To add a bit more interest, I combined it by adding a strip from a Simple Stories paper up on the top 1/3 of the layout so it almost looks two-toned. I also added a strip of pink cardstock and layered it with a piece of the self-adhesive ribbon.
Since the Simple Stories paper was already embellished with the florals and stripes, I didn't need to do much to it. I added those adorable Lawn Fawn elephant stamps and a fabric bow.
For my title, I combined the Elle's Studio smaller letter stickers with the Thickers. I also added that Crate Paper layered ribbon to help highlight the title and I love the way it fits just so.
To finish out the embellishing, I added the layered heart by Crate Paper and added a wood veneer word on top. I also journaled on the die cut, which I outlined with my pen in order to help it stand out more against the background paper. A Pebbles arrow sticker and a few small stamped hearts (from the Lawn Fawn set) helps round out my layout.
I encourage you to look at your Valentine or "Love" themed supplies and scrap about someone in your life who you love, but isn't your significant other.
Thanks so much for stopping by today and I hope I was able to help create a spark of a idea for a layout for you. Please be sure to stop by the blog everyday for a new layout and project by our awesome design team. Have a great weekend!
Hey guys, Michelle here. Happy belated Valentine's Day! We don't make a big to-do for Vday although I do make some special treats for the kiddos. My littlest was pretty excited for "I love you day" as she called it :) So today I'm sharing a page about her filling out her Valentine's Day cards for her class using the Happy Together Classic kit (the classic kit is sold out but there's still a few of the Daily Diary kit left!)
I absolutely adore that watercolor hearts patterned paper and it made a nice background for my photos. The pink shipping tags were leftover from a kit last year.
And those chipboard alphas in the kit...I'll be so sad when I've used them all up! Definitely one of my faves!!
I was excited to use some of the "love"-ly papers in this month's kit! It's a good thing I took a picture of each of my kids last Valentine's Day with their class Valentines and the baby on his 1st Valentine's Day in his car seat---hey, at least it's red!
The quote on the Simple Stories paper was perfect for me to use!!!
I made one embellishment cluster on each side of the layout. I used a combination of fussy cut hearts, a tag, the amazing fringed paper heart, the branding strip, and wood veneer words from the kit. I painted the wood veneer words white so they would coordinate better with the layout.
For this embellishment cluster I used a few of the die cuts, some of the cut apart words, the pink alphabet (number) stickers, and again some of the wood veneer words-painted white. I finished off the layout with a journaling card from my stash.
Thank you for stopping by today! I would love to see your creations with the "Happy Together" Classic Kit over on the Noel Mignon Members Facebook page or on Instagram #noelmignon. Have a great day!!!
Hello everyone! Sarah here with a Valentine's Day layout using the February Classic Kit. Confession: I rarely scrap about Valentine's Day. We don't tend to make a big deal about Valentine's Day, but every so often I will say something about it in my scrapbooks. For this layout, I went old school. I am working on an album that is all about the time when my husband Josh and I were dating. I didn't start scrapbooking until after we were married and one day I realized I had never gone back and documented the time when we were falling in love. That was a pretty special time so I wanted to start getting it documented. I have been working with an 8.5x11 album so this layout is that size.
*I apologize for the glare in the photo - that's in the photo from the flash of the camera...before we knew about all the cool tricks to prevent that...
One thing I did here was use two bold patterns right on top of each other. I used the Pebbles papers in the two-toned pink stripe as my main base and then used the heart gingham paper on top as my background. In order to distinguish the two, I used my pen to make a double outline all around the gingham paper.
I also used the small piece of patterned vellum behind the picture. I knew I wanted to use the "XO" strip along the bottom and wanted to bring out more of the blue that's accented in that strip. It adds a nice subtle layer.
For my accents, I loved that little 2 of hearts die cut and thought it was perfect since there's the two of us in the photo. I also cut down the "Happy Valentine's Day" flag to say "Happy Valentine." Since I already had that sentiment on the larger heart up top, I wanted it to say something different. Don't be afraid to make the products work for you! I also added that gorgeous flair badge for a little gold accent.
I also added some floral stickers to help round it all out. For this layout, I didn't need any journaling. This picture isn't on Valentine's Day, but the date on the back of the picture says February so I figured it was close enough. Plus, we are both wearing red shirts and we had hit a point where we were having the marriage talk and being each other's "Forever Valentines." I'm really pleased with how it turned out and I'm excited to add it to our dating album.
Thanks for stopping by today! If you would like to see more of this kit being used, please be sure to come back everyday for another designer's project using this kit. Have a great weekend!
Hey guys, Michelle here with some Valentine's Day cards. Can you believe Valentine's Day is next week?? There are lots of embellishments in the Happy Together Classic Kit so it was pretty easy to put together several cards for next week!
For 2 of my cards I used the distress crayon that came with the kit. These are lots of fun...I really need to get more! On one of the cards I used the stamp that came with the kit. After stamping with Versamark I colored just a little bit of the image with the distress crayon & then used a watercolor brush to spread the color around the image.
For the other card I actually pulled out another distress crayon that came with one of the summer kits last year to create a bit of an ombre effect. To do this I colored on the card with the yellow and pink distress crayons, then used a watercolor brush to blend it together. Then I added some puffy stickers. That's it!
For my last 2 cards I used the heart embellishments from the kit along with some other elements from the kit. I think the card with the Elle's Studio strips is my favorite :)
Before I share my project this week, I want to share my unboxing video of the "Happy Together" Classic Kit for anyone who's interested to see exactly how many goodies come in the Noel Mignon Kits.
In honor of Valentine's Day, the design team is sharing Valentine's specific projects and layouts this week. I am going to share a set of Valentine's cards that I made with the "Happy Together" Classic Kit.
There are so many great embellishments (and papers) in this kit, so these cards came together in a snap!
I started with the ribbon on this card, and used a piece of red embroidery floss from my stash to "cinch" the ribbon for some added texture.
Next, I went to the puffy stickers and coordinating cardstock stickers from Pebbles to build up the floral cluster. I used some pop dots to create the various layers. Last, I masked off the stamp set to create the "I love u" sentiment.
I started the second card which was inspired by all of the "xoxo" pieces in the kit.
Again, I used some pop dots to pop up 2 of the stickers. I also painted the wood veneers dark, dark gray to match the "xoxo" sticker and bring a little more of that dark gray into the card.
Finally, for this last card, I was inspired by the tag stickers with the mini hearts punched out of them. I decided to make them look like they were hanging from the arrow. I used a piece of baker's twine from my stash.
I matted the "I love you" puffy stickers on the white cardstock in the kit and fussy cut around them. this way they stand out on the striped background paper.
I used a black journaling pen to add a few hand drawn lines to each of the cards and they were all complete! I would love to see if you make any Valentine's cards with the "Happy Together" Kits.