Showing posts with label enamel dots. Show all posts

Monday, June 11, 2018

{Pooltime Together} Layout with "The Big Splash" Classic Kit

I am LOVING working with my "The Big Splash" Classic Kit this month!!!  I have another swimming pool layout to share today.  I went with a fairly monochromatic look today to mimic the colors in my photos.

I started with the wave patterned paper as my background and added a strip of the palm tree paper down the right hand side.  I wanted to seperate the 2 patterns in a bold way, so I matted a strip of fish patterned paper and a strip of washi to run down that seam. 


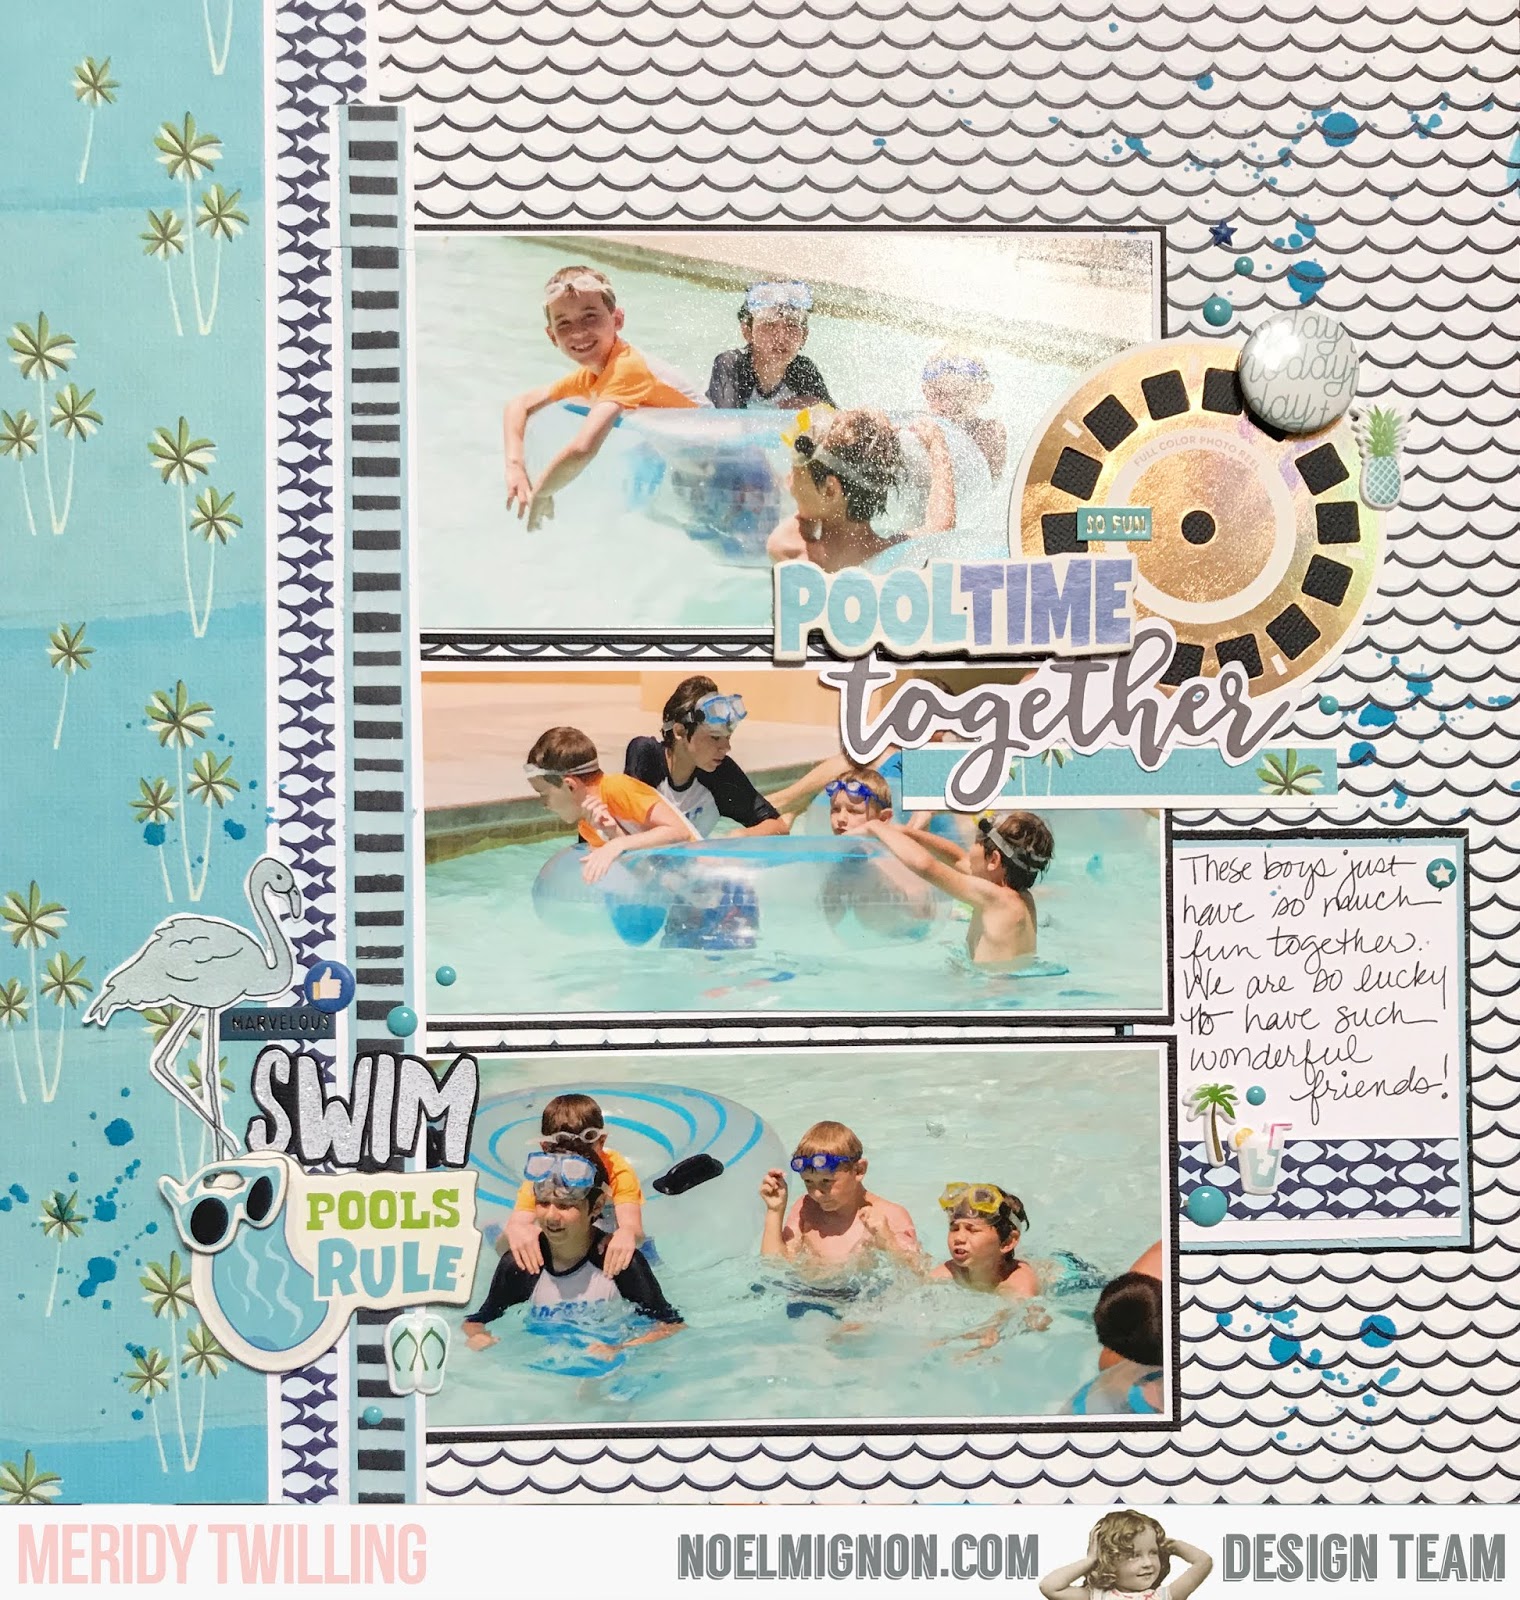
I made my own journaling block with a few scraps of paper, a few puffy stickers, and some enamel dots.


My title area is actually covering up some "photobombers" that invaded my pictures.  I placed the viewmaster slide, chipboard, and sticker so that it covered up the strangers in the background.  I embellished this little cluster with a flair button, some stickers, and a couple of enamel dots as well.


My last embellishment cluster consists of some more chipboard stickers, a couple of enamel dots, some stickers, and a stamped image of a flamingo---with BLUE ink, so it matches the layout. I outlined the stamped image with a blue pen. I used the white glitter alphabet stickers to spell out "swim" on black cardstock, then fussy cut around the word, so it popped against the busy background.


The final step was to splatter the layout with some Tim Holtz mist that came in the kit.  It is the perfect shade of blue for this monochromatic layout, and with that, the layout is complete. 

Thanks for stopping by today!!!


Monday, June 4, 2018

{Time for a Swim} Layout with the "Big Splash" Classic Kit

Hello friends!  Now that summer is in full swing, I am so excited to be working with "The Big Splash" Classic Kit.  I think there are still 2 more of these amazing kits available in the store.  I'm so sad that this will be Noel's final kit, but I'm going to make the most of it!!!


I absolutely loved the "Marco Polo" paper in this kit, and knew I wanted to use it right away!!!  So it became the background paper of the first layout I made with the kit.  I pulled the light blue from the water on the paper and matted it on light blue paper.  

I wanted to pull out the red, black, and gold color on the paper too.  So that's how I chose the papers to use in the layers behind the photos.  The ombre gold ribbon in the kit was so beautiful, I added a strip down the left hand side of the layout.  I layered the ribbon with a couple of border punch strips with inked edges to add a little more texture to the layout.


Next, it was time for me to add a title.  I really wanted to use the pink Thickers that came in the kit, but when I had the whole page completed, the pink looked a bit off to me.  So I colored right over the pink with a red sharpie for a perfectly matching title.


All 3 of the embellishment clusters contained a stamped phrase on yellow paper, some enamel dots, and a puffy sticker from the kit.  I also threw in some stickers, a chipboard sticker, and the date using the glitter alphabet stickers. 


I really loved working with these supplies from the kit and using a bit of an eclectic and unique color scheme for swimming photos.  Thanks for stopping by today!


Friday, March 30, 2018

You Are Awesome: You Go Girl Daily Diary Kit

Hi!  Sarah here with my last layout using March's You Go Girl daily diary kit.  I really wanted to use that little puffy sticker of the Boston terrier....I had a Boston terrier...it was meant to be!!!  I had this picture of my sweet Brody, who passed away last April.  


For this layout, I made it 8.5x11 to go in an album I had started a few years ago and never gotten back to.  It's basically a "Stories" album where I'd like to house some special stories from our lives.  This picture of Brody is perfect to go into the album.  I used an 8.5x11 piece of navy paper with gold foil hearts on it that went really well with the 6x6 papers from the kit.


The navy foam Thickers were perfect for the color scheme.  I cut out the camera from one of the cards in the kit and put that adorable dog face in the center of the camera.  It was perfect!


The #flawless die cut was so great to use here because he was pretty flawless.  


One of the journaling cards from the kit was so great to place my journaling on.  I also pulled out a chipboard "Hello" from my stash and some navy enamel dots from my stash as well to help pull it all together.

Thanks so much for joining me today.  We can't wait to see what you're making with March's kits!


Monday, January 22, 2018

{Chick-let Crop} Layout with the "She's So Crafty" Classic Kit

Hello everyone, it's Meridy here.  I have another "crafty" layout to share this week with the "She's So Crafty" Classic Kit.  Today I'm sharing a layout about my kids scrapbooking with me, at a crop especially for kids!  I'm so lucky to have such a great group of scrapbooking friends, we do all kinds of cool things at our crops all year long.

The bright colors in my photos were just perfect for the bright colors in this month's kit!  I started with a couple of strips of the patterned paper with scissors, rulers, and paint brushes on it.  I didn't want that busy pattern to overwhelm my layout, so I just used 2 small strips.


I wanted to try something different, that I don't usually do, to mix things up a bit, so I decided to do a very symmetrical design.  I placed everything fairly evenly right down the center of the 12x12 page. 

The "LOVE" card, was one of the cut apart cards in the kit.  I added the large button to read as a "O" instead of using the vintage sewing machine that was printed on the card. 


I dressed that card up with the cute scissors charm from the kit, a few enamel dots, and a chipboard camera.


Finally, I added my journaling and the title across the top of the photos to finish off the layout. 


And that wraps up my layout share for today.  I would love to see your Noel Mignon "She's So Crafty" layouts on Instagram #NoelMignon 


Monday, August 28, 2017

{So Happy} with the "Weekend in Paris" Classic Kit

Hello there!!!  Today I'm sharing my last layout with the "Weekend in Paris" Classic Kit.  I loved working with the soft colors in this kit this month.  I really like making double page layouts for my albums mainly because I like both sides of the layout to match, and not clash with each other.  But I enjoy creating single page layouts because they are a nice change of pace for me.  So sometimes when I create single page layouts, I make sure to use the same supplies (and in this case pictures of the same event) on the other side, so the pages still match.  Today I am sharing an example of this.

This week I created this page to match the layout I shared last week.


Here is the layout I shared last week, as you can see I used the same papers and embellishments.


Since I used the same supplies and photos from the same event, the 2 pages will flow from one to another in my album.  

I tried to mimic the embellishment clusters that I used last week, I did this by using cardstock stickers, vellum phrase stickers, a bit of the lace, crepe paper flowers, mini alphabets, and enamel dots.  


I just adore the little camera sticker, and had to use it on one of my layouts this month.  It is precious!  I used more of the same types of embellishments on this cluster as well.  This wrapped up my layout and really brings the eye back and forth between the 2 separate 12x12 layouts to create one cohesive design.


 Thank you for stopping by today!!! Have a great week!


Monday, August 21, 2017

{Sweet Little Baby Face} layout with the "Weekend in Paris" Classic Kit

Hello there!  It's Meridy here and I have another single page layout using the "Weekend in Paris" Classic Kit!  The colors of this month's kit are so soft, just like the soft colors in the photo I choose for this layout.  


I started this layout with 4 triangles I cut from 6x6 squares of my patterned paper.  Once I got them laid out, I decided to add some more patterns with the branding strips on the right hand side of the layout.  I wanted to mimic the vest I'm wearing in the photo, and the cream colored trim in this month's kit was the perfect match!

Next it was time to add my other embellishments, such as a few puffy stickers, cardstock stickers, enamel dots, and vellum phrase stickers.  I tried to use all kinds of patterns and/or colors in order tie everything on this layout together.


Finally, it was time for me to work on the little cluster of embellishments on the upper left hand side of the layout.  I continued using the enamel dots and the puffy stickers to create continuity on my layout.  I also added a tissue paper rose and a flair badge.  


Thank you for stopping by today!  I would love to see what you have created on the Noel Mignon Instagram #NoelMignon.


Monday, August 14, 2017

{Hello, My Love} layout with "Weekend in Paris" Classic Kit

Hello all!  It's Meridy here with a layout I made using the "Weekend in Paris" Classic Kit.  I went for a bit of a monochromatic black and white look with a little touch of aqua.  I thought that the black and white picture of my son from last year would go perfectly with this color combo.


I layered a piece of black cardstock with the "b" side of one of the Maggie Holmes papers from this month's kit and topped that with the heart print paper to create the base of my layout.  Once I had that set up everything else layered together pretty quickly.

I knew right away that I wanted to use the "hello" wood veneer and paint it white to match the layout.   As I was going through the rest of the embellishments from the kit I found the word "LOVE" on the puffy sticker sheet.  I thought that the "hello" and "love" were perfect for a title, and I decided to add the word "my" with the mini alpha stickers for the final title of "hello my love".  


I added the cute clip with hearts on it right above my title, a sprinkling of dark grey enamel dots and the self adhesive gold sequins,  2 banner die cuts, a bit of the gold washi tape, the date, and a couple of label stickers to finish off my layout.


Thank you for stopping by today!  I would love to see what you have created lately with your Noel Mignon kits on Instagram #NoelMignon.  Have a great week!!!


Monday, July 17, 2017

{Crazy Cousins} with the "High Five" Daily Diary Kit

Hello friends!  Happy Monday!  It's Meridy here and I have a 12x12 layout to share with you today.  I am using the "High Five" Daily Diary Kit and the paper pack add on for today's layout.   I am so happy to be using all of these bright summery colors this month, so I found some bright summery pictures to use on today's layout.


I started with the background papers and stitched them down to add some texture to the layout.  Next, I started layering the patterned paper behind the photos, building up to the "Be Happy" bingo card.


Next, I pulled a variety of different embellishments from the kit, including enamel dots (from an older Noel Mignon kit), the puffy sticker labels, some sequins, and Thickers to spell "100%".  I used these embellishments to create a couple of clusters, one on either side of the strip of photos.  I added a little journaling, and that wrapped up the layout!


Thanks for stopping by the blog today!  I would love to see what you made with your Noel Mignon kit this month on Instagram #NoelMignon.


Monday, June 19, 2017

{H2O Day} with the "Dive In" Classic Kit

Hello!  It's Meridy here today.  I have a 12x12 layout to share using the "Dive In" Classic Kit.  I think there are 2 more of these kits left in the store, and let me tell you, they are PERFECT for those bright, summer photos that you are taking these days!

The layout I'm sharing today has photos I took about a year ago of Water Day for my son's 1st Grade class.  I was able to get a couple of photos of the whole class together, and since there were so many bright colored swimsuits and towels, this kit was a perfect match!


I tried a BRAND NEW TECHNIQUE, that I have never tried before on this layout.  I have been accumulating a few stencils here and there over the years, and I wanted to try using texture (modeling) paste with them.  But, when I wanted to start my layout, it was late at night, and I couldn't go to the store to pick any up.  So I turned to Pinterest, which led me to Gabrielle Pollacco's blog, and her recipe for homemade modeling paste!  Basically, she uses baby powder, white glue, white acrylic paint, and a little water, all of ingredients I have at home, so I whipped some up and went to work using it with my stencil.  And it worked!!!!


I was so excited that I had this new technique to add a little texture to my layouts.  With her recipe I have PLENTY of modeling paste left over to use it on more layouts in the future.  I sealed it up in a small mason jar so it won't dry out.  

I decided to build up my embellishment cluster and title in the same area that the textured triangles were at the top of the layout.  So that's where I started using buttons, cardstock stickers, and enamel dots from this month's kit!  I added my title with alphabet stickers from my stash.  I finished off the clusters with a few splatters of yellow mist.


I created a second, matching cluster near the bottom of my layout, where I also had some more textured triangles.  This second cluster balanced out the one at the top of the page.  I only added a tiny bit of journaling to this layout, because I have a few more pictures of my son at this event.  Therefore, I will add a little more detailed journaling to the layout I create with those photos.


Thank you for stopping by today!  Let me know if you try out the modeling paste recipe, I just love this new technique that I finally braved!


Monday, June 12, 2017

{Cool Summer Swimming} with the "Dive In" Classic Kit

Hello friends!  It's Meridy here, and I have a double page layout to share with you today using the "Dive In" Classic Kit.  As the name of this kit suggests, it is perfect to use with swimming photos.  This week the design team will be sharing layouts all about water, swimming, the beach, etc. 

I used a few 3x4 photos and one 4x6 photo of my kids swimming last summer on this layout.


I grabbed a few papers that used the same blues, pinks, and yellows in the photographs.  Once I choose the patterned papers, I pulled various coordinating embellishments from the kit. 

I really loved the flamingo trim, so I used it as a strip down the left hand side of my layout and cut a few flamingos from it to use as "stand alone" embellishments as well.


I wanted the look of rippling water, so I used some of my old decorative edge scissors to cut a few "waves" from various shades of blue paper.  I stacked those bits across the bottom border of my layout.


Next, it was time for me to add titles, journaling, and embellishments to the layout.  I started with my title "Cool Summer Swimming" and created it with a set of Thickers, a set of alpha stickers, and a chipboard sticker all from this month's kit.  Then I added a few enamel dots, some of the gold rub-ons, a few buttons, and some vellum stickers from the kit.


I added the same types of embellishments to the opposite side of the layout to balance the 2 sides of the layout.   I pulled a couple of extra buttons from my stash for this embellishment cluster.


I added a subtitle of "Making a Splash Jump" on this side of the layout to balance out both sides of the layout a little more.


And that wraps up this layout.  I would love to see what you create with your "Dive In" kits on Instagram #NoelMignon.  Have a great week!!!