Monday, April 2, 2012
First Primrose Lane Kit & Spot Colored Photos
Happy Monday, Everyone! I have my first Primrose Lane Kit layout to share with you today. This kit sold out quickly, but if you would like to sign up for the Waiting List a Kit Subscription, be sure to check out the information in the sidebar of THIS PAGE.
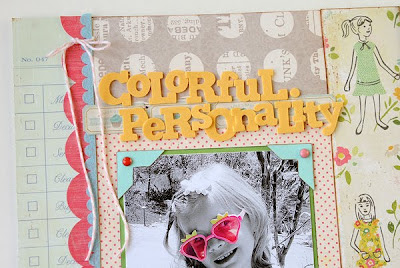
COLORFUL PERSONALITY
Every day my daughter comes home from school, strips off her "regular" outfit, and puts together a perfectly, crazy & colorful outfit of her choosing. These ensembles make a daily appearance and totally crack me up. I wanted to record this fun part of my daughter's personality on this page.
I began the page with a full-color photo, but as I built my page, it looked way TOO chaotic with her colorful outfit. I decided to change the photo to black and white, and then spot color her Strawberry Shortcake Sunglasses to call attention to her fun and funky personality. It's easier to do than you might think!
Here is how you create a Spot Colored Photo in Photoshop Elements 5.
1. Open your photo file. Make sure your "Layers" palette is visible by selecting Window>Layers.
2. Create a duplicate layer of your photo on top of your original image. Select Layer>Duplicate Layer. A window will pop up and ask you to name this new layer. The default will say "Background Copy". You can leave it as is, like I do, or rename it whatever you would like.
3. Next, we will change the top layer, or the "Background Copy Layer" to black and white. The original colored image layer underneath your Background Copy Layer will remain untouched.
4. In the Layers palette, make sure the duplicate layer, or top layer, is highlighted. Select Enhance>Adjust Color> Adjust Hue/Saturation.
5. A window will pop up titled "Hue/Saturation." Select the box in the lower right corner that says "Colorize". Next, change the Hue to 0 and the Saturation to 0. Adjust the lightness, if desired. (If you would like your top layer to be Sepia toned, change the Hue to 35 and the Saturation to 25).
6. Next, select your eraser tool in the toolbox and adjust the size of the eraser tool, if needed. You can do this in the top of the toolbar, or by pressing the "[" or "]" keys.
7. Carefully, erase away the top black/white layer to reveal the colored image below in the areas you desire. When you are finished, flatten the image to save as a new jpeg file. Do this by selecting Layer>Flatten Image . Then choose "Save As" to save your newly created photo.
8. Print out and scrap!
See! Easy-peasy! And a great technique to use when you want to call attention to a particular part of your photo.
I hope you enjoyed this quick-tip today! See you again soon!
Jana Eubank
Subscribe to:
Post Comments (Atom)


1 comment:
I love this layout! GREAT use of that cute "girl" paper in the kit. I've been wanting to use it too! And I love your tutorial! That's awesome!
Post a Comment