Saturday, July 30, 2011

Summer Lovin'

Happy weekend friends! I have a new favorite LO to share with you today.

A few weeks ago I took a trip with my boys down to the beach for a few nights. I managed to snap a shot of my toes on the wet sand and a shot of some beach cruiser bicycles that were propped up against a wall at the edge of the beach. One thing I really like about this LO is that is is all about the journaling and the photos evoke the feeling of summer, without any faces. I think this might actually be the first "faceless" LO I have done. I also love the "beachy" colors...it just makes me happy! :)

This one uses a lot of theMary Ellen kit stuff with some Salt Water Taffy touches and letters from Jump and Jive. All of these kits are still available! Come and get them so I can make some more! :)


Friday, July 29, 2011

Going embellishment crazy with Salt Water Taffy

So I FINALLY got a chance to really dig into the Salt Water Taffy kit this week, and because it's the cutest kit, I think I may have gotten a little exuberant with my embellishments.
I decided to add extra journaling along the bottom, so I traced the different sized alphas in the kit to add the numbers.

I love this kit so much! The colors make me very happy and I can't wait to play some more!

Thursday, July 28, 2011

Two-Page Layouts: Happy 1st Birthday


Hello again, friends! Today, I'm wrapping up my blogs series for this month of focusing on two-page layouts. For my layout today, I used the "Delightfully Domestic" kit using photos of the girls' 1st birthday. I did a highlight page using my favorite photos of their birthday party. I added a couple things from my stash to this layout as well. I've been hoarding the KI Memories calendar paper and cut that up to use on both of the pages. I also incorporated a Maya Road chipboard cupcake and a candle sticker by American Crafts. Everything else is from the kit. I have scrapbooked several of these photos individually but I love the idea of creating a two-page layout of their birthday every year to tell a more complete story. And since I have twins, it works perfectly so the girls can each have pages of their birthdays someday. 


Here's a look at the cupcake...the rub-on is by Melissa Frances.


And here's the title...I also layered a tag in the kit, a rosette by American Crafts and a Maya Road stick pin.


I hope you enjoyed my blog series this month. It's been a great challenge for me to create these two-page layouts. I'm going to make it a goal to create a two-page layout with each month's kit so these definitely won't be the last two-page layouts you'll be seeing from me. 

See you next week! :)
Jill

Wednesday, July 27, 2011

The Not So Pretty

Do you ever take pictures of the not so pretty things in life? For example, a messy living room or a bad hair day? Well you should! They may not be the prettiest pictures in the world but they are a part of your life so why not document it.

This past Sunday I had put out the sprinkler for my girls to play in. Little did I know that creating mud cakes and feeling mud squish between their toes would be ten times more fun than running through the sprinkler! I ran in the house and took a few pictures to document it.


I used items from the Salt Water Taffy kit and a few items from previous kits.

Happy Creating!
-Diana

Monday, July 25, 2011

Christmas in July

Merry Christmas!!
:)
There is one more week left in July
so I figure it is time for a Christmas in July
celebration!
It's not too early to start thinking about Christmas cards either!
Recently I pulled out my Bedford Falls kit
(you are in luck...there are still a few left!!)
and knocked out a few cards...
Having a kit full of Christmas stuff sure makes it easier to make my Christmas cards!

Feeling festive yet??!

Here is a little layout inspiration for you too!
I recently submitting this layout for the CK Sketches column in the Nov/Dec issue of
Creating Keepsakes.
Obviously it did not get picked up & I am sharing it here instead!

Everything here is also from Bedford Falls except for the alphabet, twine, & red scalloped border.
*****
I put up a Christmas in July challenge over on the challenge board today.
Jump in and celebrate with us!
:)
Happy holidays!

Friday, July 22, 2011

A couple of cards with the Salt Water Taffy kit!

Some scrappers make creating cards look effortless.

However, trust me when I say that I am not one of them.

I think it took me two hours to make these two little cards. PATHETIC!

Regardless, I finally got them done- just in time for my parents' birthdays! (Yes, they both have birthdays in the same week!)


I made them with the Salt Water Taffy kit. Even though making the cards was hard for me, at least the products were super easy to work with. :)

(The kids craft project is on hiatus this week because I left my camera with my craft project pictures on it at my church, so it will return next week! My apologies!)

Thursday, July 21, 2011

Two-Page Layouts: Splash Into Summer


Happy Thursday, friends! I have another two-page layout to share with you today using the fabulous "Salt Water Taffy" kit that continues my blog series this month. We recently took the girls swimming at a baby pool near my parent's home when back for a recent visit and took a bunch of fun pool pictures. I selected and used 10 photos on this layout in a couple different sizes - 4 x 6 and 2 x 3. 


I punched and cut a variety of circles...the "thermometer" patterned paper by Pink Paislee was perfect for a summer layout. 


On this layout, I designed everything and then realized I wasn't sure where I wanted to put my journaling. A couple of the open circles were the perfect spot!


I also have a bonus layout for you today also with "Salt Water Taffy". I recently made the girls princess crowns and wands to play with and took some photos of them playing. They love Cinderella and Belle and we've been talking about being a princess. They are so cute with their little wands saying "Wish...wish." Ha! I love it! 

For this layout, I used a piece of My Mind's Eye patterned paper as a background. The little striped pieces are by Lily Bee. 


I love the Hambly washi tape in the kit and used that to highlight one of the main photos. 


The pink gingham half circle and flower were a happy accident. I had smudged the cardstock underneath and needed something to cover it up. 


I'll be back next week with another two-page layout!
Jill

Wednesday, July 20, 2011

Cooling Off

It is crazy hot here in Oklahoma. We have had temps in the 100s for 40 plus days! Insane right? One of our favorite things to do when the temperatures are unbearable is to eat ice cream. Such a great way to cool off! I created this layout with items from the Salt Water Taffy kit. Hurry and get yours today!


What ways do you cool off when the weather gets hot? I'd love to hear about it.

Happy Creating!
Diana

Tuesday, July 19, 2011

Bloggity Blog Blog

This weekend I sat down at my computer to bog and just thought....bleh. Ever get to that point where something you look at every single day is suddenly just so ugly you can't take it another second? Yeah, that's where I was at. So I'm experimenting with some things like buttons, solid color versus patterned background, two columns versus three?

And the first thing I decided to change was my Blog Title. And I thought, "Why not make my own?" I mean, I have this beyond awesome Salt Water Taffy kit and I thought it would be fun to take it step by step so I could share how to go about this with you all who might want to build your own blog title too!

Here's my first attempt, and oddly, I love it! I think this will be a fun thing to rotate on a regular basis. It's certainly one of a kind!

So here we go!

It's important to remember that you can make your title any size you like, but I used a 12"wide x 4.5" tall base. Obviously, we are going to be scaling this down in Photoshop when we're finished designing the actual title, but starting with the standard 12" papers will make things much easier to construct, otherwise your patterned papers will wind up looking over-sized.

Step 1: Choose your supplies


Here are the supplies I used from the Salt Water Taffy kit:
Zing! Embossing Powder in Mustard
Jenni Bowlin Butterfly Acrylic Stamp
Washi Tape
Echo Park Country Drive 'Bee's Knees' paper
We R Travel Light Tag
Hambly 'Birds on a Wire' Overlay
MME Lime Twist 'Happy Go Lucky - Togetherness' paper
MME Lime Twist 'Life of the Party - Bloom' paper
MME Life of the Party 'Be You' Accessories Sheet

Extras from my own stash:
Versamark pad
Ranger Heat Tool
Sewing machine
Glossy Accents
Glue Dots
Foam Dots
Pumice Stone Distress Ink
Finger Dauber
Chipboard

Step 2: Trim your papers to size


Once you've decided on the papers you want to use, cut the primary piece to 12"x 4", the bottom piece to 12"x1", and cut one length of birdies out of the Hambly overlay.


Cut scallops onto the bottom edge of the blue woodgrain strip. You can draw them first if you need a guide.


Trim closely around the edge of the birdies so that this strip looks a little cleaner.

Step 3: Stick it down


Glue down the strip of birdies to the honeycomb paper so that the left side sits higher than the right side.

Step 4: Washi Tape


Find the Washi Tape in your kit and run a strip of it along the seam between the honeycomb paper and the woodgrain paper.


Run another length of tape on top of the first so that it looks like the photo below.


Smash down the loops you left.


Stitch down the center of the tape with a sewing machine.


After you're finished stitching, flip up the top and bottom edges of the washi tape and de-stick using some corn starch or baby powder.
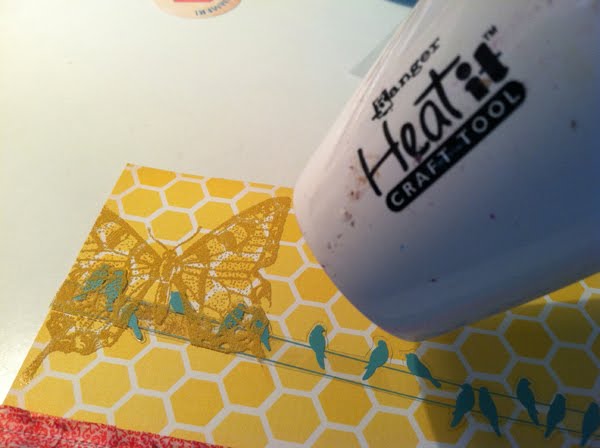


Step 5: Stamping


Grab your supplies - the Jenni Bowlin stamp and Zing! embossing powder from your kit as well as some Versamark ink and a heat tool.


Lay down a piece of paper to catch the embossing powder and stamp the left side of the paper, so that the stamp goes off the edge a bit. Sprinkle on a generous amount of embossing powder so that it completely covers the stamped butterfly.


Shake off the excess onto the paper beneath and pour it back into the jar.


Heat set the embossing powder. I used to use the purple Marvy embossing gun, and that's fine. BUT NOOOOOOOW I use the Ranger heat tool and O. M. G. it's amazing. You don't realize how loud your gun is until you use the Ranger one. It's soooo quiet.

Step 6: Inking


Use Pumice Stone Distress Ink and a finger dauber to rub on a little bit of ink over the stamp, and right around the edges. It might look a little rough at first, but keeping rubbing the ink in, and you will end up with a shadowy result that really pops off the page!

Step 7: So far...


This is what you should have so far.

Step 8: The tag


Grab one of the tags from your kit and put a few foam dots on the back. Stick down to the left side of the piece, over the washi tape. Glue the twine into place with a little gob of Glossy Accents.

Step 9: Make the whirligig


Cut a 1.5" square out of the MME paper. You don't have to draw the lines and dot if you are comfortable making whirligigs, but if you're new at it, you might find it helpful when cutting.


Fold over every other wing and glue to the center of the square.


Glue a little button over the center of the whirligig to hide the ends you just glued.
Put a couple glue dots on the back of it, and stick to the top left of the tag.


Step 10: The Sticker


Cut the sticker in half.


Stick it to the top right of the piece.


Stitch over the sticker with a sewing machine.

Step 11: Measure for chipboard

When you get to this point, you are finished. BUT you probably have some waves in the paper from embossing, so we'll need to mount the whole thing onto a piece of chipboard to flatten it out.


Measure the total height of the piece.


Cut the chipboard and then mount the finished piece on top of it.

Step 12: The finished product!


Once you finish the background, you are ready to photograph it for editing. Make sure you put the piece flat on a debris-free surface and get as straight of a photo as possible. Try to avoid using the flash on your camera as it will cast a glare on the overlay.

Open your photo in Photoshop (I use CS3, but most people use Elements. I say use what you're comfortable with.) and make any changes to brightness or contrast that you want. Lasso the background of the picture and delete. Once the background is gone, crop the whole thing down so that it just includes what you want to see. Resize the image to be about 5" wide at 150 dpi, then save the image as a PNG file so that there is no white background - just the image you want to see. From there, go into your blog and change the title to this image.

Lots of steps, but all in all, fairly easy!
Have fun and if you have any questions at all, just let me know!

xoxo
Britt