Showing posts with label Noel Mignon. Show all posts

Tuesday, December 13, 2016

"Wrap It Up" Holiday Cards

Hello Everyone, Lynn here with some Holiday Cards using this month's "Oh What Fun" Classic Kit. Last week I created a tree from strips of paper - you can see that layout here. I used the same design to create some Holiday Cards. Our challenge this week is "Wrap It Up". We used both washi tape and ribbon on our projects. I used strips of washi tape and papers to create my trees and a piece of ribbon for the tree trucks. Here are my cards.
I created most of the cards on white with a kraft background. I created one on kraft with a white background and that's my favorite. Here's some close ups.
I love the translucency of the washi tape. The acrylic words included in the kit added a nice touch and dimension to some of my cards. 
Of course, a few sequins and a puffy heart don't hurt either!!!! 
All my cards are size A2. I love the burlap ribbon for the trunks.
My last card.
These holiday cards are quick and easy to put together. I like having handmade cards ready for that someone special.
Thanks for stopping by and I'll see you next week.

Tuesday, June 7, 2016

Smile! It's Picture Perfect with the "Happy Days" Classic Kit

Hello Lynn here with my first layout using this month's "Happy Days" Classic Kit. There are still some of these gorgeous kits left so grab one quick - it's loaded with product perfect for your photos!! Our challenge this week is "Picture Perfect". We are using a camera, film or instagram motif somewhere on our page. Luckily this is quite easy with this month's kit - lots of options!!
Here's my page. My Mom's neighbor took these photos last week of my Mom and Dad enjoying the outdoors which is difficult for my Dad with his limitations - so this layout means alot to me!!
I used papers from Simple Stories "Life in Color" for this page. I recently made three cards from this collection as well so I was excited to see the full sized papers and embellies from this collection. 
I knew when I saw the paper with the camera and quote exactly what I wanted to create. Here's some close ups.
I clustered chipboard, enamel dots and stickers around the photos.
I added some word phrases on the camera as a final touch! 
Thanks for stopping by today and I hope you have a great week. I'll be back next week with another layout using this month's kit!! 

Tuesday, May 31, 2016

More Shaping Up Going On!

Hello Everyone. Lynn here on the last day of May - can you believe it?!?! I hope you all had a great Memorial Day weekend! I spent time with my family and was lucky to visit some puppies on Saturday, one of which will be my Mom's shortly. Man, they were so sweet! I need a dog soon - I miss my Simba so much and it's quite empty without a dog. I'm working on it!! 
Today I'm sharing my last layout using the fabulous "Pure Bliss" Classic Kit. Our challenge this week is Shape Up For Summer! No pressure, no gym fees or sweating - just repeat a shape on your project. I chose a hexagon shape. I used a hexagon punch to create a background for my photo and embellishments. Here's my page - another 8.5 x 11 size! 
The background came together easily once I got started! I clustered some embellishments and ribbon around the photo.

The title fit perfectly around the hexagons - like it was meant to be! LOVE when that happens. I stitched through the dream part of the title for a little texture. 
I added some splatters of Gold Heidi Swapp Color Shine as a finishing touch! 
Thanks so much for stopping by and we hope you join us in this week's challenge. Have a great week!

Tuesday, April 5, 2016

An Adventure with the Trailblazer Classic Kit

Howdy Bloggers, Lynn here and I'm up on the Noel Mignon blog today with my first layout using the latest and greatest kit from Noel called "Trailblazer". The Classic and Daily Diary Kits are PERFECT for vacation pictures, especially for camping, rafting, hiking or any travel adventures. The blues, browns, reds and greens are so rich and fun to create with. As I was designing my page with the Classic Kit, I remembered my first white water rafting trip I went on YEARS ago. I found the photos and they were a great fit with the patterned papers, especially the photo I chose which captures the end of the rafting day when we finally relaxed and settled down. 
Our challenge this week is "Cut it Out". Basically, fussy cut something or cut a negative shape into your design. I took this challenge REALLY simply and used the Pretty Little Studio "Let's Go" cut out tags. These are perfect sentiments to place anywhere on your page. Here's my page
The My Mind's Eye rub ons that coordinate with the papers are a great addition to my layout, especially the larger one I added to the right of my photo.

The burlap tag, traveler clip and wood circle add textures that fit the theme of my page.
Included in the Classic kit is a "Let's Go" overlay that I tucked under my photo.

There are still Classic Kits available, so grab one while you can - you won't be disappointed!! 
This is a great time to grab a kit as the July-December Kit subscriptions are currently open. For details click on the link above.
Thanks so much for stopping by today and we would love to see what you create with this week's challenge!! 

Wednesday, December 2, 2015

Christmas Cheer!

Gosh you guys, how is it already December?!? Time is passing crazy fast these days, and sometimes it feels like there's no time to even catch your breath before it's time for more work to be done!

I don't know about you, but I seem to get myself into a total funk this time of year, because I always over-commit myself with parties, presents to make, memories to capture, and somehow still keep my legs shaved and eyebrows plucked. THAT'S a tough job! So this year I have vowed to not get the hum-drums. I am keeping it simple. I am planning a few projects that I have been dying to make, and letting the rest fall where it may.

And since we're all just getting started, I figured I'd share a few of my holiday plans with you. And maybe you'll be able to simplify, stay sane, and most importantly, keep those caterpillars from taking up permanent residence on your forehead.

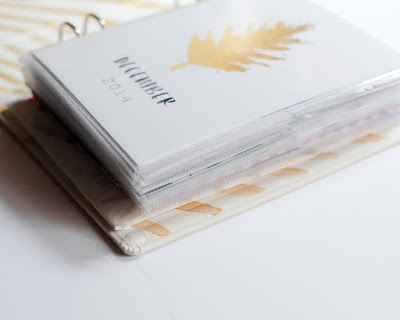
The first plan I have is kind of a maybe plan. As in, I'd REALLY like to do this, but am trying to be realistic about the outcome. I found this amazingly simple and clean December Daily album on Pinterest, by Assari Jarrett, and am loving the idea that this is something I could actually do. It's still the first week of December, I COULD still get this done, right!? PLUS she has a free printable for 2015 that is super cute!

http://azzarijarrett.com/blog/2015/11/december-daily-2014

Have you gotten your tree yet? I always want to have it for the first of the month, and it always seems to dry out by the 25th, so this year I decided to wait until the weekend to get it. This gives me some time to prep some cute little paper projects that I can use my beyond-adorable Mistletoe & Holly kit for. I mean, how cute are these garlands?!


I always have left-over little scraps of paper when I'm finished with my kits - what a perfect way to use them up!

And you know the most amazing part about making paper decorations? They're not breakable. As in your almost-two-year-old can't yank them off the tree and cause a cacophony of sounds of glass breaking, tree limbs going through the lamp shade, and the cat shreiking because he had the audacity to sleep under said tree when said almost-two-year-old pulled it down kind of amazing. YUP. 

And since we're on the subject of non-breakable decor...

I mean, really? How cute are those?!?!?!?!?!
Lots.


So, whether you have lots of time or no time at all, there are so many ways you can make your Holiday special, with just a little paper and imagination. Have you gotten your Mistletoe & Holly kits yet? I CAN'T WAIT to dig in to mine! Now if I could just distract the almost-two-year-old long enough to escape to my studio...

Happy Wednesday, everyone!

Saturday, September 19, 2015

A Show and Tell Pocket Page

Happy Weekend Everyone! I'm back with another project using this month's "Show and Tell" Daily Diary Kit. Last week I shared a mini file folder created for project life cards. Today I created a Project Life page focusing on My Mind's Eye My Story products included in this month's kit. I love the color palette of this collection, and the gold elements are gorgeous! Here's my page.
My photos this week are approx. 2.75 square and I backed them with fun foam to give them dimension and to allow embellishments to go over and under the photo for even more depth. I layered rub-ons, enamel shapes and brads on the cards. I also added some stamping with the adorable Heidi Swapp Stamp set included in the Daily Diary Kit.
The mason jar wood veneer shape is from this month's Classic Kit and I outlined the jar with the fun gold uni-ball pen also from the Classic Lit. I stamped on the wood veneer jar which I haven't done before and I like how it came out!
 
I used a rub on directly on a photo and added some ribbon and paper under the bottom of the photo - the brads that I used are also from MME My Story collection and I cut off the prongs on the back so they would lie flat.
The last card has some ribbon on the back of the heart cut out which coordinates with all the gold elements in the collection.
I hope this page gives you some ideas on how to used this month's Daily Diary Kit.  I will be back this coming Tuesday with another Project Life page using this awesome kit. Thanks for stopping by today and have a great weekend!!


Tuesday, September 8, 2015

Show and Tell Project Life Pocket Folder

Happy September! It's hard to believe but summer is winding down - I know this is a relief for a lot of people but not so much for us here in New England. After this past winter, which broke records - and not in a good way, we have NOT complained about the summer. We love our summers here and are in no hurry for it to leave.
This month the Noel Mignon Classic and Daily Diary kits are my FAV so far as a Design Team member. The kits are always great, but this month is exceptional. I get both kits each month so I'm in heaven!! I wanted to do something a bit different this week with the Show and Tell Daily Diary Kit. I was shopping recently and was inspired by the back to school pocket file folders so I decided to create a smaller version to hold some Project Life cards. The folder was created using a piece of cardstock from the Classic kit. Then I created my cards and tags to put into the folder. Here's the cover
I focused on My Mind's Eye My Story products from the Daily Diary Kit and some from the Classic Kit. Here's the inside of the folder ...
I used PL cards and created a few of my own tags from the 6x6 pieces of paper from the Daily Diary Kit. The photos are from a class my friend and I recently took with Dina Wakley, one of our all time favorite mixed media artists. Here's a look at each tag...
I used a file tab punch on a few of my cards. I added banners and rub-ons from the MME My Story collection. I love all the pops of gold!
This tag is part of the My Story journal cards packet and I added enamel shapes also from the My Story collection in the DD Kit. The decorative brads and rub-ons are from the Classic Kit. The journal strips were typed on my vintage typewriter.
This tag I created using one of the 6x6 papers from the DD Kit. I like that it's slightly longer than the PL cards so it sticks out of the folder a bit! Here's the cards from the right side of the folder...
The ribbon and flair are from the Classic kit and the banner I hand cut from the 6x6 papers in the DD Kit.
The file tab was punched out of gold vellum from a previous Noel Mignon kit. The photo shows a magazine signed by Dina making it more special to me. Here's the last card...
This photo is of an art journal page I created in Dina's class and I love how it came out!
I hope you have enjoyed this project - it's always fun to see different ways to use Project Life Cards and this would make a great little gift for someone. See you later this month for another project using September's Show and Tell Kit!! Happy scrapping!!