Showing posts with label Trailblazer Classic Kit. Show all posts

Friday, April 29, 2016

Here Comes the Sun // 2 layouts

Hey all!!! This week the design team is using the 'here comes the sun' theme and I have 2 layouts to share, one using the Trailblazer kit and one using the new Pure Bliss kit.
 

In my first layout my sun is not quite so obvious (it's the cute little 'Wow' sun rub-on...I've been getting a lot of mileage out of those great rub-ons!). 
Sometimes you just have to scrap the not so great times and this was one of them. My son had quite the start to baseball season last year...getting hit several times (the one in this photo was obviously to the face). It's something most kids have to go through when playing sports and how to come out of it says a lot about what kind of player you are! And how much stress a mama can take on the ball field when she sees her kid hurt ;)  
And since I couldn't resist cracking into the new Pure Bliss Classic kit I just had to create a page with it! I cute a sun free handed  for the top corner of the page and cut the striped Pink Paislee paper into strips (the backside was the yellow paper that I used for my sun). 
I dipped into more of the OA alphas from the Trailblazer kit to add to my title but everything else is from the new kit!

Wednesday, April 27, 2016

Trailblazer Classic Kit: Two Layouts

Hello! Jana Eubank here. Have you been enjoying all of the inspiration this month with the Trailblazer kits? I know I have! I have two layouts to share with you today using this fabulous kit!

.

This month our design team participated in the sketch challenges over at Let's Get Sketchy. What a great place for inspiration! I loved working with the sketch ... here is what I came up with!

HIKE!

My son LOVES being outdoors ... so you can bet I've got a LOT of use from this month's kit with all of it's outdoor goodness! I had this photo of my son all packed up and ready to go on an overnight hike with his scout troop.


I pulled the blues, red, gray, and brown from the kit to go with my son's blue shirt. The burlap accents were the perfect way to add rugged texture. 

Also, I am DYING at how cute the Prima clips are in this kit! I adore the little binoculars and camera so much!


I used one of the October Afternoon label stickers to hold my little bit of journaling about this photo. I added some of the rubons to the bottom for more color and then make a little group of brads to the right to bring more dimension to this side of the design. I love the contrast of the rough burlap with the shiny, smooth brads.


A few mist splatters "dirty" this page up a bit ... perfect for hiking memories, don't you think? *smile* They also help to lead the eye down the page in a downward diagonal line along with the rubons.


The rubon border at the bottom of the page goes off the edge. I used the stars on the roller stamp as another layer and then added some punched chevrons lifted up with foam dots.

Come create a page with us up on the Let's Get Sketchy blog! Noel Mignon is a sponsor there this month ... create a page for your chance to win your own Trailblazer Classic kit. Hope to see you there!

.

For my second page, I played along with the design team challenge "Here Comes the Sun" we are showcasing this week. My sun is very subtle ... but it is there! I promise! It's more of a textural thing added to one of my embellishment clusters ... can you find it?! Hehe!

MIDWAY


Ahhh! ... There it is! In the upper right corner! I added it behind the decorative brads/die cuts that I had placed together at the top of my photos.


To the left of my photo grouping, I cut out the Trailer image/phrase from the My Mind's Eye Happy Camper "Adventure" paper to use as an embellishment. The date is placed on top using the October Afternoon letter stickers.


My title is located at the bottom of the page. How cute is that friendly, little Maya Road sitting on top?!


Thanks for stopping by today!


Tuesday, April 26, 2016

"Trailblazer" Classic Kit

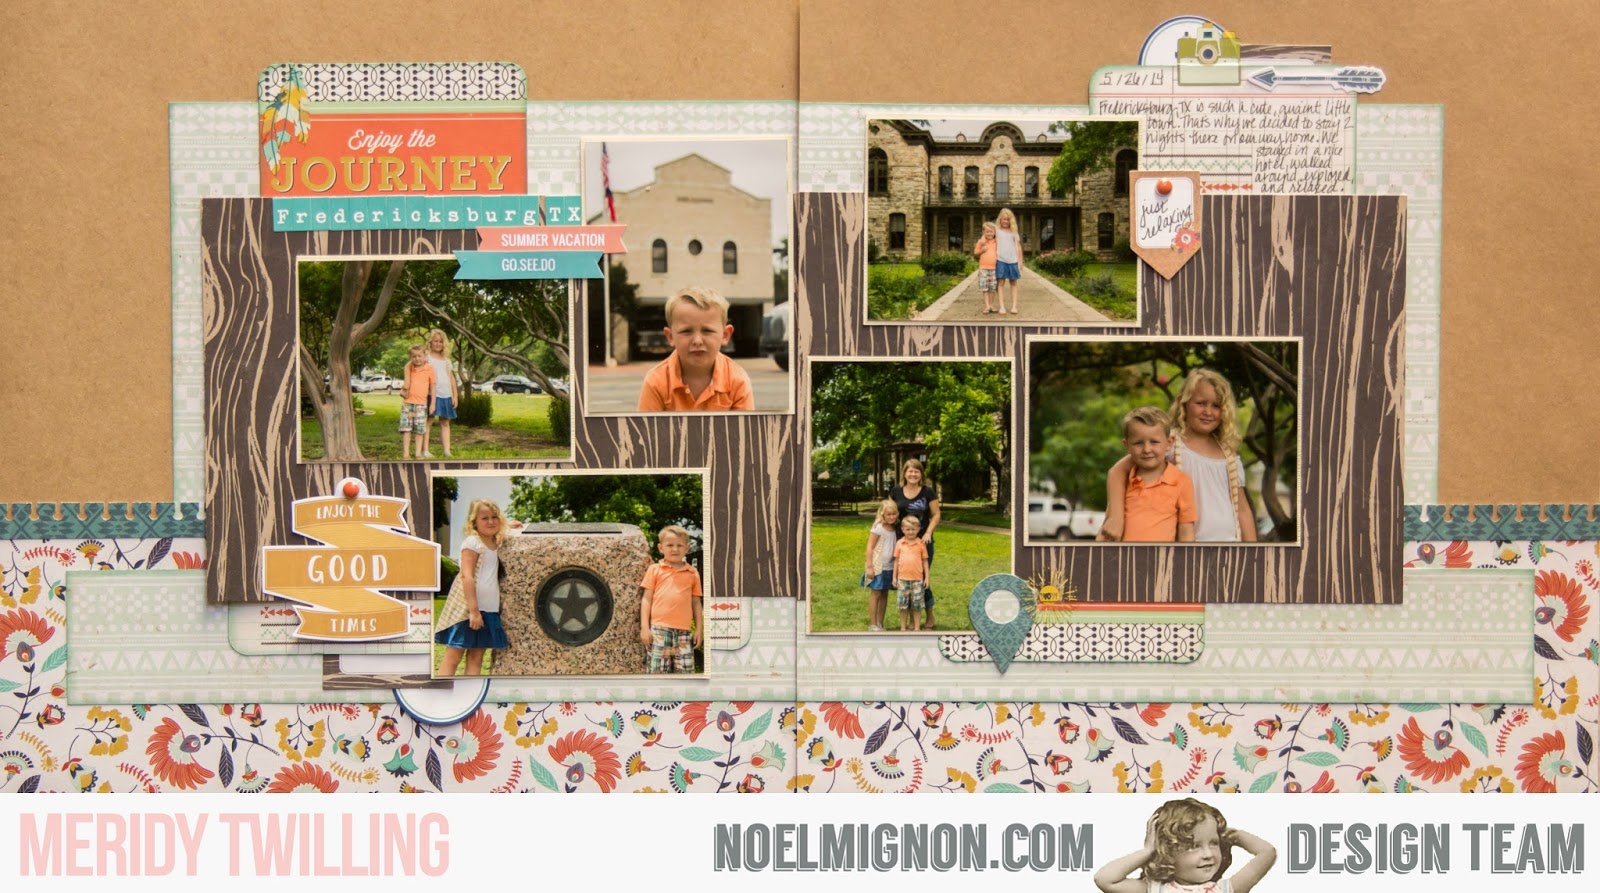
Hello!!!  It's Meridy, I'm back again today with another 2 page layout using the "Trailblazer" Classic Kit.  


I really enjoyed using all of the embellishments on this layout, label stickers, starburst punches from the cardstock, wood veneers, and a few phrases that I fussy cut from the paper in this month's kit all layered together was a change of pace for me.

I made the mini paper hat and boat embellishments from newspaper just like the paper hat and boat my son is playing with in the photos.


Here is a detail shot from the layering down the side of my photo.  I started by placing the October afternoon label stickers, then the fussy cut phrases, next I added a couple of the wood veneers, and finally I tucked in the starburst punches and banners here and there.  I basically kept building up the embellishments until I felt that it looked full enough.


On the opposite side of the layout I used an 8x10 collage so I could include plenty of photos.  I also brought in a few starburst punched circles and some fussy cut phrases to visually connect both sides of the layout.


I love the burlap tag that came in the kit, it adds extra texture to the layout and I again tried to use the same types of embellishments as I did on the opposite side of the layout to bring everything together.  There are so many colors, textures, and embellishments on this layout that I decided to use a red pen to outline quite a few pieces of paper and some of the label stickers in order to make them stand out a bit.


Thank you for joining me today!  I would love to see what you made with your kit this month.  Please share some of your work on the Noel Mignon Members Facebook Page.  

Have a great week!!!

Monday, April 25, 2016

Here Comes the Sun-"Trailblazer" Classic Kit

It's Meridy here with another layout using the "Trailblazer" Classic Kit.  This week's theme is "Here Comes the Sun"...so see if you can spot my hidden sun on this layout.   You have to look close, it's hiding!!!

I decided to create this double page layout using photos from a vacation to Texas in 2014.  I felt like the colors worked well with my photographs.


I loved the October Afternoon "Tiny Type" alphas that came in this month's kit.  I use them quite often in my titles, so I am always excited to get a new color.  The teal in this month's kit was beautiful and versatile.  I also took advantage of the Elle's Studio cut apart banners.  They give an added little pop of color when I need it.  On this page I used the "Summer Vacation" and "Go. See. Do." banners.


I added one of the brad/die cut combos in this corner of the page along with an October Afternoon label sticker and a few rub ons to create a small embellishment cluster.  I also decided to ink the edges of the lighter papers to make them really pop against the background.


I created my journaling on the right side of the layout and surrounded it by embellishments to draw your eye to it.  I think you can spot the "hidden sun" in this photo---it came from the MME rub on package that came in the kit.


This little green camera was my favorite rub on in the package, because I am a sucker for cameras!!!  I just love photography and taking pictures, so naturally, I am drawn to all things camera related.


Thank you for joining me today.  There are a couple more "Trailblazer" Classic Kits available in the store.  They work great for a variety of layouts including vacations, camping, adventures, outdoors, and boys, just to name a few.

I will see you tomorrow with another "Trailblazer" layout!!!


Friday, April 22, 2016

more with Trailblazer!

Hey guys, Michelle here!!! So who had a chance to join the kit reveal last night?!! I currently have it sitting on my desk begging to be opened!!!


I'm so excited to tear into the new kit but first I'm back again this week with another layout using the Trailblazer Classic Kit. This time I'm using archery photos from my son's archery competition last month. 

The colors worked perfectly as well as that wood circle with the deer on it and the burlap thickers!
This week the DT is showing how you can use journaling lines in your layout. Now a lot of times I don't really have a ton of journaling for my photos but this time I did. So I drew some lines free hand for my journaling underneath my photo. Sometimes I draw the lines first, sometimes the journaling, just depends on my mood and what I'm working on! Figure out what works best for you and roll with it! 
I also filled in some spaces with several of the rub-ons and added some spritzes from the Heidi Swapp mist that came with the kit, and I finally had a chance to use that wonderful blue ribbon that came in the kit!

Also, don't forget there's only one more month in the current subscriptions so if you want to continue receiving your awesome Noel Mignon kits at a discount be sure to sign up!!

Wednesday, April 20, 2016

Line It Up: Selfie Stick

Hi, Noel Mignon Fans! Jana Eubank here. This week's design challenge was a really fun one for me! For the "Line It Up" challenge, we were to use journaling lines of some kind, either hand-drawn, stitched, or whatever! I love sewing on my layouts and decided that I would add stitched journaling lines to this next page.

SELFIE STICK

I created this page using the April "Trailblazer" Classic Kit. I was drawn to the October Afternoon "Moaning Cavern" paper with the multi-colored diagonal lines.  I cut the Ecru cardstock down and adhered it on top to use as the base of my layout.


My daughter wanted a selfie stick for her last birthday, so of course we had a gazillion crazy pictures trying the thing out! Ha! I printed them in two strips and anchored them together using the Shimelle Starshine "Kepler" paper placed on a band of layered patterned paper, washi tape and ribbon the navy ribbon from the kit. I added some kraft twine (from my stash) around the photo strips for a bit more texture.


I cut the title out on my Silhouette Cameo machine using a cut file by Echo Park Paper that I found in the Silhouette Design Store. I cut it out twice and offset the two pieces so that the title appears to have a shadow. The phrases on the rolling stamp went perfectly with our silly photos and I had fun adding several of them around the title.

I used my sewing machine and navy thread to add journaling lines to my page. The texture is awesome! This is definitely something I want to do again!


Below the journaling I created a cluster of fun elements. I love the bright yellow tulle flowers included with this month's kit! To help them stand out a bit more from the busy layered papers below, I added a couple of flower shapes (cut from the Goldenrod cardstock on my Cameo) below each of them. Leaves cut from some green scrap paper from my stash finish them off. 

I then hand-cut a few of the cameras from the Shimelle Starshine "Pathfinder" paper and clustered them together below the flowers. A super-cute blue Maya Road bird sits on top of it all enjoying the view!

Thanks for stopping by and taking a look at my project today! I hope you are having a great week!


Tuesday, April 19, 2016

that look

Hey all, Michelle here! I'm popping in to share a quick layout from the Trailblazer kit.  

Btw, totally loving the colors in this kit!! 
My lab just loves being outside when the weather is nice. And whenever we go outside to check on him we always laugh that he's giving us 'that look'...the one that says "please don't make me go inside!". And since it's something that's said in house a lot (and gives us a laugh...cause our dog is a cute dork!) I wanted to make a page about it. 
One of the many things I love about scrapbooking...knowing that years from now we'll be able to flip through our scrapbooks and have a giggle at the stories :)

Monday, April 18, 2016

Line it Up--"Trailblazer" Classic Kit

Hello, it's Meridy here.  Happy Monday!!!  This week the design team is incorporating "Line it Up" as a challenge in our layouts using the "Trailblazer" Classic Kit.  I decided to put strips of cardstock in LINES on my layout to complete this challenge.  Here is my whole layout...


These are some of my favorite pictures of my little boy when he was 5.  The "Trailblazer" paper and embellishments in this kit are a great match for the colors and feel of these photos.  I used one 5x7 print on the left side of my layout with the LINES created mainly from the branding strips from various papers in the kit. 


Below is a close up of the LINES of paper strips.  I layered my title on one of the October Afternoon label stickers from the kit.  The alphabets in the kit ROCKED, I was able to use the smaller October Afternoon alphabets in combination with the burlap Thickers to make an interesting title for my layout.


I decided to use the main rub on in the MME pack on a project life card that I pulled from my stash.  I thought the quote was so cute and couldn't wait to use it right away.  I fussy cut the camera from one of Shimelle's patterned papers in this month's kit and embellished the lens with a brad from the MME embellishments that came in the kit as well.

 I used an 8x10 collage on the right side of my layout, which also holds my journaling.


I decided to mask off the top half of the burlap Thickers with washi tape and paint the bottom half red.  I used acrylic paint for this.  Super simple and quick!  I think it really makes the titles pop on the pages.


I liked the way this layout came out so much, that I decided to scraplift myself.  I periodically do this, it's pretty easy, and I feel like I get this second layout done really quickly.  Sometimes I will do this with completely different papers and embellishments.  

This time I decided to use a similar color scheme.  These two layouts won't go in the same album, so no one will probably even notice that they are so similar.


A few details...some fussy cutting again...


This time I painted the entire burlap Thicker title.  I tried only painting the bottom half, but it didn't pop as well against the background, so I decided to paint the whole thing.  I like the burlap texture, and now the titles really stand out.


Thank you for joining me today...check back all week to see how the rest of the team uses up the "Trailblazer" kits.  I think there are still a couple of classic kits available, but they won't be for long!

You still have time to sign up for the next term of subscriptions (June-December 2016).  Click here for details!

Have a great day!!!

Friday, April 15, 2016

Wander // Let's Get Sketchy!

The Noel Mignon design team is playing along with Let's Get Sketchy again! Sometimes a great sketch is all you need to jump start your creativity and that's exactly what this sketch did for me!
I didn't deviate a whole lot from the original sketch because I loved the design of it so much. It works perfectly when you have just one main photo as the focal point of your page.
I adhered some twine in a circle pattern behind my photos (which also goes along with the Dot to Dot theme the DT is doing this week). And some paint, rub-ons, and a star punch added the perfect accents to my page!
I used the new Trailblazer Classic Kit which I love so much and as you can see works great for any kind of outdoor pictures (not just camping or hiking). 

Be sure to head over to Let's Get Sketchy for more great sketches and a chance to win a kit from Noel Mignon!!!