Showing posts with label October Afternoon. Show all posts

Tuesday, April 26, 2016

"Trailblazer" Classic Kit

Hello!!!  It's Meridy, I'm back again today with another 2 page layout using the "Trailblazer" Classic Kit.  


I really enjoyed using all of the embellishments on this layout, label stickers, starburst punches from the cardstock, wood veneers, and a few phrases that I fussy cut from the paper in this month's kit all layered together was a change of pace for me.

I made the mini paper hat and boat embellishments from newspaper just like the paper hat and boat my son is playing with in the photos.


Here is a detail shot from the layering down the side of my photo.  I started by placing the October afternoon label stickers, then the fussy cut phrases, next I added a couple of the wood veneers, and finally I tucked in the starburst punches and banners here and there.  I basically kept building up the embellishments until I felt that it looked full enough.


On the opposite side of the layout I used an 8x10 collage so I could include plenty of photos.  I also brought in a few starburst punched circles and some fussy cut phrases to visually connect both sides of the layout.


I love the burlap tag that came in the kit, it adds extra texture to the layout and I again tried to use the same types of embellishments as I did on the opposite side of the layout to bring everything together.  There are so many colors, textures, and embellishments on this layout that I decided to use a red pen to outline quite a few pieces of paper and some of the label stickers in order to make them stand out a bit.


Thank you for joining me today!  I would love to see what you made with your kit this month.  Please share some of your work on the Noel Mignon Members Facebook Page.  

Have a great week!!!

Monday, April 25, 2016

Here Comes the Sun-"Trailblazer" Classic Kit

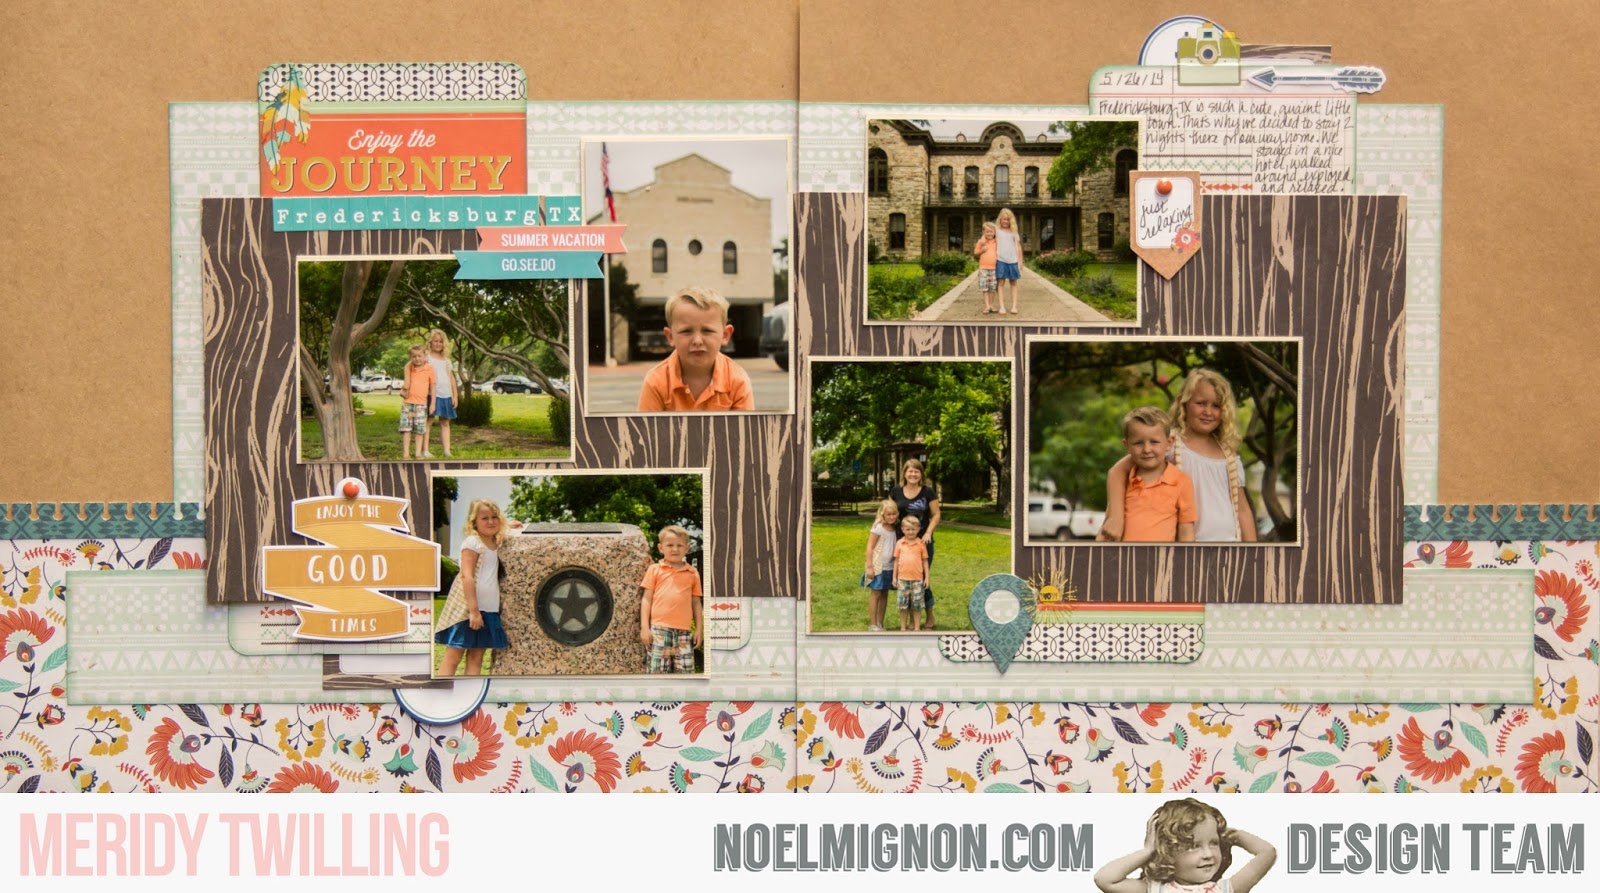
It's Meridy here with another layout using the "Trailblazer" Classic Kit.  This week's theme is "Here Comes the Sun"...so see if you can spot my hidden sun on this layout.   You have to look close, it's hiding!!!

I decided to create this double page layout using photos from a vacation to Texas in 2014.  I felt like the colors worked well with my photographs.


I loved the October Afternoon "Tiny Type" alphas that came in this month's kit.  I use them quite often in my titles, so I am always excited to get a new color.  The teal in this month's kit was beautiful and versatile.  I also took advantage of the Elle's Studio cut apart banners.  They give an added little pop of color when I need it.  On this page I used the "Summer Vacation" and "Go. See. Do." banners.


I added one of the brad/die cut combos in this corner of the page along with an October Afternoon label sticker and a few rub ons to create a small embellishment cluster.  I also decided to ink the edges of the lighter papers to make them really pop against the background.


I created my journaling on the right side of the layout and surrounded it by embellishments to draw your eye to it.  I think you can spot the "hidden sun" in this photo---it came from the MME rub on package that came in the kit.


This little green camera was my favorite rub on in the package, because I am a sucker for cameras!!!  I just love photography and taking pictures, so naturally, I am drawn to all things camera related.


Thank you for joining me today.  There are a couple more "Trailblazer" Classic Kits available in the store.  They work great for a variety of layouts including vacations, camping, adventures, outdoors, and boys, just to name a few.

I will see you tomorrow with another "Trailblazer" layout!!!


Wednesday, December 16, 2015

Christmas Morning 2014-"Mistletoe & Holly" Classic Kit

The Mistletoe & Holly Classic Kit  is to die for!  I looked forward to getting the December Noel Mignon kit so I could get some pictures from Christmases past scrapbooked.  For some reason, I have a hard time scrapbooking Christmas photos, probably because it is such a busy time of year--I just run out of time to scrapbook.  I take so many pictures in December and have a huge backlog of printed photos that need to be scrapped--and this month's kit is just what I need to get the job done!

For today's layout I took a cue from a layout I saw on Pinterest---sometimes I need to go there for inspiration and a starting point, it gets my creativity going.  I used a layout found on Little Scraps of Magic blog and loosely scraplifted it.  Here is the finished product...


I popped the die cut up off of the page using Pop Dots.  I really like adding a little dimension to some of the embellishments when I can.


The best part of making this layout was figuring out which embellishments I wanted to use from the kit and where I wanted to place them.  There are always so many great bits and pieces in the Noel Mignon kits---it makes it very easy to embellish my layouts. 


I had so many many photos of my son opening his Christmas gifts, so the second "half" of this layout is actually a 12x12 collage of photos from Christmas morning.


I liked the way this layout turned out so much, that I created an identical layout for the photos of my daughter opening her gifts! 


Thank you for checking out the blog today...I will see you next week!


Monday, December 14, 2015

documenting my december


Ahhh....my most favourite time of the year!  
Hello to the month of December....AND a brand NEW monthly Noel Mignon kit.  It truly could not get any better than this!
There are SO many amazing elements to this months kit.  I cannot wait to share all of my projects with you all this month...so let's get started!
Of course, I am using this kit to continue on with my December album.  There are so many stories to tell this month, and this kit makes it incredibly easy to get my memories and photos documented and told!

When I saw the large October Afternoon "Under The Tree" sticker sheet I immediately fell in love with the large multi colored alphas.  They are SO fun.  So what I decided to create was a large title page.  I grabbed a piece of white card stock from my stash, and spelled out 'it's the most wonderful time of the year'.  I then added a piece of vellum (again from my stash) and laid it over top to "soften" the effect of the page.  I love the effect.


To secure the vellum to my white cardstock, I simply added some stickers along the bottom and ran some machine sewing stitching across. So simple, and I love it.

Such a fun page!


This kit comes with so many wonderful patterned papers and cards.  This is a great way to use punches that you may have in your stash!  I added in some photos into 2 of the pockets....then created some fun confetti embellishments  by simply using my star punch and a few of the patterned papers from the kit.

Such an easy way to create custom embellishments and really stretch the use of your kit...and use up scraps! 


I then added some typed journaling to one of the 3x4 cards.  Added the super cute tree paper clip, a punched star and an epoxy heart sticker.  Simple and cute!  Just the way I like it!


I hope you are having just as much fun playing with this stunning kit as I am.  Love December!

Tuesday, December 8, 2015

Holiday Home Decor Week with Mistletoe & Holly

Hello Tuesday! Lynn Kopas here to share another home décor piece using December's Mistletoe & Holly Kits. I decided to create a small Holiday canvas that would be a nice little decoration just about anywhere! This would make a great gift and it was so easy to make. I covered a 4 x 4 canvas with paper from the kit. I then looped several circles of the Tim Holtz Pine Twine included in this month's daily diary kit to make a wreath. After applying the wreath to the canvas with a hot glue gun, I added SnowTex - a cool mixed media product that looks just like snow. I adorned the wreath with October Afternoon Pop Drops, some ribbon, the title JOY and was done! Here's the final result.
I have this sitting on a small wooden easel. Wouldn't this be cute on someone's desk or shelf? Here's a close-up of the wreath.
The Tim Holtz sentiment stickers are from last month's kit.
Hope you liked this idea - it was really easy to make. Have a great day and stay tuned for more Home Décor projects for the Design Team!
 

Wednesday, September 9, 2015

Kindergarten--"Show and Tell" Classic Kit

Today I'm sharing another double page layout with the "Show and Tell" Classic Kit!  This time I created a layout about my son's first day of Kindergarten.


I really love the Webster's Pages background paper.  It was the perfect base paper for a layout, complete with it's own space for journaling!


There were so many great bits and pieces of embellishments in this month's kit, between the October Afternoon die cut shapes, the Heidi Swapp gold foiled chipboard pieces, the Crate Paper Wonder enamel dots (and sequins), the Crate Paper Wonder cardstock stickers, and the Evalicious Photo Shoot 2 puffy stickers---it made these embellishment clusters so much fun to put together!


I stamped the Lawn Fawn crayon stamp "tone on tone" and fussy cut it out to create my own embellishment.  I always feel happy when I use stamps on my layouts, since I feel like sometimes I don't use them often enough.

Thank you for joining us at Noel Mignon today...share some of your "Show and Tell" layouts on our Members Facebook Page!


Saturday, July 25, 2015

More Summer Fun with the Pool Party Daily Diary Kit

Hello Everyone! Lynn Kopas here with my third Project Life page using the oh so summery Pool Party Daily Diary Kit!! I have loved this kit and even after three pages I still have leftovers showing how PACKED these kits are! Here's my entire page...
I love stamping on my PL cards. I have a ridiculous amount of date stamps and love how the dates look stamped on my cards.
All the elements in the kit coordinate so nicely! The cardstock stickers are a great way to embellish your photos.
I'm a sucker for frames and use them a lot on my PL pages and layouts. They are fun to embellish or add to a photo.
I printed a few of my Collect App pics in a 4x6 format which allows room for adding more embellishments. Here's a few more close-ups...
This month's kit is AWESOME for summer memories and PACKED with products to make it easy to create your pocket style pages! Thanks for stopping by and letting me share my PL pages!

Tuesday, July 21, 2015

The Summer Fun Continues: Pool Party Daily Diary Kit

Howdy! I'm back with my second project life page using the Pool Party Daily Diary Kit! This week we are focusing on journaling on our projects. My favorite ways to incorporate journaling onto my PL pages are by using the Collect App and my vintage typewriter. Here's my page for this week ...
 
Each photo has personal journaling on it as well as the date - that's what I love about the Collect App Photos.
 
Cardstock stickers are another great way to add journaling as well as decorating your PL cards. The Pool Party Kit has lots of word stickers to choose from as well as Pillow Puffs which are fun epoxy stickers.
 
By the way, how cute is this pocket card - I tucked my movie ticket stub and some other embellishments in the pocket.
 
My most favorite way to journal lately is with my Mom's vintage typewriter. I love hearing the tap tap tap of the typewriter keys. I also love that it's not perfect - it feels more authentic that way.


I hope you've enjoyed my tips on journaling and thanks for stopping by today! Have a great week!!

Wednesday, July 15, 2015

Last Day of Summer Vacation-Pool Party Classic Kit

I have another fun layout created with the July 2015 "Pool Party" classic kit!  I thought these papers and embellishments worked great with some splash pad pictures from the end of last summer.


I adore the flamingo die cut that came in the kit, so I had to use it here.  The little sentiments are stamped using various roller stamps" that I have collected over the years. The "Summertime" die cut is actually a scrap from the October Afternoon background paper branding strip. 


I think that starburst background papers are so perfect!  They lead your eye straight to the photograph.  I wanted to add a little color into this October Afternoon "Sunshine" starburst paper, so I cut some of the Pebbles "Splash" patterned paper and fit it over a few of the sunburst rays.  In hindsight, I think it would have been easier to cut a few rays out of the October Afternoon background paper, and placed the Pebbles patterned paper behind it.  

I then proceeded to add a pop of color over the seams using red thread and a zig zag stitch on my sewing machine.


For the right side of my layout, I tried to incorporate the same pattern papers and the red zig zag stitching, so it would look like a coherent 2 page layout.  I also used an 8x10 collage of photographs to fit more pictures onto the layout.


One of my favorite things from the "Pool Party" Classic Kit was the Pebbles Fun in the Sun Puffy Stickers.  I used them on both sides of this layout to create titles.  The tiny pink heart October Afternoon pop drop and the Queen & Co. blue flowers made for perfect little embellishments to jazz up the title.

Thank you for checking out my layout!  I look forward to sharing another Pool Party layout next week.  In the mean time, I believe there are still a few more "Pool Party" Classic Kits available at the shop!!!  Have a great week!!!