Showing posts with label Maya Road. Show all posts

Tuesday, October 31, 2017

Marching Band Mini Album part 2 with the Apple Crisp Daily Diary Kit

Hey all!  Happy Halloween or if Halloween isn't your thing Happy Tuesday.  ;)

Nicole here on the blog today to share one more look at the Apple Crisp Daily Diary Kit.  Can you believe tomorrow is November?!  A couple of weeks ago I shared a mini album I started putting together for my band geek teenager.


I am back today to share more:

I added a few embellishments to the top of the photo with a 3x4 card and Jenni Bowlin date sticker.  This page is a pocket page so I included more photos on a pull out tag and used a piece of the Maya Road twine on the top.


I printed off more 4x6 photos from both tournaments on this spread and stuck them in the pockets. 


This tournament the band scored 3rd place and an award for visual.

I decided to cut apart one of the 3x4 cards and placed the puffy words between the card.


And with that my Daily Diary kit is pretty much finished.  Such a fun kit this month and I'm so excited to break into next months.  Thanks for stopping by the blog today!

Happy Scrapping!


Tuesday, October 10, 2017

Fall Banner with the Apple Crisp Daily Diary Kit

Fall y'all!  I love, love, love fall.  This year I am a little sad since I am usually crazy decorating our house for the upcoming holidays and this year my living room is full of boxes.  To make myself a little happier as moving day is quickly coming I bought a few little pumpkins and whipped up this little fall banner with the Apple Crisp Daily Diary Kit.


I used foam adhesive to place the large die cut letters on the Becky Higgins Project Life cards.  To add a little more color I added some teal ink around the edges of the cards.


I then cut tabs from the Echo Park pattern paper and stapled them to the top of each card.  

I strung them on the yellow Maya Road twine and hung it off the pumpkin stems since I have already taken down on the hooks from my mantle.  I am so happy with this cute little banner and the decorator inside of me is incredible happy to have a little color added to my mantle for the last time.  

And for a real life look here is a snap of my current mess.  ;)  

Crafting can be such a nice break!  Hope you are all enjoying a little craftiness in your own neck of the woods.  Thanks for stopping by the blog today.  


Thursday, March 24, 2016

{American Girl} Layout using "Picture Perfect" Classic Kit

I'm back today sharing a 2 page layout using the "Picture Perfect" Classic Kit again.  For this layout I used some papers from last month's "Heart of Gold" as well.

 
I started by using the large floral print by My Mind's Eye for the base page on the left side of my layout.  Before adhering the layers, I cut one of the floral elements from the paper in an area that was going be covered up with the pink polka dot paper. I also used the packaging from the Hello Gorgeous wood shapes by My Mind's Eye.  The packaging is the layer of paper with the pink lace print on the bottom left of the layout.  It was such cute packaging, I could not resist using it on the page!


Below is a close up of the flower element that I fussy cut and used as a die cut on the layout.


As I have said before, I really like mixing fonts on my titles, so I used some Thickers and mini alphabets from my stash for the words "Super" and "shoppers".  I then used the My Mind's Eye wooden "SWEET" tag to pull the title together and ground it.

The second page of my layout is fairly simple, since it contains such busy photos.


 The tulle flower embellishment from Maya Road was the perfect large embellishment to use on this side of the layout.  I added another wood tag, a couple of enamel dots, a puffy sticker, and a cut apart tag to round out this embellishment cluster. And that wraps up my layout for today!


Thanks for stopping by, I hope I inspired you today!!!


Wednesday, March 23, 2016

Somebunny Special-"Picture Perfect" Classic Kit

Today's layout is honoring "Somebunny Special" using the March 2016 "Picture Perfect" Classic Kit.  (I think there are just 2 more of these kits in the store, so if you are thinking about purchasing one, you may be in luck!)

I live in the desert where we don't have many lush green landscapes or wildflowers.  But last year for some reason, the wildflowers were AMAZING, more than I ever remember seeing in the 30 years I have lived here.  Naturally, I had to take pictures of my kids in them.

Well, my son fell asleep in the car on the ONE mile long car ride to the flowers (he must have been really tired).  This set of pictures is showing how my 8 year old daughter is trying to wake him up, cheer him up, and help him feel better about taking pictures when he would rather be sleeping.  She even kisses his forehead, trying to make him feel better.  She is a very special and caring little girl to her brother (most of the time).  My son---well he is just eating up her attention.  I'm really glad I was able to capture this moment.


To create this layout, I used a piece of Pinkfresh Studio patterned paper as a base for the layout.  The paper already had a perfect combination of geometric shapes and flowers in a color scheme that coordinates with the photos.  The rows of yellow triangles along the bottom of the paper brought out the yellow flowers in my photos.  I built up the photo by layering multiple scraps and some "Carpe Diem" washi strips behind it.

How could I resist the yellow Maya Road resin frame!?!  I used a 1" circle punch to punch an image of a little bird from another piece of Pinkfresh Studio paper from the kit, and added that to the middle of the resin frame.

A little velvet ric rac, a few enamel dots,  and a puffy sticker rounded out this small embellishment cluster.


My journaling is accompanied by a stamped sentiment from the Pinkfresh stamp set included in this month's kit, a few more enamel dots, and 3 puffy stickers.  To keep the layout looking coherent, I try to use the same types of embellishments in all of the small embellishment clusters around the page.


The cluster at the top of the page also includes puffy stickers and enamel dots, I added a small sentiment label from the Elle's Studio Little Moments cutouts to round out this cluster.


And that wraps it up for my layout about "Somebunny Special" this week.  I would love to see some of your creations using the "Picture Perfect" Classic Kit.  You can share them on the Noel Mignon Members Facebook page. 


Wednesday, November 11, 2015

"At the Patch" a Golden Delicious "Classic Kit" Layout

Today I would like to share a layout with you using the Golden Delicious Classic Kit.   


Each year, I want to document our annual trip to our favorite pumpkin patch, and this month's kit had the perfect combination of colors for my photos from our 2014 trip...


 I have a confession here...I may (or may not) have been known to dress my kids/family in coordinating outfits, or colors that I think with coordinate with our activity----just so they are a little easier to scrapbook.  Sometimes it's really helpful when I sit down to scrapbook the photos, because the colors don't clash!!!  For example, although these photos were taken a year ago, they match this month's "Golden Delicious" kit colors.


 I adore this Maya Road fabric trim that came in this month's kit as well as the Echo Park washi.  When I used them together they have a nice contrast and balance one another out.


The variety of embellishments in this month's kit rocks (as usual) everything from cut aparts, puffy stickers, sequins, brads, and even coordinating ink!!!  It all works together for a balanced embellishment cluster with variety and texture.


I used a strip from the Carta Bella "Fall Blessings" border strip and cut it into pieces for my journaling.  Super simple and cute!


Thank you for visiting the Noel Mignon Blog today.  Subscriptions for January-June of 2015 are open for another 4 days (until Nov 15, 2015).  If you want a spot, hurry and sign up before it's too late---you will love the kits every month!!!


See you next week!!!

Friday, December 12, 2014

handmade gift bags

Hello again!

We've switched some things around this week and I am here today to share a few little things with you that I made using the gorgeous December kit, Cable Knit.

We hope you are enjoying the variety of projects we've shared with you using this kit so far this month.

Today I have some quick and easy handmade bags to share with you to help make your holiday packaging needs come together a little more quickly.


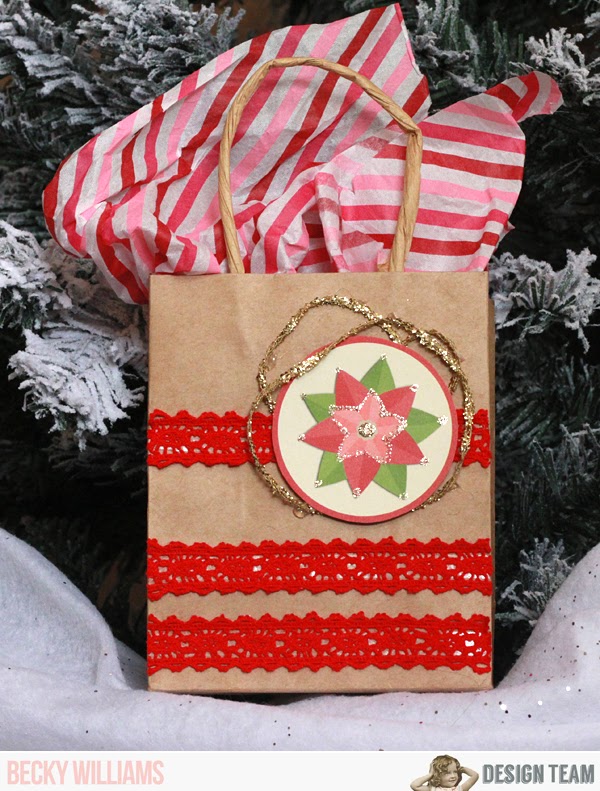
I used a basic kraft bag for the base and added papers and embellishments from the Cable Knit kit as well as the American Crafts Zazz gold glitter glue we got in the kit a couple of months ago. I think I might soon need to buy another bottle!

I cut a strip of Fancy Pants patterned paper and then cut around the scallop shape to add to the card above.


For this bag I cut the poinsettia from a Jillibean Soup card and added some glitter glue and some of the beautiful gold trim from the kit. 

One of my favorite parts of the kit this month is the beautiful adhesive lace trim from Maya Road. It is a festive red, perfect for holiday projects. I used lots of on this bag and the others.

For this last bag I used some paper from Fancy Pants, more red lace trim and a flower. I actually cut the flower from the layered poinsettia and then used a glue gun to add that and the enamel My Mind's Eye dot center to the card. The sentiment is one from Elle's Studio. I added gold glitter glue to the edge of the knit printed paper and added a piece of gold trim to the bottom edge of the bag. 

Thanks for stopping by today!