

Today I have a two-page layout to share with you using the January 2014 Fresh Start Kit. The camera on my cell phone has become a huge part of my designing process lately. I LOVE using it to take pictures of my project with different options and then using the photos to decide how I want to proceed with the design on my page. I thought that today I would not only share the competed page with you, but also use my cell phone pictures to talk you through the creative process of putting this page together.
First, here's a look at the completed project.
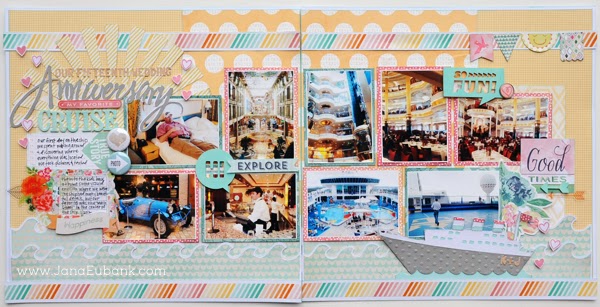


A couple of years ago, my husband and I went on a cruise to celebrate our 15th wedding anniversary. On our first day, we walked around the boat while we were still in port and took pictures to text to our kids back at home so they could see what we would be doing for the week while we were away from them. I wanted to create a spread with all of these snapshots together so that we could remember the beautiful details of the ship we spent the week on.
First, I used my Canon Selphy printer to print out all of the photos in a 3"x4" size. I left a white border around each one as a border, and also to add continuity of the photos throughout the page. Most of the time, I will print one or two photos larger than the rest and use them as a focal point, but in this case, all of the photos had the same "weight" to them in my memory, so I decided to keep them all the same size.
Next, I started shuffling them around my paper to decide which placement I liked best.
I decided they looked best in two rows. The top row is where I grouped all of the vertical photos, flanked with corresponding horizontal photos. The bottom row consists of all horizontal photos. I happened to have an extra sheet of one of the patterned papers that came in the kit (October Afternoon Girl Talk - Blah, Blah, Blah) and decided to use the side with the subtle background as the background to my layout. (If you would like to recreate this page, I will tell you later how you can make this page spread using only ONE sheet of the October Afternoon Paper ... stay tuned!)
As I stared at my photos, I decided that I would add waves along the bottom (perhaps adding a cruise ship later on to make a little scene), and that I would add a taller paper layer in the center of the layout that would mimic the taller photos in the center of my photo placement. This center paper would be cut into two pieces so that the paper would appear to span both pages. (Including a page element that spans the gutter of a two-page layout is a great way to unify the pages together.) Here, you can also see that I played with a few accent ideas.
I cut the waves from the BasicGrey Fresh Cut - Lilac Meadow paper included in the kit. I had already used a portion of this paper on last week's layout, and so I had a limited piece to work with. I cut the waves with my Silhouette Cameo machine, making sure to fit four of the borders onto the scrap I had left.
When I placed the four borders on my page, the pattern made waves hard to see. I used the Offset feature of the Silhouette designer software and created a white cardstock shadow piece for each of the waves so that they would stand out a bit better.
I didn't have enough paper to create a third row of waves to cover the bottom of the page, so I cut two strips of white cardstock, added the October Afternoon Daily Flash washi tape to them, and adhered the strips to the bottom of the page. I loved the splash of color this added, and decided to add more color to the top of the layout with additional washi tape border strips.
You can also see that I cut out the word "Anniversary" for my title (Silhouette Cameo), cut out a cruise ship (using my Cricut Expression and the Pack Your Bags cartridge), and started placing other items from the kit around the page. I also cut the cream/yellow hexagon patterned paper into two 6 x 6" paper layers to add to each side of the layout. These 6" x 6" paper layers help to anchor the horizontal photos.
I liked where the page was going, but I felt like the center section needed more color. I matted some of the photos with the pink dotted side of the Carta Bella Hello Again - Hello Chevron paper from the kit. I also embossed the gray layer of the ship with polka dots, assembled it together, and adhered it to the bottom of the right page.
I also started playing around with the idea of using the blue ink pad from the kit to change the color of the foam thickers.
The pink mats on the photos looked great, but I still wanted even more color. I matted the rest of the photos with the teal floral side of the BasicGrey Fresh Cut - Bluebell Boutique paper. You can also see that I committed to changing the color of the foam letters. I used the blue ink pad to change the color the wood pieces as well.
I also decided that I didn't like the gap at the top of the page above the washi tape border strips. I grabbed the excess strip of polka dot paper out of the garbage that I had trimmed off of the center layer earlier, and added it back to the top of the page. The gap between the two pieces of the orange dot paper is hidden behind the tape borders. This felt a LOT better to me ... and you would never know about my goof up because it is hidden behind the border strips!
The title felt like it needed more weight. I pulled a piece of yellow/white striped paper from my scrap bin and used my Cameo to cut it into a sunburst shape. I added it behind the title. Problem solved!
But, now I felt like I needed to fill up more of the sunburst, so I added more words to the title using the small kraft letter stickers from the kit. I also added the "Happiness" banner sticker (below the scalloped journal block), and pennant stickers (in the upper right corner) from the BasicGrey Fresh Cut Title Stickers sheet. I also added the pink heart enamel brad to the right side of the "So Fun" wood die cut.
My page was really shaping up nicely at this point. I felt like the kraft letters needed to match the width of the die cut "Anniversary" word, so went back and added the word "Our" to the beginning, shifting the other words over to the right. I also added "K+J" (Kevin plus Jana) on the back of the boat to represent my husband and I on the ship. A few stamped hearts around the title and boat and this page now felt complete!
......
Here is one more look at the completed page ... along with a few detail shots.
To create this page using just ONE sheet of the background paper, use two sheets of white cardstock as the layout base and cut the left piece to 7.5" wide, and the right piece to 4.5" wide. All of the other paper layers will conceal the blank area in the middle. (Note: Orange Polka dot paper is cut to 4.75" wide on the left page, and 7.25" wide on the right page.)
Title Detail
Banner and Close Up of Inked Wood Piece
Boat Detail
Thanks for hanging with me through this photo-heavy post. I hope you have enjoyed taking a tour through my creative process and I hope it has inspired you to create a two-pager using the single papers from this month's kit.
Happy creating!


