Showing posts with label Fresh Start Kit. Show all posts

Tuesday, April 8, 2014

Someday....


Hello my crafty friends!! I have a fun layout to share with you today using a mix of scraps and leftovers from some of the past few kits! I have been challenging myself to kill as much of my leftover kits as I can, so this was a fun layout to use of some of those leftover scraps. I only used one full 12x12 sheet of paper on this one!


I've been in a bit of a creative slump lately, so for this layout, I thought it would be fun to do two things! First, I did not use my trimmer once, everything is cut by hand ( so if it looks crooked, that's probably because it is! lol)! Second, I used this but down piece of white cardstock as my base. I created my layout completely on it, and then matted it on the larger 12x12 piece.

I found that kinda stepping away from my normal scrapping "procedure" made for a fun layout!  Here are a few close ups for you:


Friday, February 14, 2014

Book of Love Crop: Be Still My Heart Challenge

Hi Friends! I'm back again with my second challenge for the day.

Be Still My Heart Challenge: Use hearts as a predominant element on your page.


This week I cut out several glittery hearts to go on my daughter's Valentine cards. The negative piece was so pretty and I couldn't bare to throw it away! I decided to use it as a background for this page.


I backed the hearts with several papers from the January 2014 Fresh Start kit. The result is a whimsical page with a childlike appeal.

What kind of hearts are you going to add to your project? We can't wait to see!

Monday, February 3, 2014

Free Pocket Page Sized Valentine's Quote Cards!


I don't know about  you guys, but I know the next two weeks are going to be full of Valentine's card and decor making! I counted up the number of cards my kids will have to send out, and it looks to be around 100. EEK! I always like to do something little for some of the special people in my life too, so I spent some time working on some things this weekend.

I love quotes... especially ones from Harry Potter. ;) (The above quote is from HP & the Deathly Hallows.) 

I created a sheet of printable quotes for you guys to download and print out! I cut my cards out with my Silhouette machine... these will cut out at a lovely 2x3", just right for tucking into a Project Life pocket page as well! 

You should be able to click here to download it at its full size: http://s26.postimg.org/f98urhj55/Untitled_1.jpg

Enjoy! 

Friday, January 31, 2014

Selfies & Snapshots

Happy Friday, Friends! Jana Eubank here. Can you believe that January is over? I'm getting excited for Valentine's Day and it's starting to show in my scrapping! I just couldn't resist adding a bunch of hearts to this last page using the January 2014 Fresh Start kit.


I love the little stamp set by Elle's Studio that came with the kit. I used the outline heart stamp and gray ink to add a confetti-sprinkling of hearts down the left and right sides of my page. Next, I used the pink and aqua SEI ink pads (included with the kit )and the solid heart to fill each heart with color. I adore how these colors go with the kraft paper.


The toothpick hearts from the kit top off my photo collage so sweetly! I anchored them to the top of the photo block by placing one of the BasicGrey Fresh Cut die cut frames behind them and then a My Mind's Eye tap sticker over the toothpics. I love the touch of glitter they add to this page along with the Thicker letter stickers! Just perfect for a girly page of selfies and snapshots. :D


I left a few of the spots of my photo grid open for embellishing. I cut solid paper to fit in the squares and then added little bits to each one. The top square gets more stamping with the hearts and a sticker from the My Mind's Eye sticker sheet. On the center square, I used the tag from the decorative brad pack and then layered a punched heart and word (cut from the tear strip of one of the patterned papers) on top. The bottom square is filled with another My Mind's Eye decorative brad.

Thanks for taking a look at my page! I hope it has inspired you to get creating this weekend!

See you again soon!

Thursday, January 30, 2014

Imagination is everything . . .

Hello everyone!!  I'm back with another page featuring that gorgeous Fresh Start kit!  I snapped this pic the other day with my phone.  Just an everyday shot of my two boys playing in their playroom.  They were running a "school of wizardry" & making imaginary potions :)  I LOVE watching these two dream things up & listening to all the things they say when it's just the two of them.

 photo imagination_zpse0ff0c5d.jpg

For the title I was going for "light & airy", so I cut the word "imagination" out of some vellum with my Cameo.  Then I used the Elle's Studio stamp set to accent the title with a few hearts above the "i's".  At the bottom of my page I added strips of patterned papers, stitched down.  It was an easy way to add splashes of color against the white background.

 photo imaginationcu2_zps6ab27a0b.jpg

Above the title I clustered five of the speech bubble chipboard pieces from the kit.  I typed up random things I heard them saying while at play - just wanting to document all the little things they said :)

 photo imaginationcu1_zps6f1b7b51.jpg

Thanks so much for stopping by!!!  Feel free to share your own Fresh Start kit creations in our Facebook group - we love to see our members at work with our kits!!


Tuesday, January 28, 2014

Lovely Day Together

Hi all!! I have a layout to share with you today using the Fresh Start kit. For this layout, I was inspired by all the fair ribbons that have been part of some of the few past collections that have came out. Here are a few examples:

American Crafts - Dear Lizzy Neapolitan Collection - Fair Ribbons at Scrapbook.com $4.99
These are from the Dear Lizzy Neapolitan and the My Girl collection, both from American Crafts.

I thought a fun way to incorporate these would be not as an embellishment, but as the main focal point. Instead of using a rosette type embellishment on the top, I simple centered everything under my photo. 


I fussy cut the banner element from one of the Elle's Studio papers, and then simply added in more texture and dimension with additional layers and embellishment.


My final layout has all of the embellishment centered right under my photo, which help to draw your eye there. Using the lighter color pallet with the darker tones in my photo helps my photo to really stand out and take center stage!


Monday, January 27, 2014

Sabby - Fresh Start Kit


As part of my intention this year to live more creatively, I took my girls out last week to do a little photo shoot with them. I struck scrapbooker's gold with the results, and the photos have been so fun to play with! 

I was inspired by this image found on pinterest, and it was the jumping off point for my color scheme.

(credit: creature comforts blog)

The lovely colors of the Fresh Start kit (sorry, sold out!) also just happened to fit this, so I pulled out the kit and starting laying down papers.


I love the look of layers peeking through each other, and played that up with this feather cut with my Silhouette machine and layered stickers behind it.

I just had fun... which fits my girly. 


Oh and guess what's coming soon??? :)


Friday, January 24, 2014

Scrapping a Page for a Boy with the Fresh Start Kit

Hello Creative Friends! Jana Eubank here. Today I have another page to share with you using the January 2014 "Fresh Start" kit.

I had a snapshot of my son from a few summers ago that I wanted to get into our scrapbook. I decided to pull out some of the more "boyish" colors from the Fresh Start kit to create the following page featuring my son kicking off his summer vacation by chilling in the hot tub.


I used the Pink Paislee pennant title from the kit to guide my color choices for this page. Even though there is a lot of color, layers, and contrast going on (with the pops of black and white), everything works together because it is anchored on a neutral background.


I pulled the spring off of the clothespin and adhered both pieces to my page using glue dots. This creates a lower profile, than if I had used two separate clothespins, and hey, they match!

I love the little bit of softness the butterfly die cut adds to the title.


I used a white color pencil to write my journaling on the BasicGrey Fresh Cut chalkboard tag from the kit. I also added a little more color to the tag by stamping the "always remember" sentiment with the blue ink from the kit. Just be sure to allow it some time to dry, so that it doesn't get smudged.

I love when I can create my own layered embellishments for a page. The circular embellishments at the bottom of the photo were created by using the Pink Paislee Hey Kid paper in the kit. I used a circle punch to create a base layer, and then handcut the "smile" pennant for the second layer, adhering the pennant with foam squares. On the "You are my sunshine" tag, I used a smaller circle punch to punch out the flowers. I adhered it to the center with foam squares for a bit more dimension.

Thanks for stopping by today! What things have you been creating with your kit this month? Be sure to share your projects with us on the Noel Mignon Facebook page. We would love to see!

Until next time!

Jana Eubank


Thursday, January 23, 2014

Just Like Magic

Learning new things for little ones, that's just what it's like - magic.  My youngest recently received his first science kit for his birthday.  I'm sure he had no clue what it was when he opened the package, but when we broke into it the other day to do our first experiment, he was hooked!!  I used the January Fresh Start kit to document this "magical" moment.

 photo justlike600_zps3b45eadc.jpg

The layout is fairly neutral in color, with lots of white space, but I chose to simulate the idea of an experiment bubbling over a beaker with these fun sprays of color out to the right of the page.  I punched two different sized stars, as well as some small circles in shades of teal, pink, and yellow.  I also added in some splatters of ink as well.  The colored sections are divided by some hand-stitching in grey.

 photo justlikecu1_zps7d7ca987.jpg

For the title work I combined those fun sparkly white Thickers in the kit, with a die-cut word from patterned paper.  Right below that you will see a "True Story" tag peeking out from a glassine bag behind the photo.  The journaling tag is tucked away in the bag, but easily pulls out to read my story :)

 photo justlikecu2_zps2cf04a44.jpg

The Fresh Start kit is all sold out, but sign up for one of the few spots left in the special offer March - June subscription period & you'll never miss out :)

 photo 1012010_10151915279493932_455200771_n_zps3cc544ec.jpg


Tuesday, January 21, 2014

My Little Man

Hi everyone!! Amanda here with you to share another layout made with the Fresh Start kit. I love this kit so much...the colors are fabulous, and I love that I have gotten two very different layout looks out of it, (this layout and my princess layout).

Over the summer we love to spend as much time outdoors as possible. I was able to snatch this picture of our baby boy on his first fishing trip out last year. He, obviously, was too young to participate yet, but he had such fun watching his sisters and just enjoying the environment around us..so of course, it had to have a layout to go with it! :)


I loved that Hey Kid banner piece from Pink Paislee, and knew I wanted to use it for the color scheme on this layout, I also used it for my title. Some very simple layering and I love the finished product.


This corner here was actually done as an after thought, I originally had adhered the wood veneer speech bubble in this spot, but it just wasn't working. I went to remove it, and it tore my photo a bit, along with leaving behind some adhesive. A few simple cuts and the adorable arrow clip, and I was able to cover the spot AND it ended up being one of my favorite details of the layout!


I felt the corners need a little something more, so I just cut a few strips from that fabulous Elle's Studio paper ( I am saving every sngle scrap of that one LOVE it!) and some messy stamping was the perfect finishing touch!
Love how this kit worked absolutely perfect for both a very girly layout and a very boy layout! Noel sure knows how to put them together!! So...if you haven't yet, make sure you scoop up this deal!! Only a very limited number left!! Also, don't forget about the 50% off sale that is going on right now...good on past kits and shop items!!


Hope you all have a great day, and are inspired to create something you love!!


Monday, January 20, 2014

Munchkin


I had some more time this week to play with the Fresh Start kit. I actually worked on this layout over the course of several days. I find that if I can spread out time on a layout and look at it with fresh eyes, sometimes it helps me to have perspective on what to add or take away. 

To begin with, I had this whole thing mounted on a white piece of cardstock painted with gelatos and with a large title. It was soft and pretty, but really seemed to somehow take away from the layout. So I cut it off, and then matted it onto the feather paper. LOVE! The colorfulness added to the "feel" I wanted this page to have.


This picture is so cute of my littlest during a wedding, but there were a lot of distracting elements in the photo. I ended up covering up part of the photo with vellum to really draw the focus to my munchkin. I also added some words cut from one of the papers in the kit to draw the eye to her.


I cut a couple of feathers from the base paper (underneath where the photo is matted so you don't realize there's missing pieces from the base paper!) and tucked them in here. I like how it draws things together.


I love adding texture to my pages, especially with ribbon! It's such a quick and easy element to add.


Friday, January 10, 2014

Process of a Two-Pager

Hi Everyone! Jana Eubank here. I'm so excited to be joining all of you here at Noel Mignon, as we play and record our memories with Noel's fabulous kits.


Today I have a two-page layout to share with you using the January 2014 Fresh Start Kit. The camera on my cell phone has become a huge part of my designing process lately. I LOVE using it to take pictures of my project with different options and then using the photos to decide how I want to proceed with the design on my page. I thought that today I would not only share the competed page with you, but also use my cell phone pictures to talk you through the creative process of putting this page together. 

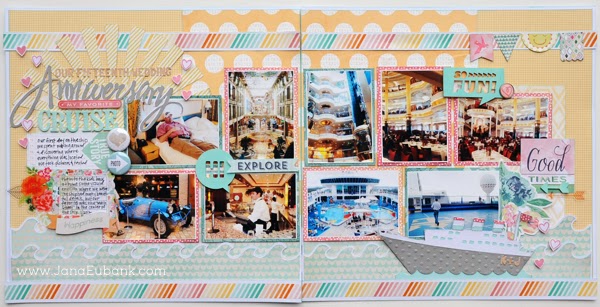
First, here's a look at the completed project.


A couple of years ago, my husband and I went on a cruise to celebrate our 15th wedding anniversary. On our first day, we walked around the boat while we were still in port and took pictures to text to our kids back at home so they could see what we would be doing for the week while we were away from them. I wanted to create a spread with all of these snapshots together so that we could remember the beautiful details of the ship we spent the week on.

First, I used my Canon Selphy printer to print out all of the photos in a 3"x4" size. I left a white border around each one as a border, and also to add continuity of the photos throughout the page. Most of the time, I will print one or two photos larger than the rest and use them as a focal point, but in this case, all of the photos had the same "weight" to them in my memory, so I decided to keep them all the same size.

Next, I started shuffling them around my paper to decide which placement I liked best.


I decided they looked best in two rows. The top row is where I grouped all of the vertical photos, flanked with corresponding horizontal photos. The bottom row consists of all horizontal photos. I happened to have an extra sheet of one of the patterned papers that came in the kit (October Afternoon Girl Talk - Blah, Blah, Blah) and decided to use the side with the subtle background as the background to my layout. (If you would like to recreate this page, I will tell you later how you can make this page spread using only ONE sheet of the October Afternoon Paper ... stay tuned!)


As I stared at my photos, I decided that I would add waves along the bottom (perhaps adding a cruise ship later on to make a little scene), and that I would add a taller paper layer in the center of the layout that would mimic the taller photos in the center of my photo placement. This center paper would be cut into two pieces so that the paper would appear to span both pages. (Including a page element that spans the gutter of a two-page layout is a great way to unify the pages together.) Here, you can also see that I played with a few accent ideas.


I cut the waves from the BasicGrey Fresh Cut - Lilac Meadow paper included in the kit. I had already used a portion of this paper on last week's layout, and so I had a limited piece to work with. I cut the waves with my Silhouette Cameo machine, making sure to fit four of the borders onto the scrap I had left.

When I placed the four borders on my page, the pattern made waves hard to see. I used the Offset feature of the Silhouette designer software and created a white cardstock shadow piece for each of the waves so that they would stand out a bit better. 

I didn't have enough paper to create a third row of waves to cover the bottom of the page, so I cut two strips of white cardstock, added the October Afternoon Daily Flash washi tape to them, and adhered the strips to the bottom of the page. I loved the splash of color this added, and decided to add more color to the top of the layout with additional washi tape border strips.

You can also see that I cut out the word "Anniversary" for my title (Silhouette Cameo), cut out a cruise ship (using my Cricut Expression and the Pack Your Bags cartridge), and started placing other items from the kit around the page. I also cut the cream/yellow hexagon patterned paper into two 6 x 6" paper layers to add to each side of the layout. These 6" x 6" paper layers help to anchor the horizontal photos.


I liked where the page was going, but I felt like the center section needed more color. I matted some of the photos with the pink dotted side of the Carta Bella Hello Again - Hello Chevron paper from the kit. I also embossed the gray layer of the ship with polka dots, assembled it together, and adhered it to the bottom of the right page.

I also started playing around with the idea of using the blue ink pad from the kit to change the color of the foam thickers.


The pink mats on the photos looked great, but I still wanted even more color. I matted the rest of the photos with the teal floral side of the BasicGrey Fresh Cut - Bluebell Boutique paper. You can also see that I committed to changing the color of the foam letters. I used the blue ink pad to change the color the wood pieces as well. 

I also decided that I didn't like the gap at the top of the page above the washi tape border strips. I grabbed the excess strip of polka dot paper out of the garbage that I had trimmed off of the center layer earlier, and added it back to the top of the page. The gap between the two pieces of the orange dot paper is hidden behind the tape borders. This felt a LOT better to me ... and you would never know about my goof up because it is hidden behind the border strips!


The title felt like it needed more weight. I pulled a piece of yellow/white striped paper from my scrap bin and used my Cameo to cut it into a sunburst shape. I added it behind the title. Problem solved!


But, now I felt like I needed to fill up more of the sunburst, so I added more words to the title using the small kraft letter stickers from the kit. I also added the "Happiness" banner sticker (below the scalloped journal block), and pennant stickers (in the upper right corner) from the BasicGrey Fresh Cut Title Stickers sheet. I also added the pink heart enamel brad to the right side of the "So Fun" wood die cut.


My page was really shaping up nicely at this point. I felt like the kraft letters needed to match the width of the die cut "Anniversary" word, so went back and added the word "Our" to the beginning, shifting the other words over to the right. I also added "K+J" (Kevin plus Jana) on the back of the boat to represent my husband and I on the ship. A few stamped hearts around the title and boat and this page now felt complete!

......

Here is one more look at the completed page ... along with a few detail shots.


To create this page using just ONE sheet of the background paper, use two sheets of white cardstock as the layout base and cut the left piece to 7.5" wide, and the right piece to 4.5" wide. All of the other paper layers will conceal the blank area in the middle. (Note: Orange Polka dot paper is cut to 4.75" wide on the left page, and 7.25" wide on the right page.)


Title Detail


Banner and Close Up of Inked Wood Piece


Boat Detail


Thanks for hanging with me through this photo-heavy post. I hope you have enjoyed taking a tour through my creative process and I hope it has inspired you to create a two-pager using the single papers from this month's kit.

Happy creating!