Showing posts with label crate paper. Show all posts

Friday, May 18, 2018

Science Spectrum: Enjoy the Journey Daily Diary Kit

Hi!  Sarah here with another layout using the May daily diary kit.  For this one, I layered up some papers from the April kit that I hadn't used.  I really like all the colors together and they paired nicely with the die cuts from the kit.


With the two photos I had of the museum, I also had one of our tickets that I placed on it's side next to the pictures.  I like how the blue on the ticket plays off the colors.  


I really liked the oversized arrows from Pretty Little Studio and used two of them to point towards the photos.  The "Stop Here" sign was also a nice touch and helped me to build that embellishment cluster.


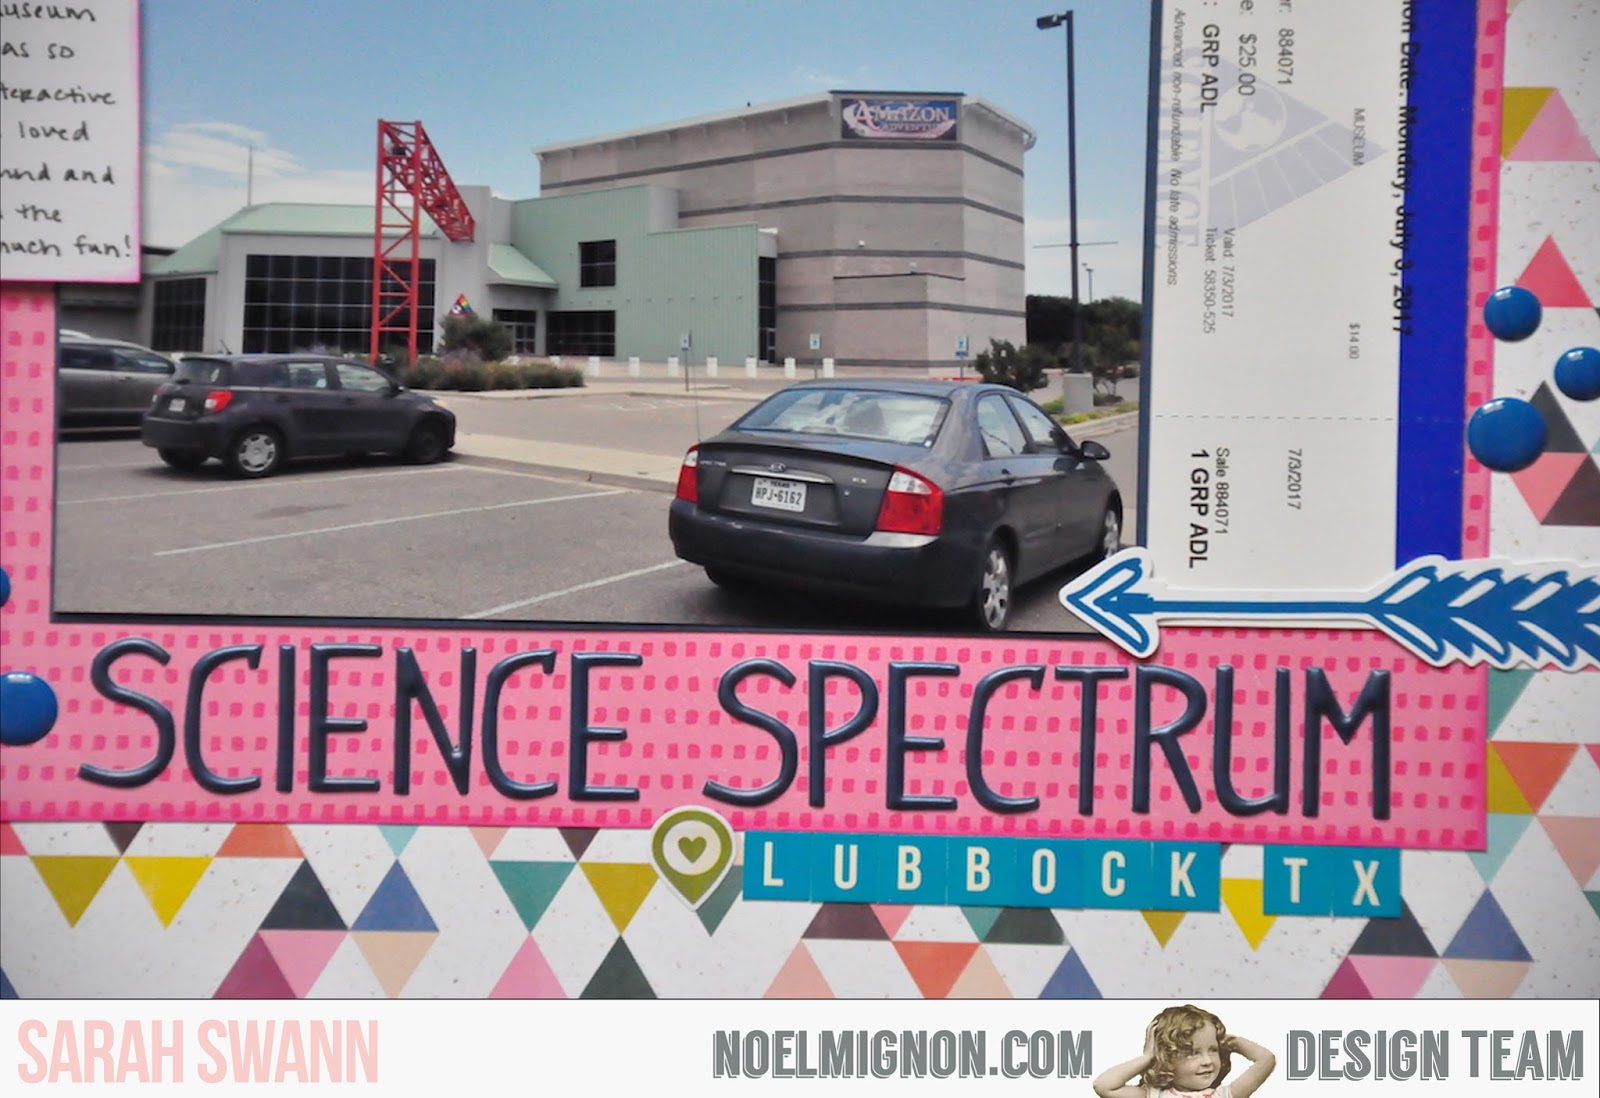
I used some Hip Kit Club alphabet puffy stickers for the title.  I like how the navy pops against the pink paper.  I used the Pebbles tiny alphabet stickers from the kit to indicate the city where the museum is.


I did my journaling on a piece of white cardstock and popped it up on some foam squares.  I finished it off with some navy enamel dots from Teresa Collins from my stash.

Thanks so much for joining me today.  I'd love to see what you're making with your May kits!


Friday, May 11, 2018

Hot Tubbing: Enjoy the Journey Daily Diary Kit

Hi!  Sarah here with a layout using the daily diary kit for May.  We took a fun little weekend to Santa Fe a bit ago and stayed in a great hotel.  They had a pool and a hot tub, so we swam and let the girls jump in the hot tub.  It was their first time doing that and they giggled the whole time.


I used a Maggie Holmes paper from last month's kit for my background.  The marbled look was great for the water in the picture.  The heart paper is also from last month's kit and it went really well with the 6x6 papers from this month's kit.


The die cut paired with one of the arrow stickers fit nicely above my title.  The title is made with Thickers from my stash.  I also added some enamel dots from my stash.


I used a circle punch to punch out the "relax" and the "don't forget to play" cards from the kit.


To finish it off, I added some of the word tile stickers and a geotag.

Thanks so much for joining us today!  We'd love to see what you're making with your May kits!


Friday, April 27, 2018

Women of Destiny: Vintage Spring Classic Kit

Hi!  Sarah here with a last layout using the gorgeous Vintage Spring classic kit for April.  I just loved the Carta Bella floral border paper.  I was just screaming at me to use it.  This week, we are using texture in our projects so I used this as an excuse to use the gold leaf ribbon.


The floral border paper just perfectly laid the foundation for my page.  Since I had two 4x6 photos, I wanted to be sure the florals stood out so I staggered the pictures.  


The Destiny ribbon is a wristband from the event that I saved.  I was happy to find a floral die cut in the kit with a floral pattern to echo the background paper.  I layered up some stickers and some of the Amy Tan felt bows.


For the texture, I used the gold leaf ribbon to help separate the photos.


I mixed the two alphas from the kit for the title and added some layered butterfly stickers and enamel dots.

Thanks so much for joining me today.  We can't wait to see how you're using your Vintage Spring kits this month!


Monday, April 23, 2018

{Splash Pad} with the "Vintage Spring" Kits

Happy Monday, it's Meridy here today.  I have a layout to share using a combination of the "Vintage Spring" Daily Diary and the "Vintage Spring" Classic Kits.  The beautiful watercolor paper from the classic kit made the perfect background for a page about the splash pad.


I added a few of the Daily Diary cards, some small strips of paper, the packaging from the gold leaf trim, and a few labels to create the layers behind the photos.  But I thought it still needed a little textrue and detail, so I mixed in a couple of pieces of washi tape and outlined each layer with black pen.  I added my journaling, a few phrase stickers, a couple of bug stickers, and some gold heart stickers to dress up the layers.


Next, it was time to work on the title of the layout.  At first I just had the small title that read "Splash Pad" on the bottom left hand side of the layout, but it still looked too plain for my taste.  


So that's when I decided to add a bunch of phrases and stickers describing the experience.  Ultimately, this is what I came up with, and I love the look of the different fonts, stamps, Thickers, and stickers.


Once I added all of these textures and words, my layout finally looked complete.  I love the way it turned out.  Thank you so much for stopping by today!!!  Happy Spring!  I hope you are putting your "Vintage Spring" Kits to good use, I would love to see what you are creating on our Facebook page or Instagram #NoelMignon


Friday, April 13, 2018

Hello Gorgeous: Vintage Spring Classic Kit

Hi!  Sarah here with a layout using the classic kit.  This week we were challenged to make a spring inspired project.  I chose to make a layout about this peacock that we saw at the zoo over spring break.  Peacocks are one of my favorites!  They are so beautiful.  I wish he had opened his tail, but he didn't, so I'm happy to scrap these pictures I was able to get.


Most of this layout is made with the Maggie Holmes Flourish line from the kit.  As soon as I saw that peacock sticker, I knew these pictures would make it onto a layout.  


I wanted to let the background paper shine so I kept everything towards the center.  Up in the lefthand corner, I added the fringe banner and popped one of the felt bows on top of it.  


I layered up some of the stickers from the kit and added some sequins.


For the title, I used one of the chipboard stickers along with the black alphabet stickers.  I added another felt bow and used some stickers on top of the large peacock sticker.

I just love the spring feel of this with the colors and being outside in nature.  Please show us how you're using your April kits in the facebook group!


Monday, April 9, 2018

{Eleven} with the "Vintage Spring" Kits

Happy Monday, friends!!!  It's Meridy here today, and the "Vintage Spring" Classic Kit  and Daily Diary Kit naturally scream "SPRINGTIME" to me, and since spring is a time for new beginnings, I decided to scrap another new beginning with these kits this week.  I'm scrapping a picture of my daughter's 11th birthday, which also happens to be 2 days before she started Jr. High.  So these spring images, embellishments, and flowers went prefectly with this photo.


This kit is so beautiful, and all of the Maggie Holmes papers and embellishments make me so happy, so I couldn't wait to use them.  I decided I wanted to use lots of die cuts and pieces of the beautiful gold leaf trim to frame my photo.

I stared with the deer and fussy cut a couple of quail.  We live in the desert, so we see lots of quail (and baby quail) each spring.  Although this page isn't about quail, these icons still work with the layout.


Next, I started layering up a few of the flowers and greenery.  I used pop dots to pop a few things up to add some dimention into the layout.  I spelled out "eleven" with the alphabet stickers and placed it at the bottom of the layout. I didn't want a large title, since there is already so much deatil on this layout, so these small alpha stickers were perfect!


I really liked using the gold leaf trim in whole pieces, as I did in the upper right hand corner of the layout, but I also liked the look of one or two leaves sticking out from under the die cut flowers, it added a little color and texture to the blooms.  


A few strips of washi and paper across the top of the layout and a journaling card tucked into the layers of paper finished off the layout.  Thank you so much for stopping by today!!!  Happy Srping!!!


Friday, April 6, 2018

Swans: Vintage Spring Classic Kit

Hi!  Sarah here with my first layout using the April Vintage Spring classic kit.  The sticker with the swans on it called my name and I knew the exact picture I wanted to use.


The GORGEOUS Maggie Holmes Flourish paper jumped out at me since it is teal and black.  Both of those colors are in my photo so it was perfect.  I didn't want to cover much of it up, so I kept the embellishing right around the photo with a little in the upper left corner.


I loved the swan banner in the Flourish embellishment pack and it's perfect since I have two little Swanns...  I used the Maggie Holmes rose gold washi to help ground my cluster along with stickers and enamel dots.


The washi is echoed here as a shelf for my photo.  I used a tag, an Amy Tangerine bow and a flair all from the kit to help around my photo.  The large doily is from my stash.


For my title, I used the Pretty Little Studio alphas above a Maggie Holmes sticker.  Enamel dots helped to finish it off!

Thanks for joining me today!  How are you using your April kits???  Please share them with us on the Facebook group!


Thursday, February 8, 2018

Sketchy inspiration from Becky Fleck

When I saw that our challenge this week was to use a sketch or other inspiration source my first thought was to see what new sketches Becky Fleck had released and as I suspected, I found a great sketch for me to use for this week's project.

Here is the sketch I found, and it's from the February PageMaps by Becky Fleck.


I didn't follow the sketch exactly but did use the same basic design for my page. 

Here is what I came up with using the So Sweet Daily Diary Kit


With this pretty floral from Simple Stories as the background of my page I started with a piece of white cardstock as the anchor, then placed a 6x6 sheet of tan heart paper and a few Becky Higgins journaling cards before placing my photo. 


As in the sketch I used for inspiration, I had a horizontal and vertical strip of Simple Stories Love & Adore washi tape where I added a variety of hearts from the kit. 


The large heart that you can see here was cut from one of the journaling cards included in the kit. I finished off my page with some of the cute Simple Stories pennant and sentiment stickers. 

What is inspiring you to create lately? 

We'd love to have you share it with us at the Noel Mignon Facebook group. 

Friday, December 29, 2017

Winter: Gingerbread and Peppermint Classic Kit

Hi!  Sarah here with a layout from our Christmas card photo session.  I decided to use these pictures to talk about how crazy the weather here in New Mexico is.  It actually snows here!!!  We were shocked when we first moved here and it snowed in the winter.  It still blows my mind.


I knew I needed to use some of these gorgeous papers for this layout.  The plaid paper just plays perfectly with the plaid in the picture of my girls.  


The puffy sticker pack had the perfect title for the topic I was documenting, so I used a few stickers to create the title.  The little snowman was just too adorable!


The large flower was the perfect color to accent around the photos and help bring them together.  


The little bird with the scarf is just the cutest and my journaling on the bottom helped to finish it off.

Thanks so much for joining me today!  How is the winter weather where you live?  Have you taken a chance to document it?


Friday, December 22, 2017

Power Rangers: Gingerbread and Peppermint Classic Kit

Hi!  Sarah here with a Christmas layout for you using the December classic kit.  This picture was taking a couple of years ago.  My little Layla is normally a girly-girl...and then she will do something like ask for a Power Rangers playset for Christmas.  She also loves Ninja Turtles and Batman.  Whatever floats her boat!  She asked for a playset, she got a playset.  And she still loves it!


I went with the red and pink from the kit since the toy in the picture has red in it and I'm journaling about my little girl wanting a Power Rangers playset.  The colors seem to be natural.


I combined the Elle's Studio and the Thickers to make my title.  Since the Thickers are bold, they stand out against that busy paper nicely.  I layered up a few of the die cuts so that just the edges show to create a frame around the picture.


I cut out a Santa and some presents from some paper to create little die cuts.


A few of the puffy stickers and some banners up in the corner helped me to finish off the layout.

Thanks so much for joining me today!