Showing posts with label layout. Show all posts

Thursday, March 29, 2018

It's a great life

How are y'all doing today?

This will be my last post for a while...life necessitates that I cut back on scrapping for a little while but hopefully in the not-too-distant future maybe I will be able to do more again. With 4 kids things can get a little hectic. I don't know how I managed years ago to take on multiple design teams and actually get everything done!

I think that maybe it's because the kids were tiny and there was this thing called nap time when I could get some things done everyday. ☺

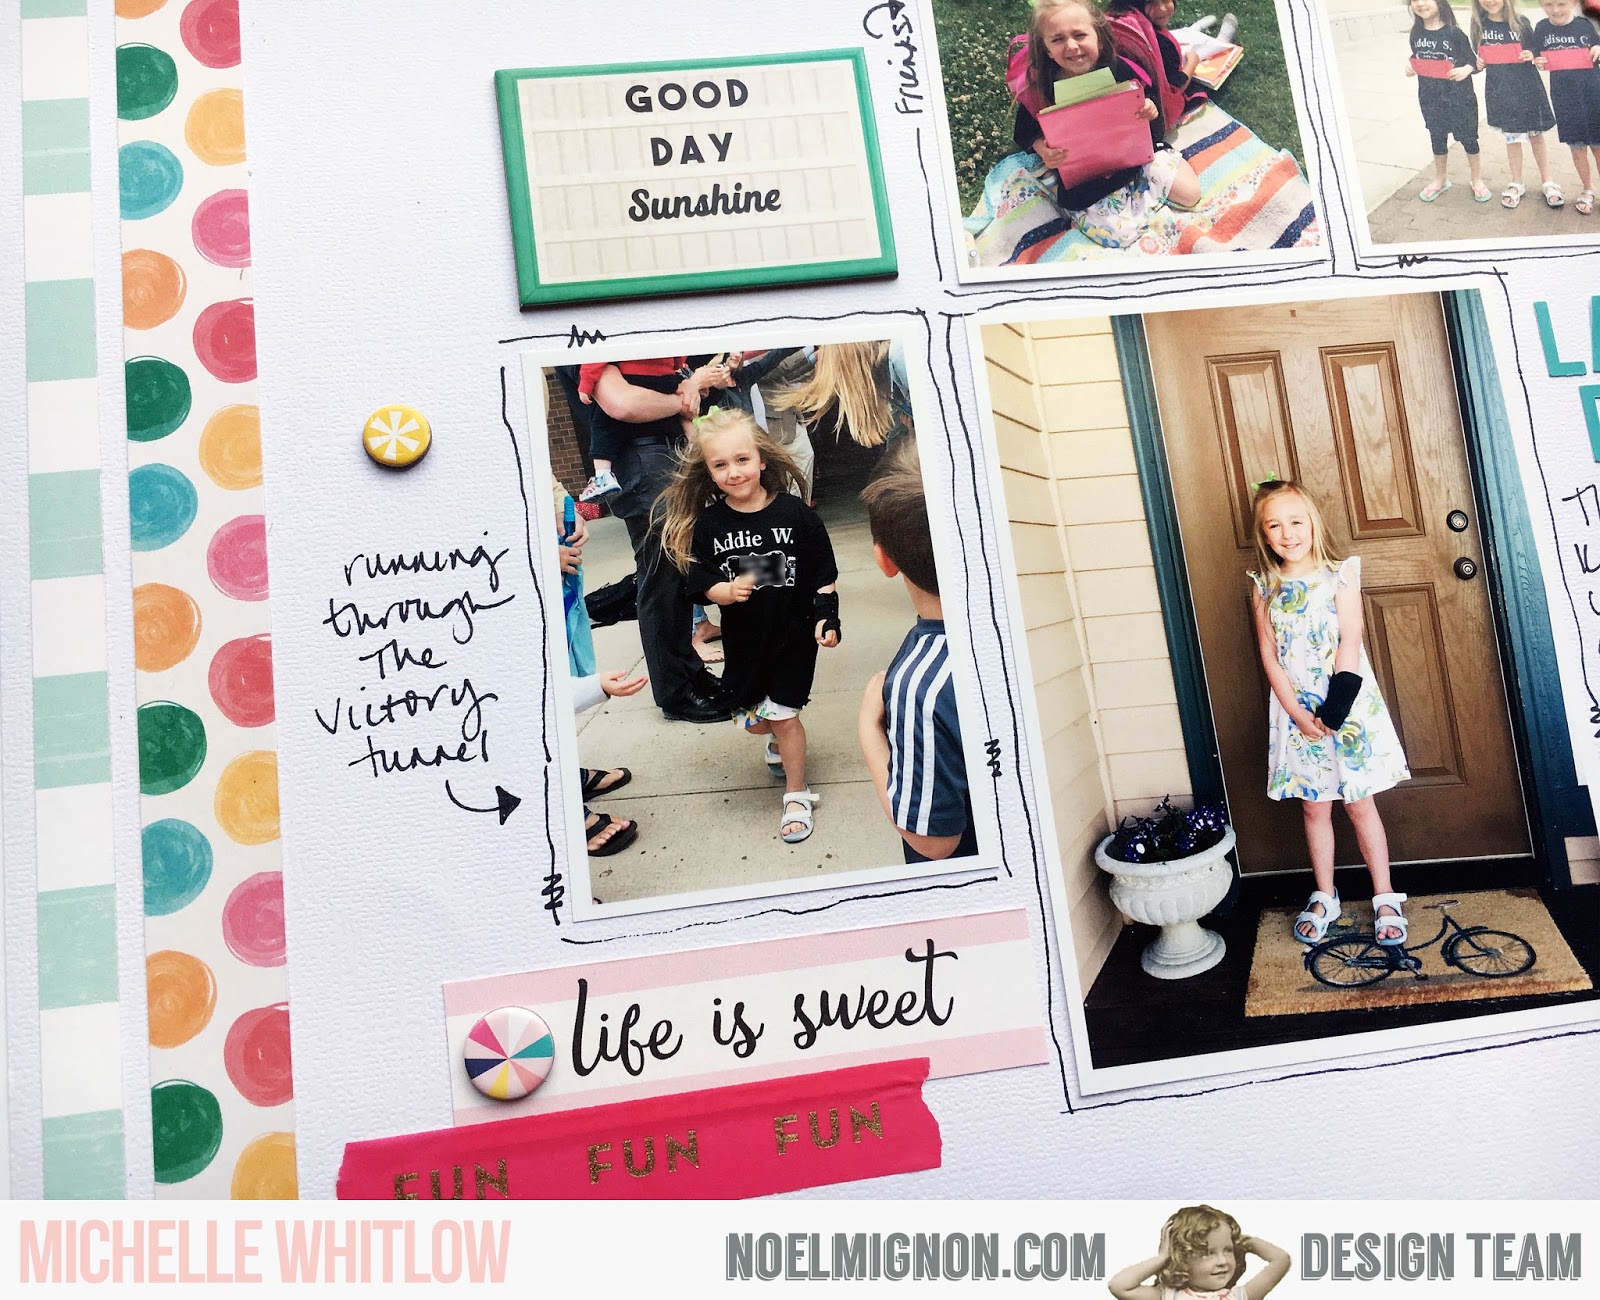
Anyway, I've used both You Go Girl kits from this month to create this layout below:


I started with a white cardstock base like I do a lot of the time and added some spray mist in pink hues to match my girls' shirts and then added the cute x's and o's diecut mat. I layered some patterned paper, Simple Stories little squares of paper and a journaling spot from the Elle's Studio calendar cards. 


The pale pink heart was cut from another calendar card from the Daily Diary kit. I added some washi and stickers to the card with the green box at the top. 


One of my favorite parts of these March kits was the cute icons like these adorable girls, pretzels, flowers and sunshines. SO fun! 

Thank you for stopping by Noel Mignon today ♥

Stay tuned every day for more creations with the You Go Girl kits and soon the design team will share some projects with the beautiful new Vintage Spring kits.  As always, check out the store to see what other things you might like to have to go along with your kits. 

Thursday, March 15, 2018

remembering the best times

Hey there!

Is it spring break where you are?

It is here and we've been lazily enjoying our time off.

We haven't gone anywhere amazing or done anything too exciting but it's been fun to be home and to relax and not have to be too many places like we would on a regular week. With one daughter in competitive gymnastics we get to travel a lot this time of year so we are happy to just be able to stay home and do nothing ☺

For this week's project I used the You Go Girl Daily Diary kit. It's adorable and there are still two left in the shop!


For this page I used the grid paper in the Daily Diary kit. The rainbow striped piece is actually the paper insert from the little foam Thickers. I just pulled it out of the packaging and cut a strip off and saved the remainder for another project. I love to use packaging and other kit contents in creative ways. 


This little frame was from the kit as well. I used spray mist in green and aqua to add some color to it and then added a couple of Pink Fresh Studios leatherette tags and other embellishments around it. 


One of my favorite parts of Noel's kits is the mix of alphas that can be used in titles. Here I used the foam Thickers from the Daily Diary kit and some puffy stickers and a chipboard word to make the title for my page. 

What have you been creating lately? 

We'd love to have you visit with us and share your creative ideas on our Noel Mignon Members Facebook page. 

Have a great day!

Wednesday, March 14, 2018

Fill, Pour, Repeat

Hey guys, happy Pi day :) This week I got a bit more creative with my layout. I found this pics of my daughter in the tub, doing what she always did with cups...filling them up, pouring them out, on repeat over and over and over again :)
I wanted to create movement with my page so I started with my photos. I would have preferred to have square photos but the nature of the images just didn't allow for cropping them that way so I rolled with it. Then I just started placing all of my embellishments around them, creating a circle. I adhered everything down except for the photos, added some messy circular stitching, then adhered my photos and a few more stickers. 
There are so many fun embellishments with this month's You Go Girl kits with the die-cut shaped, chipboard stickers, & puffy stickers. Not to mention those aqua alphas that are reminiscent of the old October Afternoon alphas that I used to love so much!
 

Thursday, March 8, 2018

Selfies from a silly 6 year old

It's a beautiful spring-like day and I'm happy to share my first layout with the You Go Girl kits from this month. I got both kits because they are so cute, and plan to mix and match items from both kits on my projects. This page, though, uses only product from the Classic kit.

Do your kids ever leave funny selfies on your phone?

I was moving pics from my phone to the computer and found these pics of my youngest daughter (along with about ten more pictures) and decided to use them for this page. The little camera and smile! chipboard went perfectly with the theme of my page.


It's been a bit of a crazy week and the west Texas wind lately has given me headaches. Truth be told, I made this layout late last night and decided to keep things quick and easy. 

Sometimes that is the best, though, to allow the photographs to take center stage. 

I used some strips of patterned paper along with some Pink Paislee washi tape strips. 


I drew some lines with the nozzle of my spray mist to create a spot for hand journaling. 

I finished off the page with lots of Simple Stories stickers and a mixed-alpha title using the chipboard Thickers and blue alphas from the You Go Girl Classic kit. 


I thought the little pink sunglasses were so cute and liked how they looked right on one of the pics of my silly girl ☺

Have a fantastic day!


Wednesday, January 10, 2018

Christmas Morn

Hey all! I wanted to finish up one more project with the Gingerbread and Peppermint Class Kit before moving on to more January projects. I know a lot of people feel the pressure to be "caught up" with scrapbooking but I don't. I mean, if we were all caught up what would we scrapbook about, right?! But when January rolls around I like to complete at least one layout about Christmas morning knowing that I can go back later and finish up any other layouts for the month (I'll share more about my process for that later).
I already had an idea of how I wanted the layout to go - one larger photo with 3 smaller ones. This page is more of a snapshot of Christmas morning and I'll go back and do another page (maybe a pocket page) with more photos and journaling later. 
If you have a lot of Christmas memories to scrapbook there are just 2 - TWO! -  of these wonderful kits left. You can head over to the shop to check it out. I believe there's also one of the Daily Diary kits left as well. 

Thursday, January 4, 2018

New year, new post, new challenge

Happy New Year!

It's me, Becky, here with you today to share my first project of the year with you.

We were challenged to create a project focusing on something NEW.

Well, I did something that was new for me...I created a layout with NO PHOTOS.

Have you ever done that before? It was a switch for me but I like the end result.

I created this layout using the brand new She's Crafty Classic Kit, full of bright, fun colors and lots of great embellishments that I took full advantage of for this page.

Here is a look at the full page:


And here are some detail shots:


To start off I used the ledger paper in the classic kit. I added thin strips of patterned paper on each edge and then added droplets of spray mist in a few different colors. After that I started layering the rubons until I had it set the way I wanted. 

I then added strips of the cute washi from the kit at the top and bottom of my page, then added the title with chipboard alpha stickers included in the kit. 


The next thing that I did on this page is I started adding my journaling, then more and more journaling to fill the space. In the journaling I talked about how I wanted to try and live in this new year. I mixed in quotes and other stickers to add some variety to the journaling.

I used a blue marker on the acrylic word to help it stand out more on my page. 


I finished off my page with a few more embellishments like this cute Jillibean Soup heart and some enamel dots. 

So, not only does this page talk about my goals for the new year but I also challenged myself to try something new with this project. 

What is something new YOU would like to try this year? 

Thanks so much for stopping by today. 

Wednesday, August 16, 2017

poolside

Hey all, Michelle here! I know some of you probably have kids that have already started back to school but we still have a couple weeks left of summer vacation and we're milking it for all it's worth! I'm also spending a little bit of time documenting our fun memories while they're fresh in my mind.
I know most of you would probably look at the Weekend In Paris kit and think it's not 'summery' but that's what I love about Noel's kits, there is so much variety in each kit you're not limited to one particular theme. 

For this page I was drawn to those colored lanterns in the the background paper (at least they look like paper lanterns to me!) and loved how the pink patterned paper and doilies added a nice accent. 
I grabbed the blue alphas from the High Five Daily Diary kit and they matched perfectly with the 'fun' sticker and the mini alphas from the Weekend In Paris kit.

You'll also notice I don't have any journaling on this page, which I sometimes will do when it's an activity that we do every year. There's not much to document other than the photos of us being together and that's enough for me :) 

Side note on getting that action shot of my son coming out of the waterslide - I actually take video & then go back and take pictures from the video. Much easier than trying to take a picture at just the right second!

Wednesday, August 9, 2017

Fun times

Hey guys, Michelle here! This week the design team is adding some sewing or stitching on our layouts. I've been sewing on my layouts for years and I love the texture that it adds to my pages. 

So for this page I used the beautiful Weekend In Paris Classic Kit and added stitching to multiple places, including that adorable pink pom pom ribbon, around the inside frame on my page and also along the green floral page.
So here's a few tips when sewing on your page: 

1)Change your needle - I always use a separate needle for my paper crafting (sometimes your needle can get some adhesive on it from your page). Of course, if you don't do any traditional sewing with fabric you don't have to worry about that! 

2) Try not to use too much adhesive in the areas that you plan on stitching so that your needle doesn't get gummy 

3) use a bigger stitch length - I usually set mine to around 2.5. If the stitches are too close together they'll just create one big hole on your page and no one wants that! 

4) Go slow until you get the hang of it (but it's pretty easy...and fun!)

Wednesday, June 28, 2017

Happy 6th birthday!

This week we're working with sketches so I decided to scraplift this page I found on Pinterest. It's not a 'sketch' but using a sketch to create a page is really no different than taking the ideas of someone else's page and making it your own.
I loved the idea of the circles on the page so I set about cutting a couple photos from my daughter's 6th birthday, cut with a 2.5" circle punch, along with a few of the patterned papers from the Dive In Classic Kit
Once I had the circles where I liked them and adhered down I added embellishments from the kit to complete my page. That ferris wheel was a perfect addition to my page because of it's shape! I also added some stamping with that great alpha stamp set that came in the kit which I just can't get enough of!

Wednesday, June 14, 2017

Last Day

Hey guys, Michelle here with another layout using the new Dive In Classic Kit. When I began working on this layout yesterday I realized that this week the design team is sharing pool pics and I mistakenly shared my layout last week. I guess with all of the end of school activities going on this month I got my weeks mixed up! So this week I'm sharing a layout of my youngest daughter's last day of school.
When I thinking about my page I knew that I wanted to have multiple photos on it, so that meant cropping my photos to a smaller size (most are about 2.5 inches wide). I loosely based my page on this layout I found on Pinterest (seriously still love Pinterest...so much inspiration!!)
I loved the idea of journaling little notes around the photos! And since I didn't feel like changing the thread in my sewing machine I just doodled around my photos instead of adding stitching. I only used 2 little strips of patterned paper...everything else is just photos, embellishments, & journaling! This is also a good way to extend the life of your kits even more :)

Wednesday, June 7, 2017

So Much Fun!

We're sharing pool pages this week! We have a local pool that we love going to so I always have lots of pool pictures of my kids. Since I didn't create an 'official' title to this page I used one of the 4x4 cut-outs from the Dive In Classic Kit for my title. When you have similar pictures over the the years I don't really feel the need to come up with a title for my page or even any journaling like on this page. 

Here's a little helpful tip - whenever I'm adhering paper/elements to my page I don't use adhesive all the way to edge. That way I'm able to slide things under, like that pink washi that I decided to add to the edges of the striped paper after I had adhered that paper down. Because I didn't put adhesive all the way to the edge I was easily able to slide the washi underneath!

Since I had an empty space on the bottom I opted to use the aqua letter stickers in the kit for the date instead of handwriting it. 
A simple page showcasing the fun days of summer! Be sure to share your pages in the Noel Mignon facebook group and on Instagram (#noelmignon so we can see it!)

Wednesday, May 31, 2017

My Crazy Crew

Hey all! I'm pretty excited because the Dive In Classic Kit arrived in my mailbox yesterday! And rather than share what I had already worked on I just *had* to pull the kit out & create something! Tell me I'm not the only one who does that the second their Noel Mignon kit arrives in the mail??!!
Anyway, I had found this photo from Mother's Day a couple years ago and set to creating my page!
There are so, so, so many fun embellishments in this kit. I know I say this every time but this kit in particular has blown me away and it was so much fun to play with!
 

Wednesday, May 17, 2017

Monkey Bars - 1, Addie - 0

Hey all! I'm back with a couple pages from the Spring Fling Daily Diary kit along with some elements from the Let's Get Lost Kits. And since my daughter broke her arm last week I thought it fitting to do a couple pages on that!
I started with a main page using patterned paper from the Let's Get Lost Classic kit and paired it with elements from the Spring Fling Daily Diary kit. I thought the "You Are Brave" pennant banner from the Let's Get Lost kit (Daily Diary kit I believe) was fitting for this page.
I also created a pocket page to go along with it with additional photos using the Spring Fling Daily Diary Kit. The colors of the kit matched perfectly with Addie's new cast ;)

Wednesday, May 3, 2017

Easter layout with the Spring Fling DD kit

Hey guys! This month I got to play with the Spring Fling Daily Diary kit which makes me so happy because there are so many fun elements in this kit like the puffy stickers and the wood veneer half circles! Because there were fun bright colors and florals in this kit I used it to create a couple pocket pages with my Easter photos and they paired wonderfully.
I used a couple of the 4x6 cards in the kit and also made one with the 6x6 papers for my first page. I thought about changing my 3x4 photos to black and white but after seeing how that looked I went back to color. Sometimes you have to play around with your photos in order to decide what you like best!
Those Elle's Studio cards are probably my favorite ones from the kit. I loved the multicolored polka dot card that paired perfectly with my egg decorating photos!
And with that, another Whitlow family holiday is 'in the books'!

Wednesday, April 26, 2017

Game Day

Hey all! Are you all having fun playing with the Let's Get Lost kits?? They're pretty amazing! Today I'm sharing a simple & clean layout from my daughter's first tball game along with a coordinating pocket page. Oh my gosh, these little ones playing ball are the cutest!!
I was inspired by this layout that I found on Pinterest & used the mountain papers in the kit to create a similar design. Not only do I like those little mountains but it's fitting since I live in the PNW :)

After that I took a Project Life pocket page (design A) and cut it in half vertically so I was left with 2-4x6 slots and 2-3x4 slots. I used that for the few extra photos I had from that day. I could have created a 2 page spread but I like doing this because it adds visual interest to my scrapbooks when you're flipping through the album and there's different sized pages. 
I used cards from the daily diary kit along with more alphas from the classic kit. You can see I also added one of those tab stickers along the side of my pocket page.
Note: the chipboard alphas from the classic kit are not very sticky (like most thickers). Make sure that you secure them somehow, either with stitching like I have on these pages or with a thin line glue stick (I like the one from Stampin' Up!). Otherwise you'll find a mix of alphas at the bottom of your page protector!