Hey guys, Michelle here with another layout using the Happy Together Classic Kit. The colors in this kit are amazing, way beyond the typical reds & pinks you see for Valentine's Day. In fact, I've already made several layouts from this kit that have nothing to do with Valentine's day.
I found this picture of my youngest one & decided that this kit would be perfect for documenting my little Disney girl :)
The heart ribbon was the perfect accent below my photo, simply tied in a knot and adhered with my tiny attacher.
Next week I'm hoping to play with the adorable Lawn Fawn stamps that came in the kit along with the distress crayons. Stay tuned!
Showing posts with label Little Bird Classic Kit. Show all posts
Wednesday, February 1, 2017
Tuesday, January 31, 2017
Cards, cards, cards with the Little Bird Classic Kit
Hey everyone! I hope your week is going well. Nicole here to share some cards I put together with the Little Bird Classic Kit. I received in my kit the cork "Happy Birthday" and "Thank you" so I saved those for my sentiments. I LOVE making cards from the bits and pieces of kits. I honestly could have made about 10 cards from all the wonderful product left, but stopped myself at four. I always love having cards on hand especially thank you and happy birthday cards.
You'll notice I use layers and LOTS of foam adhesive when I make cards. I rarely mail any of these out and they tend to be tied to packages or slipped into an envelope to hand deliver. Because of this they get plenty bulky, the bulkier the better in my opinion. ;)
This one I paired a die cut, some fussy cutting, ribbon flowers, and the wreath stamp to frame my sentiment.
You'll notice I use layers and LOTS of foam adhesive when I make cards. I rarely mail any of these out and they tend to be tied to packages or slipped into an envelope to hand deliver. Because of this they get plenty bulky, the bulkier the better in my opinion. ;)
This one I paired a die cut, some fussy cutting, ribbon flowers, and the wreath stamp to frame my sentiment.
The little teal pearls are from my stash.
I started this card base with a square punch to add in some of the different pattern papers from the kit. More fussy cut leaves, ribbon flowers, and the vellum pocket under/around the sentiment.
teal pearls, tag, and seam binding from my stash
The Happy Birthday cork I used a white gel pen to trace over the sentiment to help it stand out against the black. Everything on this card besides the baker's twine is from the kit.
My last card uses the stamp set from the kit. I started by stamping the wreath with StazOn onto a piece of vellum. I then used a watercolor brush to add color to the vellum.
The watercolor puddles up a bit on top but eventually soaks into the vellum.
I trimmed around the outside, stamped the sentiment, and attached to my card.
I started my base by adding ink over the stencil and then layered my pattern paper strips on top. I fussy cut butterflies and added them with foam. As a final touch of color I added washi tape along the top and bottom.
There you have it four cards to add to my card stash. Do you use up the odds and ends of your kit up with any card making? Share if you do over on the Facebook page, we would love to see.
Thanks for stopping over here on the blog today. Happy Scrapping! :)
Thursday, January 26, 2017
Adventure Awaits (Little Bird Classic Kit)
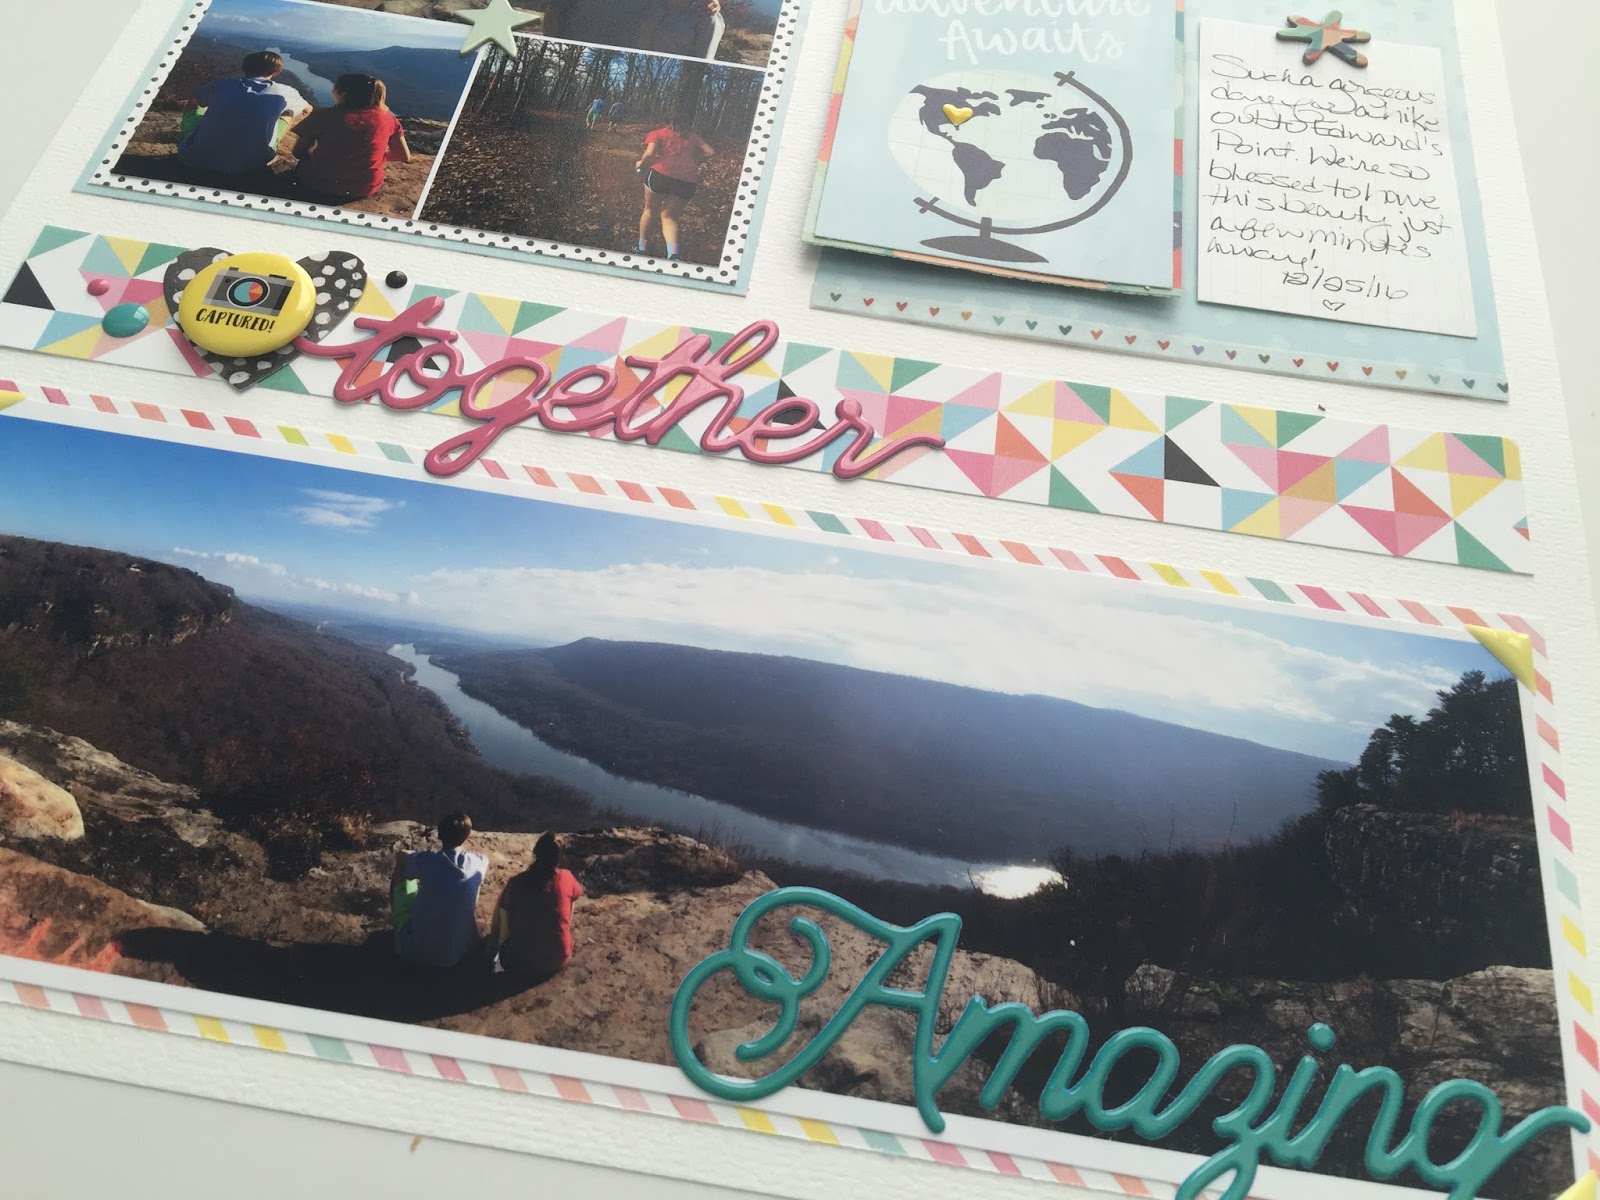
Hello, friends! Sherry here and today's layout is inspired by a sketch. We took a hike on Christmas Day and I had a beautiful panoramic shot that I wanted to include on my layout. As I was searching for a sketch, I made sure to look for one that would easily incorporate a panoramic photo. The following is the layout and the sketch I selected:
Since the photo has so many beautiful colors, I decided Fancy Pants Joy Parade (Wrap it in Color) would be a fun place to start. Even though the paper is really busy, it pops when using a small amount, such as the long strip in the center of the layout. The Fancy Pants puffy words were perfect for these photos. I can't wait to use more on another project!
I created a photo collage in PicMonkey to mimic the four squares on the sketch. Originally, I had planned to cut them apart but when I laid the photo down, I loved the way it looked, so I ran with it.
To balance the grid I cut a mat the same size and used it as a base for my journaling card and the fun globe from the Hazelwood paper. I also used the adorable heart washi tape from Hazelwood to border my mat.
If you're in a creative slump, a sketch is always a fun way to jump-start your creativity! As always, thanks for stopping by the blog today!
Tuesday, January 24, 2017
Beautiful Zion with Little Bird Classic Kit
Hey Nicole here on the blog today! As Meridy mentioned yesterday we are all using sketches this week to inspire us. I chose a sketch that I found on my Pinterest sketches board. It was originally posted on the October Afternoon blog.
This sketch caught my eye because of the number of photos used. I wanted to highlight a recent trip my husband and I had taken to Zion National Park and knew I wanted to include quite a few smaller pictures. This grid sketch was the perfect solution. You will see that I did flip the sketch upside down and played with the placement of my title.
I had a really hard time choosing from the Fancy Pants sentiment stickers and went back and forth with title options. So instead of picking just one I used them all :). One for my title and the rest on the top block of my layout. The problem I ran across was when I got my layout all put together the stickers were too bright and seemed to distract from the rest of my layout.
My solution: vellum. I trimmed a piece to the same size and stitched it in place. The result was exactly what I wanted. The block was now a design feature, but doesn't draw too much attention away from my photos.
One thing I love about Noel's kits, versatility! These pictures were taken in October when the leaves were still changing. I easily created some fall leaves for embellishments by fussy cutting only the leaves from the Hazelwood pattern paper. I then creased them and added ink to give an even more fall look.
And really this layout came together in a breeze thanks to using a sketch. I love being able to have some of the design work done for me. Do you use sketches? If so we would love to see your projects.
Thanks for stopping by the blog today! :)
*All items but the vellum and small date label are from the Little Bird Classic kit.
Saturday, January 21, 2017
Traveler's Notebook Simple Set Up with Little Bird Classic Kit
Have you heard of Traveler's Notebooks? They have been increasing in popularity over the last few years in the planning community, and of course, the scrapbooking community saw what a fantastic way it is to have memory journaling and pretty papers on-the-go and it's being adapted by all sorts of creative folks! I've spotted several new product sneak peeks with a Traveler's Notebook influence this week at CHA, and I'll be excited to see what else comes out for us scrapbookers!
I am leaving tomorrow for a trip to Colorado with my family. It's been ages since I've flown and I am trying to be wise with my packing space... but I knew I'd want a place to journal and record our adventures. I decided I'd use the Little Bird Classic Kit to make some beauty to travel with me. This little Traveler's Notebook cover came from Amazon about a year ago, and it was around $20.
I made a paper "cover" to slide in and encase everything inside. I folded over an edge to create a small pocket right inside the cover.
The elements in this kit were perfect for adding special, easy touches throughout. This section is for a blank book, where I can sketch, practice hand lettering, write out quotes and memories from our week.
This little plastic pocket is perfect for adding post it notes and little cards with washi tape to,, because it's easily removeable!
The other side has these small pockets that I was able to slide some extra sequins and a card with washi tape in. Those vellum bags from the kit slid in as if they were made for it and it made me so happy!
A section with lined paper for me to journal and make lists in is covered with another sheet of paper, with the back side including a slant pocket I made to slide in additional notes or photos.
I hope you enjoyed my little notebook! You can follow me on Instagram to keep up with our adventures this week if you'd like!
If you liked this kit, just wait 'til you see the February kit! Come join us on facebook for the kit reveal tomorrow night!
Thursday, January 19, 2017
Hello, New World (Little Bird Classic Kit)
Hello friends! Sherry here, with a fun mixed-media layout. I was so excited to see the Echo Park Stencil and Distress Ink in the kit. These products were the inspiration for my layout.
I stamped the Distress Ink onto a craft mat and mixed with Whipped Spackle (from my stash); I love the soft, buttery color it creates.
I used a palette knife to spread the spackle through the stencil. I didn't worry that it wasn't perfect; it just adds to the loose, artistic look. :)
I adore the buffalo plaid washi tape, from the kit, and used it to frame the center portion of the layout.
I fussy-cut butterflies from the Hazelwood paper and also used a small butterfly punch to create tiny butterflies to scatter throughout the layout.
I needed the tile to pop of the dark negative space of the photo, so I used white alpha stickers (from my stash) and colored the word "world" with the Distress ink.
Of course the stencil can be used in many ways: mists, paints, or even just stamping with the little ink pad. I hope you've been inspired to create with stencils! Thanks for joining us today!
Wednesday, January 18, 2017
Snow day!
Hey everyone, Michelle here! I have a traditional page to share today along with a pocket page. I had a lot of photos from our snow day last week that I wanted to use so that's why I added a pocket page to go along with my traditional page.
For my pages I used the Little Bird Daily Diary Kit along with the extra papers that were from the classic kit. I absolutely loved that heart shaped paper and knew I wanted to cut that out so that's exactly what I did. I also added stitching around each triangle. It doesn't show up much in photos but in person it just adds a subtle amount of texture to my page. The silver glitter thickers are from a kit from last year and were perfect for my snow theme!
The pocket pages I used a mix of photos, journaling cards, and stickers. Love those epoxy stickers in the kit!
It was such a fun snow day! My dogs especially enjoyed it :)
For my pages I used the Little Bird Daily Diary Kit along with the extra papers that were from the classic kit. I absolutely loved that heart shaped paper and knew I wanted to cut that out so that's exactly what I did. I also added stitching around each triangle. It doesn't show up much in photos but in person it just adds a subtle amount of texture to my page. The silver glitter thickers are from a kit from last year and were perfect for my snow theme!
The pocket pages I used a mix of photos, journaling cards, and stickers. Love those epoxy stickers in the kit!
Subscribe to:
Posts (Atom)