Thursday, September 30, 2010

Halloween Highlights with Sleepy Hollow!


Today, I've got my first layout to share with you using the fabulous October "Sleepy Hollow" kit. I have actually already scrapped all of our Halloween pictures from last year but I did several pages and thought wouldn't it be awesome to make a Halloween highlight layout to include with the others? I'm also working on a mini album using these same photos that I'll be back to share sometime in October. Since the first Halloween is something special to scrap, I know my girls will appreciate having several projects to "fight over" someday! :) 

I sized all my photos to 1.5" squares and left a white edge on them when I trimmed them down (as I do with all my photos). I kept the design fairly simple in a grid and used patterned paper from SEI, Making Memories and Pink Paislee in between the photos.


The alphabet stickers are Pink Paislee and the "halloween" stamp is We R Memory Keepers. I love the black and orange stitched cardstock also by We R Memory Keepers. The stitching adds so much texture!


I love the canvas sticker and the orange tinsel ribbon by Pink Paislee. I used little lengths to add sparkle and texture. 


I cut the flocked lace ribbon by We R Memory Keepers in half because the width was too much for what I wanted on this page. 


And there you have it! A fun page highlighting the girls' first Halloween! I think I'll probably do one of these using the December kit too with first Christmas highlights! 

Until next time,
Jill


Wednesday, September 29, 2010

A few simple storage tips!

Hi Everyone! Just sharing a quick storage tip post for you all today!
Now I don't know if many of you know, but my family and I just went through a really big move this last June. And for the people that know me really well, it is no shocker to find that I am still unpacking boxes. LOL! My scrap room is in shambles, and will be for some time more, but it is on it's way to being a very organized room, as I finally have the time to be able to devote myself to it. I really wish I could share some photos of it with you right now, but I am waaaaay to embarrassed by the way it looks to even think about doing that! LOL! So instead I have a few pics of my old scrap space, which features several things I am still using to this day to help give me a super cheap and effectively organized space. I hope this will give you a few ideas on things you can use from your own home to help get you more organized in your scrap space!
The first picture is of my paper storage. NOTE: Please igonore the stack of papers and LOs on top of my paper storage boxes, as this is actually counter-productive to what I am actually trying to help you work with. LOL! yeah things are much better now in that I don't have stacks of papers all over the place, or LOs that don't have a home. I was pretty lazy about that before, and have put a stop to it! :D Ahem. Right, moving on...So these boxes are actually the mailers that my kits come in! This allows me to recycle my boxes, and help with my paper storage at the same time! :D Now, true, they look pretty unsightly, but really they are very efficient and easy to use. I used file folders to seperate my papers from others (I organize mine by manufacturer, then by collection), and these folders fit in perfectly! I first determine the length I need to cut the box to by lining a file folder up to the outside. (I haven't made a new one in a while so I can't remember the size of them off hand! :P) I make sure that the bottom of the file folder is about an inch from the bottom of the box, that way the papers will always be suspended and never touching the bottom of the box which will keep them from buckling and bending. Once I have that measurement determined, then I just take my exacto knife and slice the box top off at the line. (I really hope this all makes sense!) Then the file folder slides in nicely and your papers sit right inside those files. A great way to reuse! I do see though that these look pretty bad, but I have plans on covering mine with paper bags! :D Another great way to reuse everyday items!

One more great item to use from your home in your scrap space are pasta sauce jars! :D I love my jars! In the pic below (which is really bad by the way! Sorry about the quality) I have used lots of jars to help organize my ribbons! This may not be your style in organizing ribbons, but it totally works for me. I don't own a whole ton of different kinds of ribbons, just a lot of repeats of the same thing right now, so putting them all into a jar together has never been a huge concern of mine. I seperated these here by color. (And can you possibly tell that we like Classico brand pasta sauce in this house? hmmm...LOL!) Anyway, you can do the same thing in smaller jars (like jelly jars) for all your buttons and what not! I love my jars. :D Possibilities are endless.
I really wish my room was further along so that I could show you more of what I am trying to achieve with it, but it is just so crazy in there that I can't make sense of a whole lot just yet. LOL! But I did want to share one more storage solution with you that I have found to be perfect for scrapbooking: Itso brand storage containers that I got from Target. :D We actually got this system for my daughter's room, but I ended up 'borrowing' a few of the bins for my own stuff because they work so well!!! My favorite bins are the fabric half size bins, as they are perfect for storing a kit in while you are working with it! They aren't real deep so you can still see things in it while being able to store quite a load of stuff at the same time, and they are big enough so that your papers can sit flat and not get all bent up because of being too short on one end or the other! I love these!!! This system is a great investment as the boxes are all really sturdy, and even the frame systems the boxes go in are really great! I can't say enough good things about this, clearly, as I seem to just keep getting more of the bins! :D
I will for sure keep you all posted as my room comes together!! I know there are a few others on the DT that are working on their rooms too so maybe we can all do a group post in the future and share all our spaces! It would be fun to see where everyone scraps. :D And if you have any great storage tips, please feel free to share them! I am all ears when it comes to good organizing!
Take care everyone!
~Amy

Tuesday, September 28, 2010

Dirty Job - TV challenge

It's challenge time again over at the challenge blog! This time the challenge is to use a TV show as your title. So I went with 'Dirty Jobs', one of my faves :) 
Journaling reads: I've been spit up on, puked on, pooped & peed on. I've changed more diapers than I can remember. I've cleaned up tons of messes. Being a mom is certainly a very dirty job but I'm thankful every day for this great job!
 
I used the Sweet Sue kit for this layout (only a couple left!). I adore the We R Memory Keepers stitched cardstock!! I added part of the Jenni Bowlin shaped paper to ground my photo strip along with tags I cut out of the October Afternoon paper. I also added the Basic Grey red ribbon doilies around the outside to add a little pop of color. I love how just the edge is sticking out!
I also tried to channel my inner Virginia with a masking tape flower :) But when I was making the flower I dropped it on the backside and ended up liking how the masking tape was peeking out from the cut circle. So I turned it around, sticky side down, added another punched circle and that pretty pink flower.
I added the journaling around the edge a long with my title and Voila! To see all the DT member's layouts along with the challenge info, click here!

Monday, September 27, 2010

Step Outside Your Box


Have you checked out today's new challenge yet? You should. It's a good one. It's all about using the name of a tv show for your layout. I mean, think of the possibilities, here! Happy Days? My So-Called Life? Growing Pains? Parenthood? Sons of Anarchy? Okay, well maybe not that one, but you get the picture.

Here's mine.


I decided on One Day at a Time because that has been my new motto for the last month or so. We moved into a fixer-upper that we had been trying to buy for about a year and a half. All of our waiting paid off, but in that year and a half of the house sitting empty, it really started to get sad. So we've been working every day, along with lots of family and friends to get it back into tip-top shape, and we're just now starting to see some real results. A KITCHEN!! No more camp stove and bathroom sink dish washing. We've got refinished white cabinets, Kashmir white granite, white subway tiles, brand spankin' new stainless steel appliances and I am one happy girl! A month without cooking sounds like a nice little break, but lemme tell you, I am ready to get my bake on!! I'm gonna crank out some serious food for the next few days to make up for all this time off!


I used pieces of the Sweet Sue (hurry, only 3 left!) and Office Party (sorry, sold out) kits
and man oh man do they work great together! I cut the Jenni Bowlin die cut paper in half and stitched it together, then used the circle journaling card to carry the look of the circle through for the title spot. It's pretty amazing what foam dots can do to some alpha stickers, huh? Just kinda pops em out there to grab your attention.

So make sure you head on over to the challenge blog and see what the other girls came up with, and be sure to show us what you create, too!

Happy scrappy Monday, everybody!

xoxo
Britt

Sunday, September 26, 2010

Parenthood

Good morning to you all! I have a LO of my lil' family today to share with you. It uses the "Office Party" kit. (sold out) I did add a few pieces from my stash, like the glassine bag to hold my journaling, the seam binding, and the crepe paper ruffle.

We all know that parenting is a tough job. Anyone who says it isn't is CRAZY! It is not all butterflies and rainbows.....KWIM? But at the end of the day.....these 3 other people are my life. The ones I would lay my own life down for.......
This cute little ticket from the kit was Glimmer Misted, given a few strokes of white paint, and inked in dark brown on the edges to give it a shabby feel. I used a Basic Grey rub on too!
My title was cut using my Cricut machine. I also added a Basic Grey rub on underneath.
My journaling reads:
Parenting is tough. Trying. Difficult. Rewarding. Heart Wrenching. Wonderful. Tiring. Aggravating. All of these things wrapped into one. Our little family was created 15 years ago. We could never, ever, have imagined that parenting could be so tough. We live together day after day, and there are times we can barely stand the sight of one another, and days where we laugh so hard our sides ache, and days where tears are shed and hearts are broken. We can drive each other crazy, or are driven into each other's arms for comfort. At the end of the day, this is where our hearts are. Just us. Our little family. And as a parent......I wouldn't have it any other way.
***********************************************
Be sure to check out Noel's Newest kit, Sleepy Hallow!!! A FABULOUS Halloween kit that will NOT last long!!! As a matter of fact there is only ONE left!!!!


Saturday, September 25, 2010

A Simple Halloween Card


Yes I know Halloween is still a little over a month away but I am just too darn excited about it this year! I am going to attempt to make my girls’ costumes this year. I hope they turn out well otherwise I might be purchasing a costume for them at the last minute! Ok. I digress.

Today I wanted to show you how you can make a Halloween card with your Sweet Sue kit (7 left!!!) First you will need to cut the kraft cardstock into the size of card that you desire. Then choose 3 different papers and cut them as seen in the example. In case you were wondering where the chandelier came from, I cut it with my Silhouette. Just choose any Halloween item and place it over the hen sticker.


Next up, glue the papers onto the card. Set your sticker aside for now.


Hand stitch or machine stitch each piece of paper together. This will hide the seam from where your papers are touching each other. It will also add a bit of texture to your card as well.


Place some pop dots under your sticker to add a little bit of dimension to your card. I used some October Afternoon letter stickers for my sentiment.


Here is my finished card.


Who would of guessed that you could use the Sweet Sue kit to make a Halloween card? I know I didn't think so at first either but the green, kraft, beige, and black combo are perfect colors for Halloween.

Happy crafting everyone!
Diana

Friday, September 24, 2010

Sidetracked Home Executives Card File

I've been having a hard time lately with our new fall schedules... trying to figure out how to balance one kiddo in school, two others in Mom's Day Out, and doctor's appointments, birthday parties, story time at the library, and all the other chaos in between!

Whenever life starts getting extra hectic like this, I start really struggling with time management at home. I end up not starting stuff that *has* to get done because I get discouraged with the thought of being interrupted (one of the many pitfalls of perfectionism- if I can't do it right the first time, why bother at all?!). BUT- no one can function like that, right? And the least, we'll never have clean undies. ;)

This is where I turn to the Sidetracked Home Executives system. Cheesy name, great system. :)

You can click here to read my full description of it on my blog from a few years ago. In a nutshell, you basically create an index card for each item that would be on a daily "to do" list, and a divider card for each day of the week.
I made an updated, simpler version for myself this week with a tin from the Target Dollar Spot and the Sweet Sue kit (plus some ribbon from my stash & some October Afternoon Mini Market stickers ).
I just need a way to keep me focused on the things each day I *must* accomplish, without being overwhelmed with seeing a whole list. Once I'm done with the task for the day, I move it behind the divider card for the next day.


I have other kinds of cards of things that aren't necessarily reminders (like I would ever forget that my kids are going to Mom's Day out!), but events that imply changes in my daily routines.

I also have cards for my design team assignments for each week, so I can work on them ahead of time and don't feel like I'm rushing to get things done the night beforehand. Setting aside time for me each day gives me more encouragement to keep going on the yucko tasks because I know that I will get time later, because I've planned for it! I also have things planned for like story time or craft time with my kids. They won't happen every day, but at least I know that there will be times for it.

If you're curious about a full list of all my cards, just let me know and I can post them in the message board!

Posted by Picasa

Thursday, September 23, 2010

Halloween Project Ideas!!

Hey Everyone! I wanted to thank you all for the awesome suggestions on the message boards about topics to cover! You all gave the DT a lot of great ideas, and they will all soon be coming your way via this blog! :D It is always great to know what you guys are interested in seeing here.


From your post ideas, I decided to talk about projects for Halloween that you can make using your Halloween kits and stash! Now this is something I have never done (Halloween decorating I mean), but it has always been very high on my list! And for some reason it is like an absolute essential for me this year! LOL! I am so pumped to do the projects I can hardly contain it! :P I know, I am silly. But this year will be the first that my daughter will be exposed to Halloween so I want it to be really special. Still no clue what she is gonna be, or if she will even let me dress her up, but hey-I'm still pretty excited to give it a try!

Anyway, I have lots of things here to share that I have had bookmarked for a long time-actually had to do quite a bit of searching to find it all! LOL! A couple things are from some of my favorite scrapbookers, and then there are lots and lots from other inspirations that I thought you might like too. :D You may think I am a little nutty about some of them but hear me out-cause I have big plans with those ideas! (You can actually get a pretty good idea of what my desired style of decorating is like from these ideas. It's kinda funny because I don't have anything in my home like these things right now-but I want to fill my house with them soon!) So let's get started!

First up are a couple projects that are made by the amazing Tara Anderson! (She is one of my all time fav scrappers!) She made these projects last year for a guest design spot over at Jenni Bowlin, and I fell in love with them the moment I saw them! The two projects I have pictured here are actually really simple, yet so wonderful and creative! To see more of her projects follow the link from her blog here-you will need to use the archive on the JB site to get you to Sept 09 Guest.

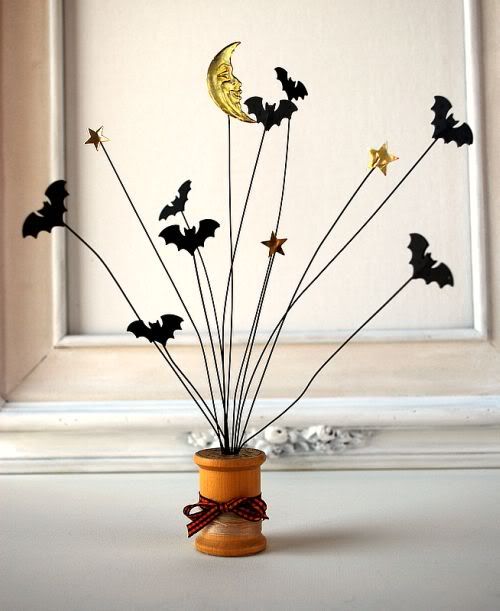
Too stinkin cute, right?! Love them.

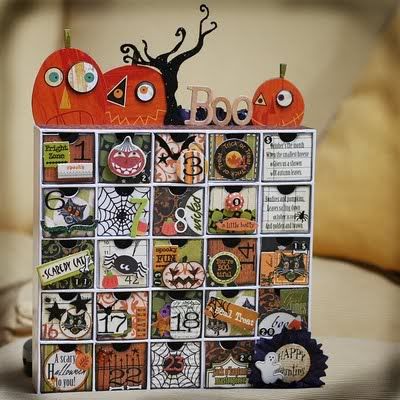
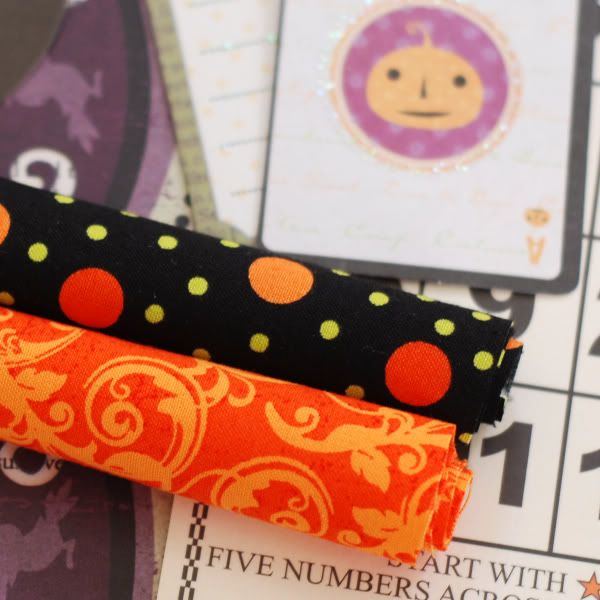
Next we have an adorable Halloween countdown calendar made by Alexis Hardy! She has been a long time fav of mine, and I always find myself going back and oooing and ahhing over her projects. :D But when I saw this project, I thought it was the most adorable thing in the world! I have one of these just sitting in the shelves of my scrap room, but am now pretty torn on whether to make it into a Halloween countdown or a Christmas one! LOL! Guess I will just have to get another! :D
Okay so the rest of the projects on here aren't actually scrapbooking projects per say-but I think they would transfer over very nicely, and it would be quite easy to incorporate a lot of typical Halloween scrapbooking things into them! They are actually Christmas holiday ideas-and this is where I mean to have faith in me-I know changing them into Halloween themed projects would turn out great! :D

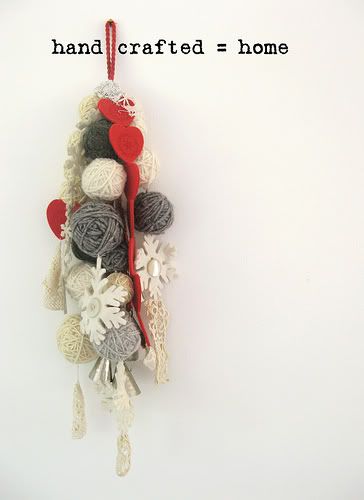
The first two projects are from the Dottie Angel. She makes amazingly vintagey handcrafted things that just make my heart flutter! I am a huge yarn fanatic (as I am a knitter) so her ideas of incorporating knitting and yarn balls into Holiday decor just floored me! These things are sooooo going to be in my house! :D They are easy, and cheap-if you use things that you have-so that right there makes them fantastic in my book.


The first picture is of a hanging she did-link here-made by just stringing everything together. When I look at this and think Halloween-I see black, orange and grey yarn balls, with bats and pumpkins and ghosts attached, with little bits of glitter thingys here and there! I really think it would work well. You can even string some fun spider web stuff on it to make it look more goulish!
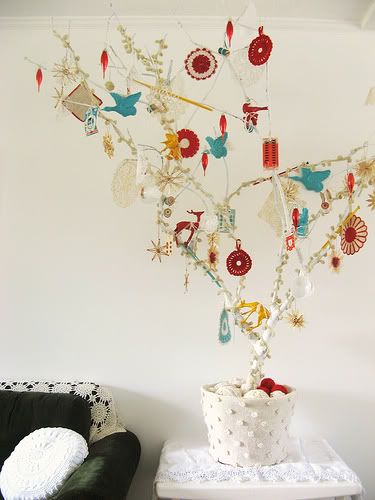
And the next project from her is actually what she made for her family's Christmas tree! My husband thought I was nuts when I told him I wanted something like this for my tree-but I can't tell you enough how much I am in love with this!! It hits home on so many levels for me. I know that if my mom were alive today, the moment she saw this she would have got to work making her own and she would have made the most amazing tree ever! We had a few handmade trees growing up (a concept my husband Jed had never heard of!), and these trees are among the fondest Holiday memories I have. So like I said, this one really speaks to me and hits a feel good home vibe within. :D


But how to change it into a Halloween idea you ask?! Well let me tell you! Imagine the tree is black-and instead of deer and birds on the tree, use some pumpkins, bats and ghosts-cover it in spider webs-maybe put a goulish little house at the bottom with a witch in there somewhere-and I think it would look amazing!!!
I totally understand if you think I am nuts too now! :D LOL! But I still have one more thing for you!


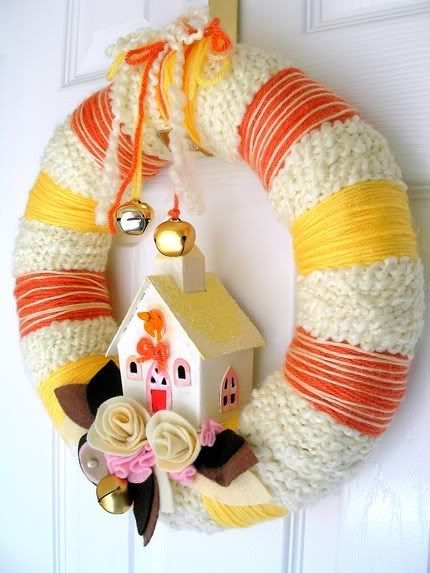
It is also a Christmas themed project-but again so easy to make and change to Halloween. :D It is a gorgeous wreath made by Agnes of Knock Knocking! She makes these amazing yarn wreaths-decorated with felt and critters so adorable! I have already purchased my styrofoam wreaths from the craft store to make some of these! And if you don't want to use yarn to cover them then fabric or something would work just as great. But I just totally see one of these with a little house, all spiderwebby covered, with a witch hanging from the middle like she is flying in the sky, complete with a full moon and a few bats around the top! What do you think? Can you see it? So excited to make this one! :D


Now aside from these ideas I also have banner I want to make, but I can't decide if I want to do a Halloween themed Welcome banner or a Happy Halloween banner. :P The first one would be easier as it is less letters (LOL! Yeah I am lazy like that), but I am really wanting a banner that says Happy Halloween on it-so I don't know what to do! LOL! I may just have to make both! But as I have a lot of projects on my list to make, we will see what actually gets done. :P

Alright! Almost done! :D The last picture I wanted to share doesn't actually use anything scrappy-but it was just too amazing a project to not share with you! It comes from the ubber talented Danielle Thompson-a tutorial on how to make these gorgeous fabric pumpkins!!
Aren't they just stunning?!! So like I said, even though they are not scrappy related, they are amazing and essential for me to make this Halloween! :D


I have a couple freebie shares with you too, just because I love ya. :D LOL! No really I do love ya, but they are freebies from other places generosity. Gotta love freebies. :D


First is from Inside A Black Apple-a super adorable little printable Halloween card! PDF format so it is very easy to use.


Second is the most adorable little hand-drawn paper doll I have ever seen!! It comes from Sarah Jane Studios, and are just begging for me to print out and color up for my little Creedence!
And last, I have two links to some adorable vintage Halloween cards! One with children's images, and the other with witches! They are so cute!

Have fun with all those freebies!! I know I will. :D
Last thing I will talk about is the amazing Halloween kit that is being sneaked to us over at the Noel Mignon message board!!! Presale is available for members of the board only right now, and it is already flying FAST!!! If you want to grab yours, just join the message board if you aren't already a member (it is free!), and then go to the members only presale and get yours! :D That easy. Can't wait for mine to come in the mail! Woohoo!! Here are a few of the sneaks that Noel has shared-just to entise you further....

Well I hope this post gave you some ideas!!! :D Take care everyone!

~Amy

Limited Edition "Field Trip" kit!

Please note** Stickers and Die cut sheets will vary in each kit, but they are evenly divided.

Click HERE to order!!


Summer Layout Tag Inspiration


I have a new layout to share today that uses the Lemonade Stand kit (sold out). One of my favorite challenges we do quarterly on the message board is the layout tag and this is what I created for our latest round. I mostly used the Lemonade Stand kit for this layout along with bits and pieces of  the Sun-Kissed and Office Party kits. The fall layout tag has already begun but I'm sure we'll do another one in winter. I love these pictures of the girls playing together this past winter. 


I used a couple alphabets from my stash from K & Co. (pink) and American Crafts (green). I sprayed my layout with Bed of Roses Shimmerz (that came in the Playdate kit) for added texture.


I opened up a Maya Road kraft envelope and used it as a base for my two smaller photos. I then accented my envelope with an Elle's Studio tag, KI Memories flair, My Mind's Eye border sticker, Cosmo Cricket alphabet stickers and a Prima pebble. 


The patterned paper is Cosmo Cricket (pink), a Basic Grey sticker, and Collage Press (green). 


Don't forget that the October kit "Sleepy Hollow" goes up for sale THIS Saturday. Stop by the message board to see all the ideas we're sharing on how to use the Halloween kit!

Until next time,
Jill